So you’ve followed our in-depth guide and built yourself a shiny new server that’s secure and tuned for optimal WordPress performance, but what’s next?
In this chapter I’m going to outline a few tasks that should be carried out on a regular basis to ensure that your server continues to run securely and perform well. We’ll look at performing software updates, upgrading PHP, and a few “gotchas” to watch out for that we may have experienced ourselves.
But first, let’s start with server monitoring.
Server Monitoring
As I’m using Digital Ocean, monitoring server performance is a relatively simple process thanks to the built-in monitoring tools. For those not hosting with Digital Ocean, Netdata is a great alternative or Pingdom Server Monitoring if you’d prefer not to host it yourself.
If you enabled monitoring during the Droplet creation, then you’re good to go! Otherwise, you’ll need to install DigitalOcean’s metrics agent manually.
Once installed, you should see the Droplet’s current resource utilization when visiting the Droplet dashboard.

Alert Policies
Alert policies are extremely useful, and you should configure them for all Droplets. Alerts reduce the need to manually check your server’s health by sending a notification when one of your chosen metrics reaches a certain threshold.
Head to the Monitoring tab and click Create alert policy.

Here you can create as many alert policies as required. I like to set up alerts for CPU, memory and disk utilization with a threshold of 80%, which is a good starting point for most people.


Investigating Alerts
A high resource usage alert can be the first sign that something is wrong with your server or the applications that it’s running. To investigate, SSH into your server:
ssh ashley@pluto.ashleyrich.com
Run htop to have a look at the system resource usage in real-time:
htop
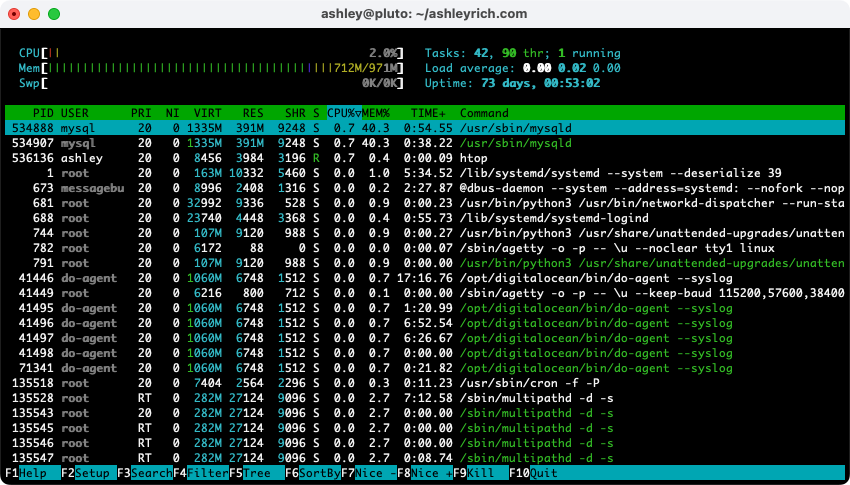
The above screenshot is sorting by CPU usage, so if the alert you’re investigating was about high CPU usage, you should be able to see the processes that are eating a lot of your CPU at the top of the list. If you’re investigating an alert about memory, you’ll need to change the sort column by hitting the F6 key.
If it’s Nginx or PHP appearing at the top of the list, you should have a look at your access and error logs. If it’s MySQL, you’ll need to enable the slow query log. A much easier way to diagnose issues is to use an application monitoring tool like New Relic.
Recently, we were receiving high CPU alerts from our VPS provider. After performing some application monitoring using New Relic, we discovered that a database query was running slow, which was causing MySQL to spike CPU usage. It turns out we were missing an index on one of our database tables. Adding the index resulted in a big drop in CPU usage:

If the alert is for high disk utilization, you’ll need to check your disk space usage to find out which files are taking up a lot of space on your server.
That’s all there is to server monitoring, now onto maintaining your server!
Keep Plugins and Themes Updated
Let’s start with an easy one that isn’t just applicable to self-hosted WordPress installs. WordPress itself, WordPress themes, and all plugins should be regularly updated. No software is immune to vulnerabilities and updating often will ensure those inevitable vulnerabilities are patched.
While you’re at it, make sure you delete obsolete themes and plugins. There’s no reason to keep them around, other than to provide a potential entry point for malicious users. The majority of premium plugins and themes won’t receive updates via the WordPress dashboard if they’re deactivated. For that reason, it’s better to delete them than leave them lying around.
Check Backups are Running
It’s inevitable that things go wrong, sometimes horribly. Regular site backups are an integral part of any disaster recovery process. In chapter 6, I demonstrated how to set them up. However, you need to ensure that they are running as expected months down the line.
Earlier this year, we noticed that our site backups hadn’t made it to S3 for almost two months. The cause? Our backup script had stopped working due to a Python dependency issue. The moral of the story? Schedule a recurring time to verify that backups are being carried out. You should also periodically test the backups by importing the SQL into a test database to ensure they’re usable if things were to go wrong.
Watch Those Log Files
Just like server monitoring, log files can help to identify issues early on before they become catastrophic. Every once in a while it’s worth checking the logs to see if anything unusual is happening. I would concentrate on the following:
- Nginx error logs
- PHP error logs
- WordPress
debug.logfile
We use Papertrail to make it easier to monitor those log files (especially debug.log, which we have permanently enabled). What makes Papertrail ideal is that you can easily send certain logs to Slack. We have an alert configured for any fatal errors that occur.
Set Up Persistent Debug.log
Enabling debug.log for live sites is often discouraged. This is because, by default, the log is stored in a publicly accessible location. This can expose potentially sensitive information about your server to would-be hackers. However, this log can be critical for helping track down obscure errors in production environments.
We can get the benefits of a persistent log while avoiding the risks by moving it to a new location and denying public access to all log files. To move the log files alongside other logs, update your wp-config.php with the following lines:
define( 'WP_DEBUG', true );
define( 'WP_DEBUG_DISPLAY', false );
define( 'WP_DEBUG_LOG', '/sites/pluto.ashleyrich.com/logs' );
Next, configure Nginx to disallow access to .log files. Add the following Nginx location block to your site’s Nginx config file, in my case /etc/nginx/sites-available/pluto.ashleyrich.com. You should place this block inside the main server block, just before the location / block:
# Prevent access to certain file extensions
location ~\.(ini|log|conf)$ {
    deny all;
}
Enable Logrotate
Log files themselves can become problematic if left unchecked. One downside to most VPS providers is that they provide a limited amount of disk space, which means the logs can quickly fill the server’s storage. In the past, I’ve had a server completely fall over because a log file grew to over 25 GBs in size.
One way to help prevent this is to enable log rotation, available by default on servers running Ubuntu 16.04 or higher through the logrotate command. This will rotate (rename), compress, and remove old log files to prevent them from eventually consuming all of your disk space. The default configuration located in /etc/logrotate.conf rotates logs weekly and removes log files older than 4 weeks. This configuration handles logs in the /var/logs directory.
To create a site-specific logrotate configuration, add a new file to the /etc/logrotate.d/ directory, named after your specific site.
sudo nano /etc/logrotate.d/ashleyrich.com
For example, this is what the contents of /etc/logrotate.d/ashleyrich.com looks like:
/sites/ashleyrich.com/logs/*.log {
    daily
    rotate 14
    size 1M
    compress
    missingok
    notifempty
    dateext
    create 0664 pluto pluto
    sharedscripts
    postrotate
        invoke-rc.d nginx rotate >/dev/null 2>&1
    endscript
}
Below are the details of each of the options used above:
- daily: perform the rotation every day
- rotate 14: remove the log files after 14 days
- size 1M: only rotate logs that are a minimum of 1MB
- compress: all rotated logs will also be compressed
- missingok: prevent errors from being thrown if the log file is missing
- notifempty: prevent empty logs from being rotated
- dateext: use the date as a suffix of the rotated files
- create: create a new log file with a specific name and permissions after rotating the old one
Finally, once the logs are rotated, any commands configured in the postrotate script will be run once at the end.
Update Server Packages
If you followed along with this guide, you would have configured automatic security updates using unattended-upgrades, which will apply security updates on a daily basis. However, it won’t install general software updates that contain new features and bug fixes. If you SSH into your server you’ll often be presented with the following:
Welcome to Ubuntu 22.04.1 LTS (GNU/Linux 5.15.0-41-generic x86_64)

 * Documentation:  https://help.ubuntu.com
 * Management:  https://landscape.canonical.com
 * Support:     https://ubuntu.com/advantage

  System information as of Fri Nov 11 19:43:40 GMT 2022

  System load:  0.0             Users logged in:    1
  Usage of /:   15.2% of 24.05GB   IPv4 address for eth0: ***.***.***.***
  Memory usage: 73%             IPv4 address for eth0: 10.20.0.11
  Swap usage:   0%              IPv4 address for eth1: 10.118.0.8
  Processes:    108

48 updates can be applied immediately.
To see these additional updates run: apt list --upgradable


*** System restart required ***
Those packages won’t automatically get updated because they don’t contain security fixes. To update them, run:
sudo apt update
sudo apt dist-upgrade
I recommend using apt dist-upgrade vs. apt upgrade because it will intelligently handle dependencies.
Before performing any upgrades, you should create a full system backup via your VPS provider (sometimes called snapshots).
Upgrade PHP
The previous step will update PHP through the point releases (e.g. 8.0.0 to 8.0.25), but it won’t upgrade PHP to a new major version (e.g. 8.1). Luckily, it’s a simple process and possible with little to no downtime.
If you are using the ppa:ondrej/php repository, you can safely install multiple major versions of PHP side-by-side, which we can use to our advantage. Remember that you only need to follow these steps if your server isn’t already running PHP 8.0. Otherwise, just run apt dist-upgrade.
sudo apt update
sudo apt install php8.1-cli php8.1-common php8.1-curl php8.1-dev php8.1-fpm php8.1-gd php8.1-imagick php8.1-imap php8.1-intl php8.1-mbstring php8.1-mysql php8.1-opcache php8.1-redis php8.1-soap php8.1-xml php8.1-zip
Next, you should configure the new version of PHP as demonstrated in chapter 2. Remember to also copy any modifications from your existing php.ini file, found at /etc/php/{PHP VERSION}/fpm/php.ini.
At this point, you’ll have multiple PHP versions installed, but Nginx will still pass requests to the older version. Next, update your site’s Nginx config so that the fastcgi_pass directive passes requests to PHP 8.1.
sudo nano /etc/nginx/sites-available/ashleyrich.com
location ~ \.php$ {
        try_files $uri =404;
        fastcgi_split_path_info ^(.+\.php)(/.+)$;
        fastcgi_pass unix:/run/php/php8.1-fpm.sock;
        fastcgi_index index.php;
        include fastcgi_params;
}
Test that your config changes are correct, then restart Nginx.
sudo nginx -t
sudo service nginx reload
Visit Site Health under Tools in your WordPress dashboard to ensure the site is now running on PHP 8.1. Once confirmed, repeat the changes for each site on the server. Ideally, you’ll perform these changes on a staging site and test the critical paths before updating any production sites.
Once you’re happy that everything is working as expected you can remove the old version, like so:
sudo apt purge php8.0-*
What About Updating Ubuntu?
Ubuntu releases a new LTS version every two years, the most recent of which is 22.04 (Jammy Jellyfish), released on April 23, 2022.
So should you update to a new LTS version as they’re released?
It’s a question often debated, and you’ll get different recommendations depending on who you ask. Personally, I don’t ever upgrade a server’s operating system (OS).
An OS upgrade can be a slow process to complete (think about the last time you updated your computer to a new major release of macOS, Windows, or Linux). During this time your sites will be completely inaccessible.
There’s also a good chance that some existing server packages won’t be compatible with the new version of the OS. This can further increase downtime as you scamper to rectify such issues.
Spinning up a fresh server is a much safer approach. Doing so allows you to test that everything is fully working as expected. A clean slate is also an excellent opportunity to reassess if your current setup still meets your needs or if a different server stack might be more suitable. You can safely try these changes without impacting your live sites.
Once you’re happy with the new setup, you can switch your DNS over with minimal downtime.
Action Plan
I’ve covered the various tasks that should be carried out on your server, but how often should these tasks be performed? I recommend that you perform the following tasks once a month. All together, it shouldn’t take you more than 30 minutes:
- Perform WordPress updates, including themes and plugins
- Ensure backups are running and that they’re usable
- Check your server metrics to see if there were any unusual spikes
- Quickly scan your server’s error logs for problems
- Update server packages
As for upgrading to a new version of Ubuntu, you should definitely be aware of the end-of-life date of your version of Ubuntu. At that point there will be no further updates released of any kind including security updates. You should definitely move all your sites to a fresh server and decommission the old server before that date. We typically provision a fresh server roughly every two years, generally after a new LTS release.
That’s all for this chapter. In the next chapter you will be able to snag a complete set of Nginx configuration files optimized for WordPress that we’ve been building throughout this guide.


