In the previous chapter, I walked you through the process of configuring Nginx to serve your WordPress sites over HTTPS on your Linux server. However, we need to do more if we want our sites to feel snappy. In this chapter I will guide you through the process of caching a WordPress site. Caching will increase throughput (requests per second) and decrease response times (improve load times).
Initial Benchmarks: How Bad is WordPress Performance Without Caching?
I want to show you how this setup handles traffic prior to any caching. It’s difficult to simulate real web traffic. However, it is possible to send a large amount of concurrent requests to a server and track the time of responses. This gives you a rough indication of the amount of traffic a server can handle, but also allows you to measure the performance gains once you’ve implemented the optimizations.
The server I have set up for this series is a 1GB DigitalOcean Droplet running Ubuntu. I’m using Loader to send an incremental amount of concurrent users to the server within a 60 second time period. The users scale, starting with 1 concurrent user and increasing to 50 concurrent users by the end of the test.
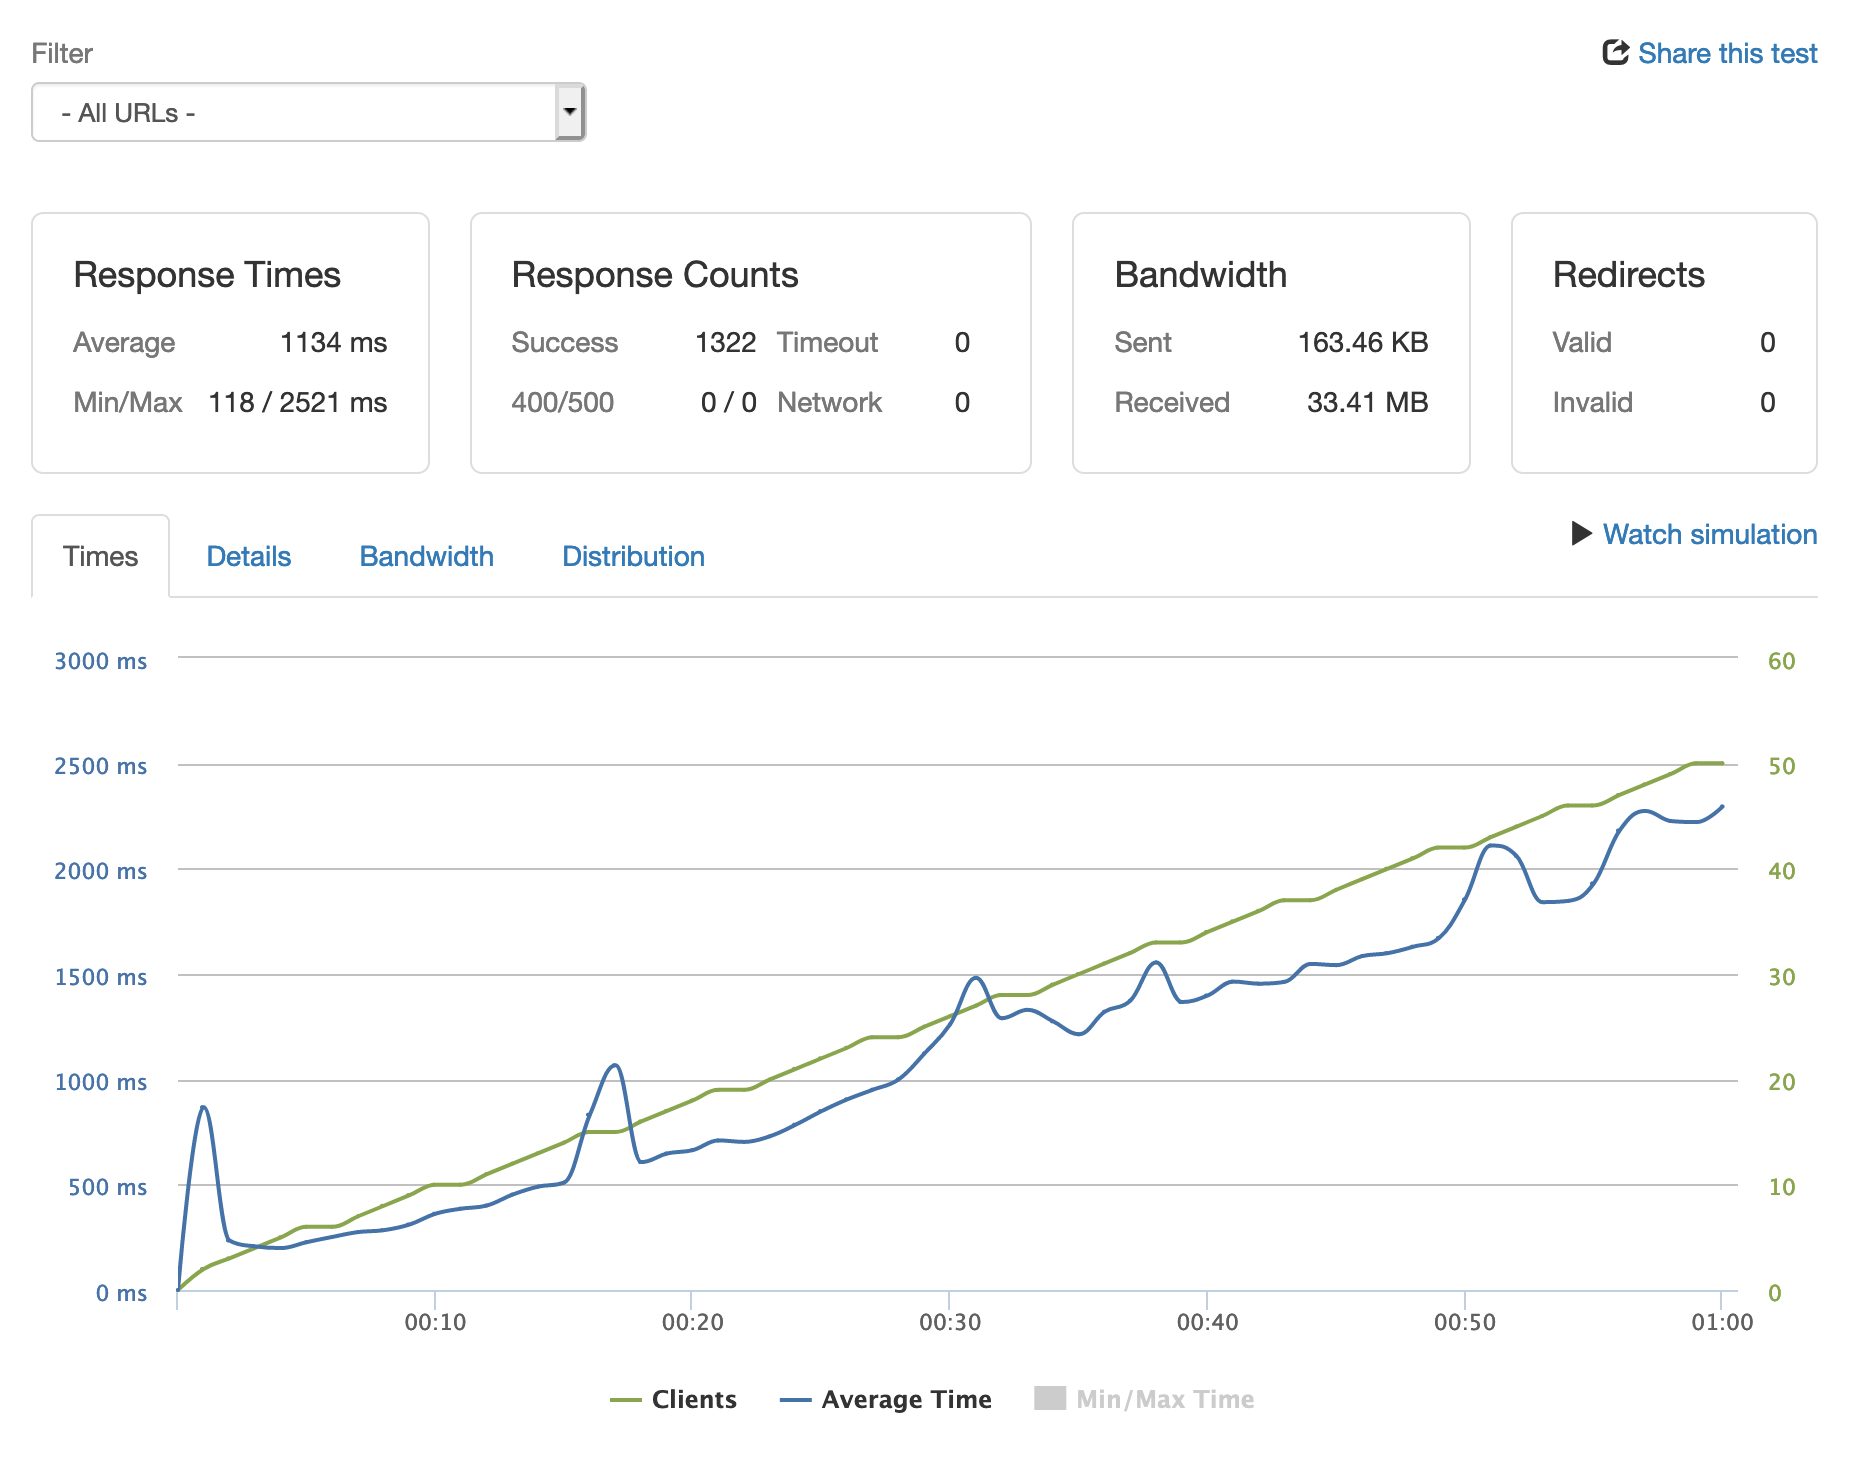
The server was able to handle a total of 1,322 requests. You’ll see that as concurrent users increase, so does the site’s response time. Meaning the more visitors on the site, the slower it will load, which could eventually lead to timeouts. Based on the results, the server can theoretically handle 1,903,680 requests a day with an average response time of 1,134ms.
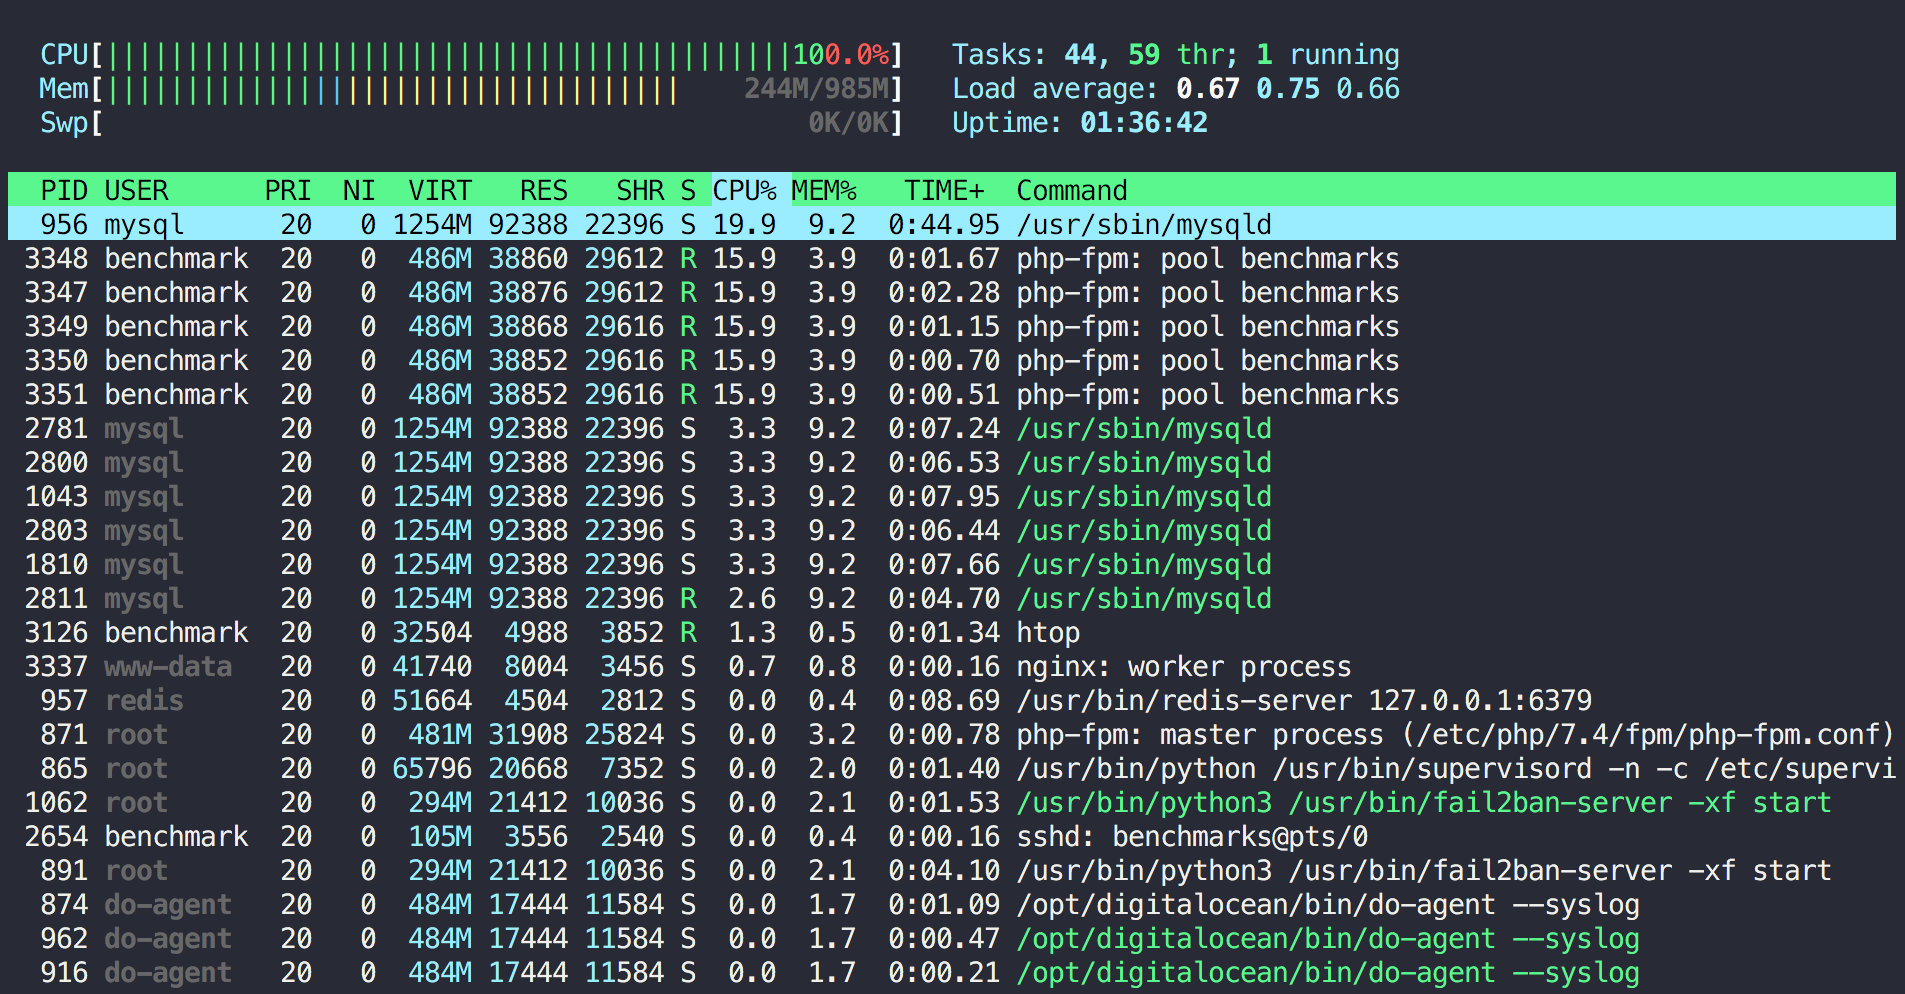
Monitoring the server’s resource usage shows that the load is split between both PHP and MySQL.
It’s time to optimize!
Object Cache
An object cache stores database query results so that instead of running the query again the next time the results are needed, the results are served from the cache. This greatly improves the performance of WordPress as there is no longer a need to query the database for every piece of data required to return a response.
Redis is an open-source option that is the latest and greatest when it comes to object caching. However, popular alternatives include Memcache and Memcached.
To get the latest stable version of Redis, you can use the official Redis package repository. First add the repository with the signing key and update the package lists:
curl -fsSL https://packages.redis.io/gpg | sudo gpg --dearmor -o /usr/share/keyrings/redis-archive-keyring.gpg
echo "deb [signed-by=/usr/share/keyrings/redis-archive-keyring.gpg] https://packages.redis.io/deb $(lsb_release -cs) main" | sudo tee /etc/apt/sources.list.d/redis.list
sudo apt update
Then issue the following commands to install the Redis server and restart PHP-FPM:
sudo apt install redis-server -y
sudo service php8.0-fpm restart
You could install the Redis Nginx-module on your server to perform simple caching, but in order for WordPress to use Redis as an object cache, you need to install a Redis object cache plugin. Redis Object Cache by Till Krüss is a good choice.

Once installed and activated, go to Settings > Redis to enable the object cache.

This is also the screen where you can flush the cache if required.

I’m not going to run the benchmarks again as the results won’t dramatically change. Although object caching reduces the average amount of database queries on the front page from 22 to 2 (theme and plugin dependant), the database server is still being hit. Establishing a MySQL connection on every page request is one of the biggest bottlenecks within WordPress.
The benefit of object caching can be seen when you look at the average database query time, which has decreased from 2.1ms to 0.3ms. The average query times were measured using Query Monitor.
To see a big leap in performance and a big decrease in server resource usage, we must avoid a MySQL connection and PHP execution altogether.
Page Cache
Although an object cache can go a long way to improving your WordPress site’s performance, there is still a lot of unnecessary overhead in serving a page request. For many sites, content is rarely updated. It’s therefore inefficient to load WordPress, query the database, and build the desired page on every single request to the web server. Instead, you should serve a static HTML version of the requested page.
Nginx allows you to automatically cache a static HTML version of a page using the FastCGI module. Any subsequent requests to the page will receive the cached HTML version without ever hitting PHP or MySQL.
Setup requires a few changes to your Nginx server block. If you would find it easier to see the whole thing at once, feel free to download the complete Nginx config kit now. Otherwise, open your virtual host file:
sudo nano /etc/nginx/sites-available/ashleyrich.com
Add the following line before the server block, ensuring that you change the fastcgi_cache_path directive and keys_zone. You’ll notice that I store my cache within the site’s directory, on the same level as the logs and public directories.
fastcgi_cache_path /home/ashley/ashleyrich.com/cache levels=1:2 keys_zone=ashleyrich.com:100m inactive=60m;
You need to instruct Nginx to not cache certain pages. The following will ensure admin screens and pages for logged in users are not cached, plus a few others. This should go above the first location block.
set $skip_cache 0;

# POST requests and urls with a query string should always go to PHP
if ($request_method = POST) {
    set $skip_cache 1;
}
if ($query_string != "") {
    set $skip_cache 1;
}

# Don’t cache uris containing the following segments
if ($request_uri ~* "/wp-admin/|/xmlrpc.php|wp-.*.php|/feed/|index.php|sitemap(_index)?.xml") {
    set $skip_cache 1;
}

# Don’t use the cache for logged in users or recent commenters
if ($http_cookie ~* "comment_author|wordpress_[a-f0-9]+|wp-postpass|wordpress_no_cache|wordpress_logged_in") {
    set $skip_cache 1;
}
Next, within the PHP location block add the following directives.
fastcgi_cache_bypass $skip_cache;
fastcgi_no_cache $skip_cache;
fastcgi_cache ashleyrich.com;
fastcgi_cache_valid 60m;
Download the complete set of Nginx config files
Notice how the fastcgi_cache directive matches the keys_zone set before the server block. In addition to changing the cache location, you can also specify the cache duration by replacing 60m with the desired duration in minutes. The default of 60 minutes is a good starting point for most people.
If you modify the cache duration, you should consider updating the inactive parameter in the fastcgi_cache_path line as well. The inactive parameter specifies the length of time cached data is allowed to live in the cache without being accessed before it is removed.
Save the configuration when you’re happy with it.
Next you need to add the following directives to your nginx.conf file.
sudo nano /etc/nginx/nginx.conf
Add the following below the gzip settings.
##
# Cache Settings
##

fastcgi_cache_key "$scheme$request_method$host$request_uri";
add_header Fastcgi-Cache $upstream_cache_status;
The first directive instructs the FastCGI module on how to generate key names. The second adds an extra header to server responses so that you can easily determine whether a request is being served from the cache.
Save the configuration and restart Nginx.
sudo service nginx restart
Now when you visit the site and view the headers, you should see an extra parameter.

The possible return values are:
- HIT – Page cached
- MISS – Page not cached (refreshing should cause a HIT)
- BYPASS – Page cached but not served (admin screens or when logged in)
The final step is to install the Nginx Cache plugin, also by Till Krüss. This will automatically purge the FastCGI cache of specific cache files whenever specific WordPress content changes. You can manually purge the entire cache from the top bar in the WordPress dashboard.
You can also purge the entire cache by SSH’ing into your server and removing all the files in the cache folder:
sudo rm -Rf /home/ashley/ashleyrich.com/cache/*
This is especially handy when your WordPress dashboard becomes inaccessible, like if a redirect loop has been cached.
Once installed, navigate to Tools > Nginx Cache and define your cache zone path. This should match the value you specified for the fastcgi_cache_path directive in your Nginx hosts file.

WooCommerce FastCGI Cache Rules
Although page caching is desired for the majority of front-end pages, there are times when it can cause issues, particularly on ecommerce sites. For example, in most cases you shouldn’t cache the shopping cart, checkout, or account pages as they are generally unique for each customer. You wouldn’t want customers seeing the contents of other customer’s shopping carts!
Additional cache exclusions can be added using conditionals and regular expressions (regex). The following example will work for the default pages (Cart, Checkout, and My Account) created by WooCommerce :
if ($request_uri ~* "/(cart|checkout|my-account)/*$") {
    set $skip_cache 1;
}
Open the configuration file for your chosen site, in my case:
sudo nano /etc/nginx/sites-available/ashleyrich.com
Add the new exclusion to the server directive, directly below the existing conditionals. Once you’re happy, save, test, and reload the configuration for the changes to take effect. You should now see that the “fastcgi-cache” response header is set to “BYPASS” when visiting any of the WooCommerce pages.
WooCommerce isn’t the only plugin to create pages that you should exclude from the FastCGI cache. Plugins such as Easy Digital Downloads, WP eCommerce, BuddyPress, and bbPress all create pages that you will need to exclude. Each plugin should have documentation on how to add caching rules to exclude its pages from caching.
Final Benchmarks: How Much Better is WordPress Performance With Caching?
With the caching configured, it’s time to perform a final benchmark. This time I’m going to up the maximum concurrent users from 50 to 750.
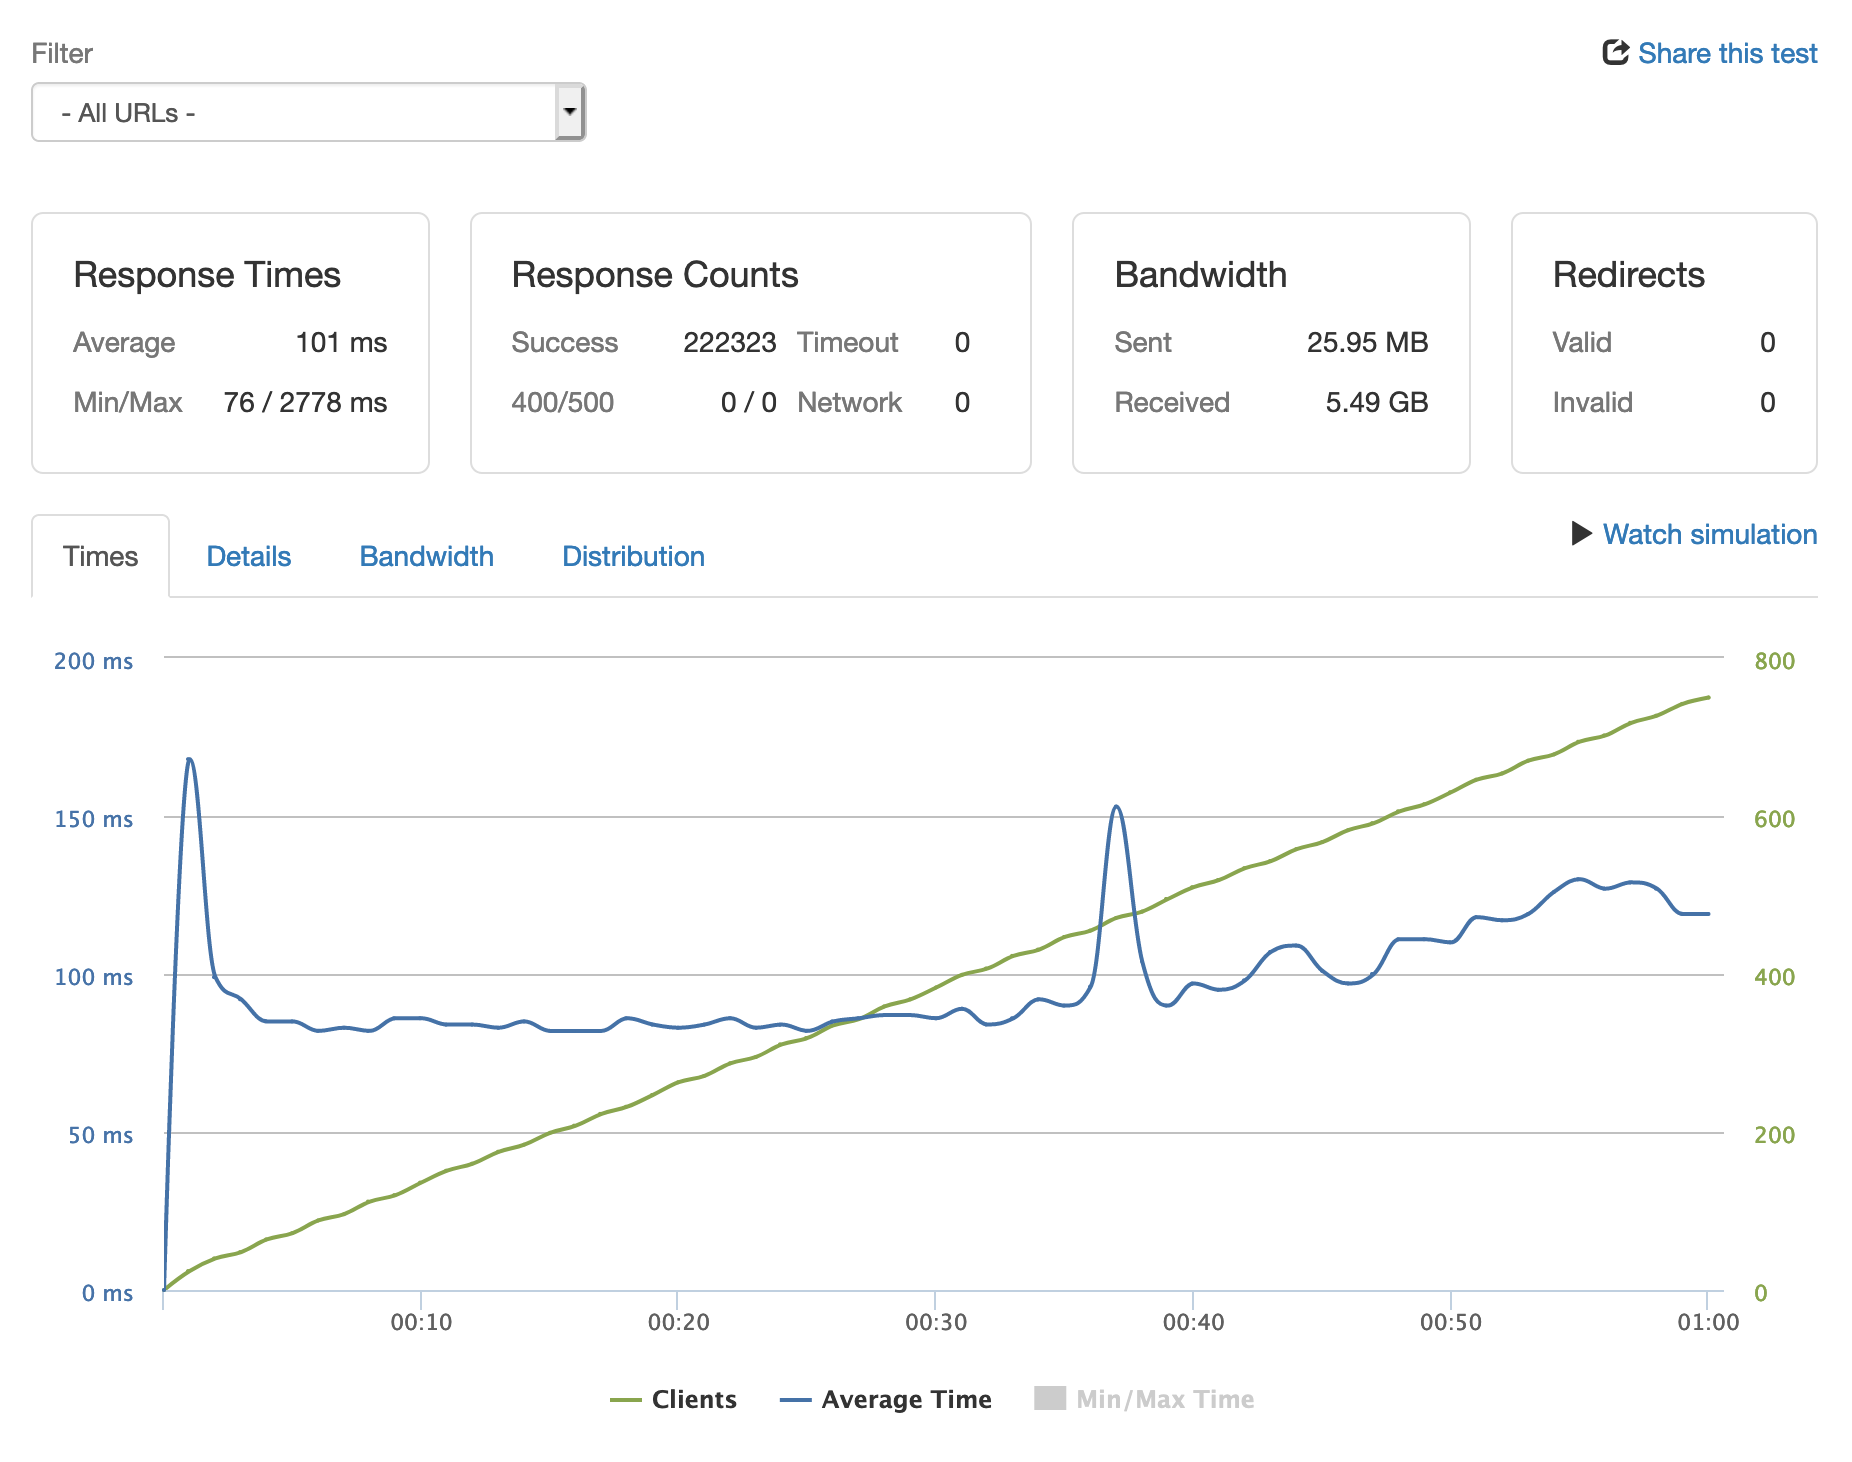
Not bad at all! The server was able to handle a total of 222,323 requests with an average response time of 101ms. You’ll notice that the response time doesn’t increase at the same rate as the number of concurrent users.
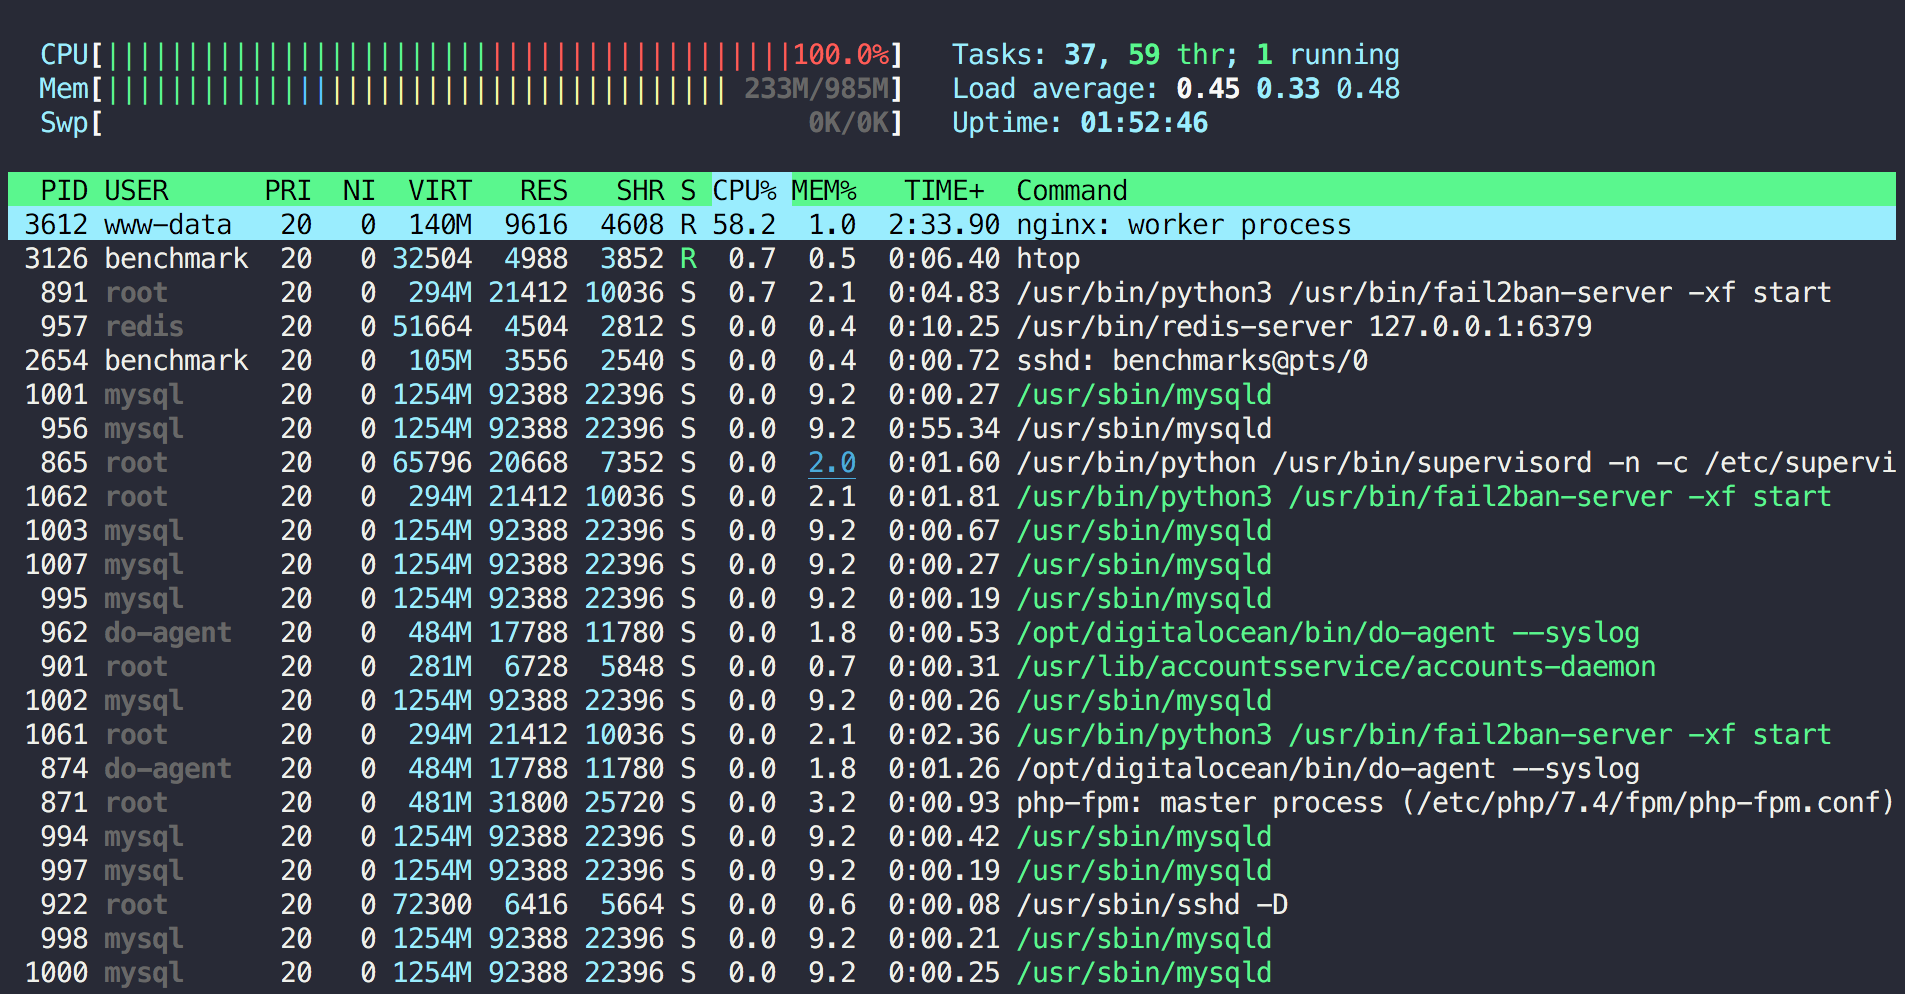
The server’s resource usage looks a little different too. Nginx is now solely causing the increased CPU usage spikes.
Performance optimization is much more difficult on highly dynamic sites where the content updates frequently, such as those that use bbPress or BuddyPress.
In these situations it’s required to disable page caching on the dynamic sections of the site (the forums for example). This is achieved by adding additional rules to the skip cache section within the Nginx server block. This will force those requests to always hit PHP and generate the page on the fly. Doing so will often mean you have to scale hardware sooner, thus increasing server costs. Another option is to implement micro caching.
Caching Plugins
At this point you may be wondering why I chose this route instead of installing a plugin such as WP Rocket, W3 Total Cache or WP Super Cache. First, not all plugins include an object cache. For those that do, you will often need to install additional software on the server (Redis for example) in order to take full advantage of the feature. Second, caching plugins don’t perform as well as server-based caching.
Offloading Media to the Cloud with WP Offload Media Lite
One significant way to reduce server requests is to use a plugin like WP Offload Media to move files that you upload to the server through the WordPress Media Library to cloud storage. The plugin will automatically rewrite the media URLs to serve the files from cloud storage.
WP Offload Media also allows you to configure a CDN to serve your media much faster, which means your pages load faster. This can lead to increased conversions and may even help improve your Google search engine rankings. Offloading your media will also mean your site’s media files don’t use up your server disk space.
Once you install the WP Offload Media Lite plugin, configure your storage provider settings. The plugin will guide you on doing this for the cloud storage providers it supports (Amazon S3, DigitalOcean Spaces, and Google Cloud Storage).

After configuring your storage settings, you can adjust your Delivery settings to take advantage of CDN benefits. Then you can start uploading your media to the library, and you’re rolling!

That concludes this tutorial on caching and speed improvements. In the next chapter we’ll dig into cron and email sending.


