In the previous chapter, I walked you through how to configure a WordPress server-level cron and set up outgoing email for your Ubuntu server. In this chapter, we’ll look at configuring automatic backups for your sites.
Performing backups on a regular basis is essential. It’s inevitable that at some point in the future you will need to restore data – whether that’s due to user error, corruption, or a security breach. You never know what could go wrong, so having a recent backup on hand can really make your life easier as a systems administrator.
There are generally two types of backups we recommend you perform. The first is a full system backup and the second is a backup of each individual site hosted on the server.
Full system backups are best performed by your VPS provider, but they are not usually enabled by default. Most VPS providers, including DigitalOcean, Akamai/Linode, Google Cloud, and AWS, offer this service for a fee.
A full system backup is generally reserved for situations where you need to recover an entire server. For example, in the event of a rare, catastrophic failure where all the data on your server was lost. You won’t want to restore the entire system if only a single site needs restoration.
A single site backup saves the database and all files of the site, allowing you to restore just that site. For a WordPress site, you might think all you need to back up are the database and the uploads directory. After all, WordPress core files, themes, and plugins can be re-downloaded as needed. Maybe you’re even thinking of skipping backups for your uploads directory if you’re using a plugin like WP Offload Media, as the files are automatically sent to your configured storage provider when added to the media library. This approach to backups can lead to trouble down the line.
There are two reasons we recommend including all data and files in a single site backup.
First, some WordPress plugins may have functionality that stores files to the uploads directory, often in a separate location from the WordPress Media Library directory structure. A common example are forms plugins that allow users to upload files from the front end. Your media offloading solution won’t move these files to the offsite storage provider. If you exclude the uploads directory from your backup, you won’t be able to restore them.
Second, if you only backup your database and uploads directory, you’ll have to manually download the WordPress core files and any themes or plugins. This is not ideal if you are hosting high traffic sites, like ecommerce, membership, or community sites. You need to recover from a failure quickly, or you will lose business.
Configuring Site Backups
A weekly backup should suffice for sites that aren’t updated often, but you may want to perform them more frequently. For example, you may want to perform backups for an ecommerce site every few hours, depending on how often new orders are received.
To set up backups for a site, first, create a new backups directory in the site’s root directory. This will store all your backup files.
cd /home/ashley/ashleyrich.com
mkdir backups
If you’ve been following the rest of this guide, the backups directory will sit alongside the existing cache, logs, and public directories.
ashley@pluto:~/ashleyrich.com$ ls
backups  cache  logs  public
ashley@pluto:~/ashleyrich.com$
Next, we’ll create a new shell script called backup.sh.
nano backup.sh
Paste the following contents into the file.
#!/bin/bash

NOW=$(date +%Y%m%d%H%M%S)
SQL_BACKUP=${NOW}_database.sql
FILES_BACKUP=${NOW}_files.tar.gz

DB_NAME=$(sed -n "s/define( *'DB_NAME', *'\([^']*\)'.*/\1/p" wp-config.php)
DB_USER=$(sed -n "s/define( *'DB_USER', *'\([^']*\)'.*/\1/p" wp-config.php)
DB_PASSWORD=$(sed -n "s/define( *'DB_PASSWORD', *'\([^']*\)'.*/\1/p" wp-config.php)
DB_HOST=$(sed -n "s/define( *'DB_HOST', *'\([^']*\)'.*/\1/p" wp-config.php)

# Backup database
mysqldump --add-drop-table -u$DB_USER -p$DB_PASSWORD -h$DB_HOST $DB_NAME > ../backups/$SQL_BACKUP 2>&1

# Compress the database dump file
gzip ../backups/$SQL_BACKUP

# Backup the entire public directory
tar -zcf ../backups/$FILES_BACKUP .
What this script does:
- Configures the script to run as a bash script.
- Sets up a current date variable (
NOW), a SQL filename variable (SQL_BACKUP) which includes the current date in the file name, and an archive file name variable (FILES_BACKUP), which also includes the current date. - Retrieves the database credentials from the
wp-config.phpfile and sets them up as variables to use in themysqldumpcommand which exports the database to theSQL_FILEfile in thebackupsdirectory. It also ensures that the SQL file includes thedrop tableMySQL command. This is useful when using this file to restore one database over another that has existing tables with the same name. - Uses
gzipto compress the SQL file so that it takes up less space. The resulting compressed filename looks something like this:20211028191120_database.sql.gz. - Creates an archive of the site’s
publicdirectory in thebackupsdirectory. The resulting archive filename looks something like this:20211028191120_files.tar.gz.
You will also notice that any time we’re referring to the location of the backups directory, we’re using ../. This Linux file system syntax effectively means ‘go one directory above the current directory’ which we’re doing because we’re running the script from inside the public directory. We’ll also need to be aware of this when we set up the scheduled cron job later on.
Hit CTR + X followed by Y to save the file.
The next step is to ensure the newly created script has execute permissions so that it can be run by a server cron job.
chmod u+x backup.sh
The last step is to schedule the backup script to run at a designated time. Begin by opening the crontab for the current user.
crontab -e
Add the following line to the end of the file.
0 5 * * 0 cd /home/ashley/ashleyrich.com/public/; /home/ashley/ashleyrich.com/backup.sh >/dev/null 2>&1
This cron job will change the current directory to the site’s public directory, and then run the backup.sh script in the context of that directory, every Sunday morning at 05:00, server time.
If you would prefer to run the backup daily, you can edit the last cron date/time field.
0 5 * * * cd /home/ashley/ashleyrich.com/public/; /home/ashley/ashleyrich.com/backup.sh >/dev/null 2>&1
Just remember, whichever option you use, you’ll need to add this crontab entry for each individual site you wish to back up.
WP-CLI Not Required
A little note about WP-CLI. You probably know that you could use the WP-CLI wp db export command, especially as we installed WP-CLI back in Chapter 2 and we use it in many of our WordPress tutorials.
However, it’s better to use mysqldump instead of WP-CLI, because it reduces dependencies and risk. For example, let’s say you update to a new version of PHP, but WP-CLI doesn’t work with that version. Your backups will be broken.
Cleaning Up Old Backups
Over time, this backup process is going to create a bunch of SQL and file archives in the backups directory, which can be a common reason for running out of server disk space. Depending on the data on your site, and how often it’s updated, you probably aren’t going to need to keep backups older than a month. So it would be a good idea to clean up old site backups you don’t need.
To remove old backups, add a line to the bottom of the backups.sh script.
# Remove backup files that are a month old
rm -f ../backups/$(date +%Y%m%d* --date='1 month ago').gz
This line uses a date command to get the date one month ago and creates a filename string with the wildcard character *. This will match any filename starting with the date of one month ago and ending in .gz, and removes those files. For example, if the script is running on July 24th, it will remove any backup files created on June 24th. So long as your script runs every day, it will always remove backups from a month ago.
The updated backup script looks like this:
#!/bin/bash

NOW=$(date +%Y%m%d%H%M%S)
SQL_BACKUP=${NOW}_database.sql
FILES_BACKUP=${NOW}_files.tar.gz

DB_NAME=$(sed -n "s/define( *'DB_NAME', *'\([^']*\)'.*/\1/p" wp-config.php)
DB_USER=$(sed -n "s/define( *'DB_USER', *'\([^']*\)'.*/\1/p" wp-config.php)
DB_PASSWORD=$(sed -n "s/define( *'DB_PASSWORD', *'\([^']*\)'.*/\1/p" wp-config.php)
DB_HOST=$(sed -n "s/define( *'DB_HOST', *'\([^']*\)'.*/\1/p" wp-config.php)

# Backup database
mysqldump --add-drop-table -u$DB_USER -p$DB_PASSWORD -h$DB_HOST $DB_NAME > ../backups/$SQL_BACKUP 2>&1

# Compress the database dump file
gzip ../backups/$SQL_BACKUP

# Backup the entire public directory
tar -zcf ../backups/$FILES_BACKUP .

# Remove backup files that are a month old
rm -f ../backups/$(date +%Y%m%d* --date='1 month ago').gz
Configuring Remote Backups
One problem with the site backups we’ve just set up is that the backup files still reside on your VPS server. If the server goes down, it will take the backups with it. Therefore, it’s a good idea to store your individual site backups somewhere other than your server. One great option for this is to move them to an Amazon S3 bucket.
Creating an S3 Bucket
First, we’ll need to create a new S3 bucket to hold our backups.
Log in to the AWS Console and navigate to Services => S3. Click the Create bucket button, give the bucket a name and select a region. You’ll need to remember the region for a later step. You can leave the rest of the settings as their defaults.

Scroll down and click the Create bucket button to create the bucket.

Setting Up an AWS User
Now that we have a bucket, we need a user with permission to upload to it. For details on how to do this, see our WP Offload Media documentation, but the TL;DR version is:
- Navigate to IAM users and create a user
- Assign the AmazonS3 access permissions
- Copy your Access Key ID and Secret Access Key
Be sure to hang onto your Access Keys as you will need them later.
Installing AWS CLI
Amazon offers an official set of command line tools for working with all its services including S3. They also provide detailed installation instructions. You may need to install the unzip utility first, which you can do with sudo apt install unzip. Once the AWS CLI is installed you can run aws from your command line terminal.
Uploading to S3
To upload to S3, we first need to configure the AWS CLI with the Access Keys of the user we created earlier, by running the aws configure command. Set the default region to the same region you chose for the S3 bucket and leave the default output format.
aws configure
AWS Access Key ID [None]: **************
AWS Secret Access Key [None]: ***************************
Default region name [None]: us-west-2
Default output format [None]:
Once this is done, it’s straightforward to upload a file to our S3 bucket, using the aws s3 cp command:
aws s3 cp ../backups/20211111122207_database.sql.gz s3://backups-ashleyrich.com/ --storage-class STANDARD
Now we need to add this to our backup script. At the bottom of the file, add the following to upload both the SQL backup and the files backup:
# Copy the files to the S3 bucket
aws s3 cp ../backups/$SQL_BACKUP.gz s3://backups-ashleyrich.com/ --quiet --storage-class STANDARD
aws s3 cp ../backups/$FILES_BACKUP s3://backups-ashleyrich.com/ --quiet --storage-class STANDARD
A Little Refactoring
Now that the basics of the backup script are in place, let’s review the script and see if we can improve it. It would be great if the script was more generic and could be used for any site.
- Ideally, we should pass the S3 bucket name as an argument to the script
- The script should make sure that the
backupsfolder exists
Here is the updated version of the backup script, with those additions in place.
#!/bin/bash

# Get the bucket name from an argument passed to the script
BUCKET_NAME=${1-''}

if [ ! -d ../backups/ ]
then
    echo "This script requires a 'backups' folder 1 level up from your site files folder."
    exit
fi

NOW=$(date +%Y%m%d%H%M%S)
SQL_BACKUP=${NOW}_database.sql
FILES_BACKUP=${NOW}_files.tar.gz

DB_NAME=$(sed -n "s/define( *'DB_NAME', *'\([^']*\)'.*/\1/p" wp-config.php)
DB_USER=$(sed -n "s/define( *'DB_USER', *'\([^']*\)'.*/\1/p" wp-config.php)
DB_PASSWORD=$(sed -n "s/define( *'DB_PASSWORD', *'\([^']*\)'.*/\1/p" wp-config.php)
DB_HOST=$(sed -n "s/define( *'DB_HOST', *'\([^']*\)'.*/\1/p" wp-config.php)

# Backup database
mysqldump --add-drop-table -u$DB_USER -p$DB_PASSWORD -h$DB_HOST $DB_NAME > ../backups/$SQL_BACKUP 2>&1

# Compress the database dump file
gzip ../backups/$SQL_BACKUP

# Backup the entire public directory
tar -zcf ../backups/$FILES_BACKUP .

# Remove backup files that are a month old
rm -f ../backups/$(date +%Y%m%d* --date='1 month ago').gz

# Copy files to S3 if bucket given
if [ ! -z "$BUCKET_NAME" ]
then
    aws s3 cp ../backups/$SQL_BACKUP.gz s3://$BUCKET_NAME/ --quiet --storage-class STANDARD
    aws s3 cp ../backups/$FILES_BACKUP s3://$BUCKET_NAME/ --quiet --storage-class STANDARD
fi
Finally, it would be useful to move the backup.sh script. Because we’ve made sure the script could potentially be located anywhere, you could even move it to the server’s usr/local/bin directory, and make it available across the entire server. For our purposes, we’ll just move it to a scripts location in the current user’s home directory.
mkdir /home/ashley/scripts
mv /home/ashley/ashleyrich.com/backup.sh /home/ashley/scripts/
In the cron job, we’ll update the path to the script and include the bucket name to copy the files to S3 like this:
0 5 * * * cd /home/ashley/ashleyrich.com/public/; /home/ashley/scripts/backup.sh backups-ashleyrich.com
If you don’t want to copy files to S3, you would omit the bucket name:
0 5 * * * cd /home/ashley/ashleyrich.com/public/; /home/ashley/scripts/backup.sh
Introducing Amazon Glacier
While sending your backups to S3 is a good start, it would be a good idea to configure Amazon Glacier. Amazon Glacier is an S3 storage class designed for data archiving and backup. While you can retrieve your data from the S3 Standard storage class almost instantly, data retrieval from Glacier can take several hours. The big advantage of Glacier is cost. For example, if you store your backups in the US West (Oregon) region, it costs only $0.0036 per GB per month if you choose the flexible retrieval option, whereas S3 Standard costs $0.023 per GB. This makes it perfect for backups.
If you read the documentation on the aws cp command you will see that all you need to do to implement the Glacier storage class is to change the --storage-class option from STANDARD to GLACIER. However, you should take into account that Glacier data retrieval can take several hours. In the event that you need to restore a site backup, it would be better to access backup files on the Standard storage class, as you could download those immediately. But wouldn’t it be great if you could keep the most recent backups on Standard storage, and then move them to Glacier after a set number of days?
Fortunately, you can configure Amazon S3 Lifecycle rules on your S3 bucket objects. These rules allow you to transition your backup files between storage classes and even set expiration dates on them. The expiration option is great for cleaning outdated backups from your S3 bucket, saving you the cost of keeping these files around forever.
Configuring Amazon S3 Lifecycle Rules
For this guide, we’re going to configure an S3 Lifecycle rule that transitions the backup files to Glacier after one day and deletes them after one year. You might want to increase/decrease these values, depending on your requirements. For example, we move our site backups to Glacier after 90 days, and delete them after two years. It’s also worth noting that once an object has been moved to the Glacier storage class, there is a minimum storage duration of 90 days. This means if you delete any item in Glacier storage that’s been there for less than 90 days, you will still be charged for the 90 days.
To create an S3 Lifecycle rule, access your bucket in the AWS management console. If you have quite a few buckets, you can use the search box to filter by bucket name.
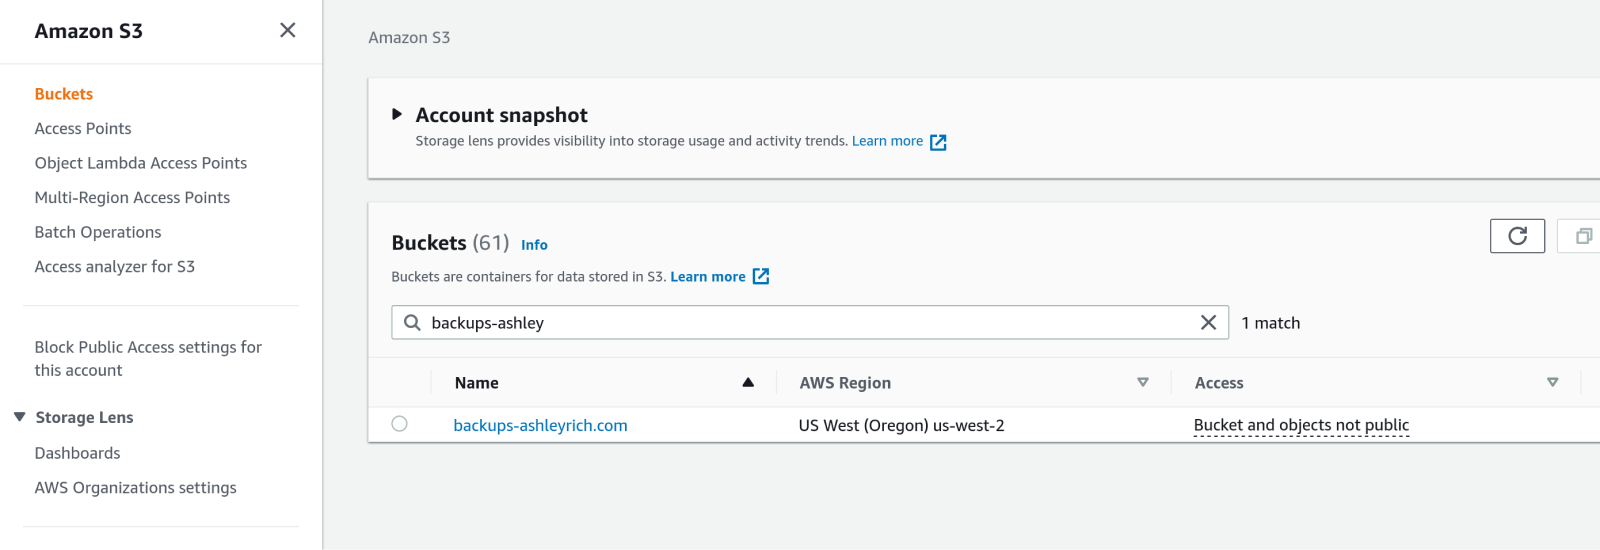
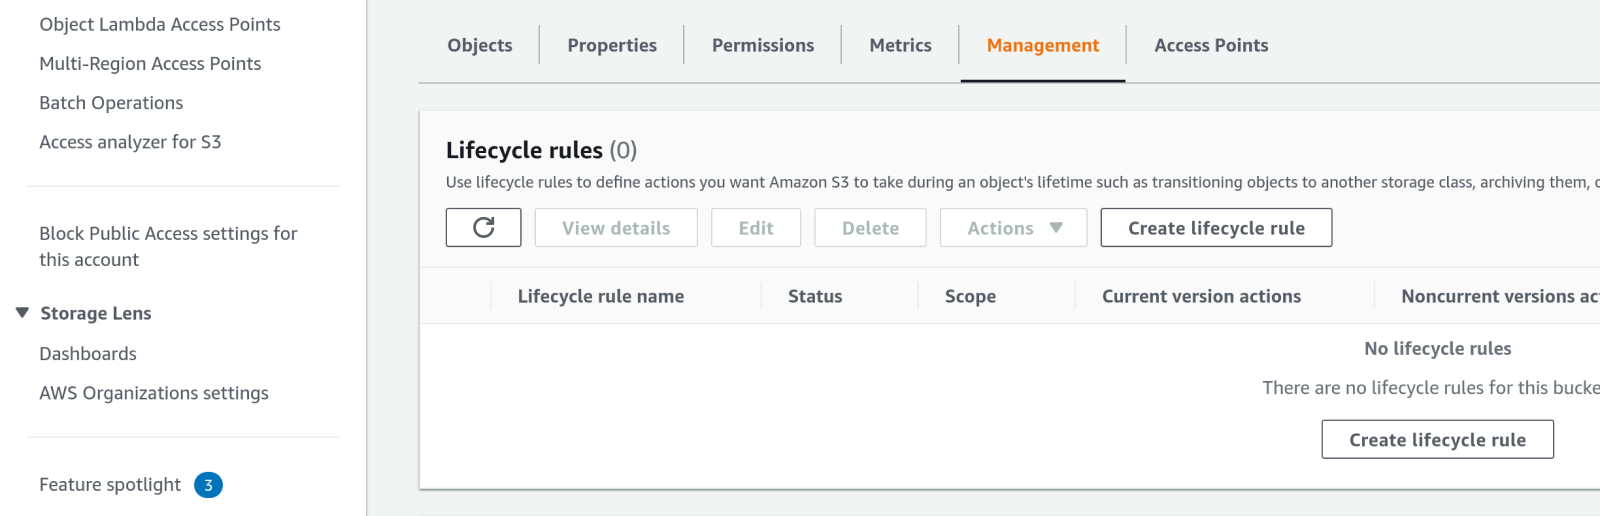
Click on the bucket name in the list to view the bucket details, then click on the Management tab. Click on either of the Create lifecycle rule buttons.
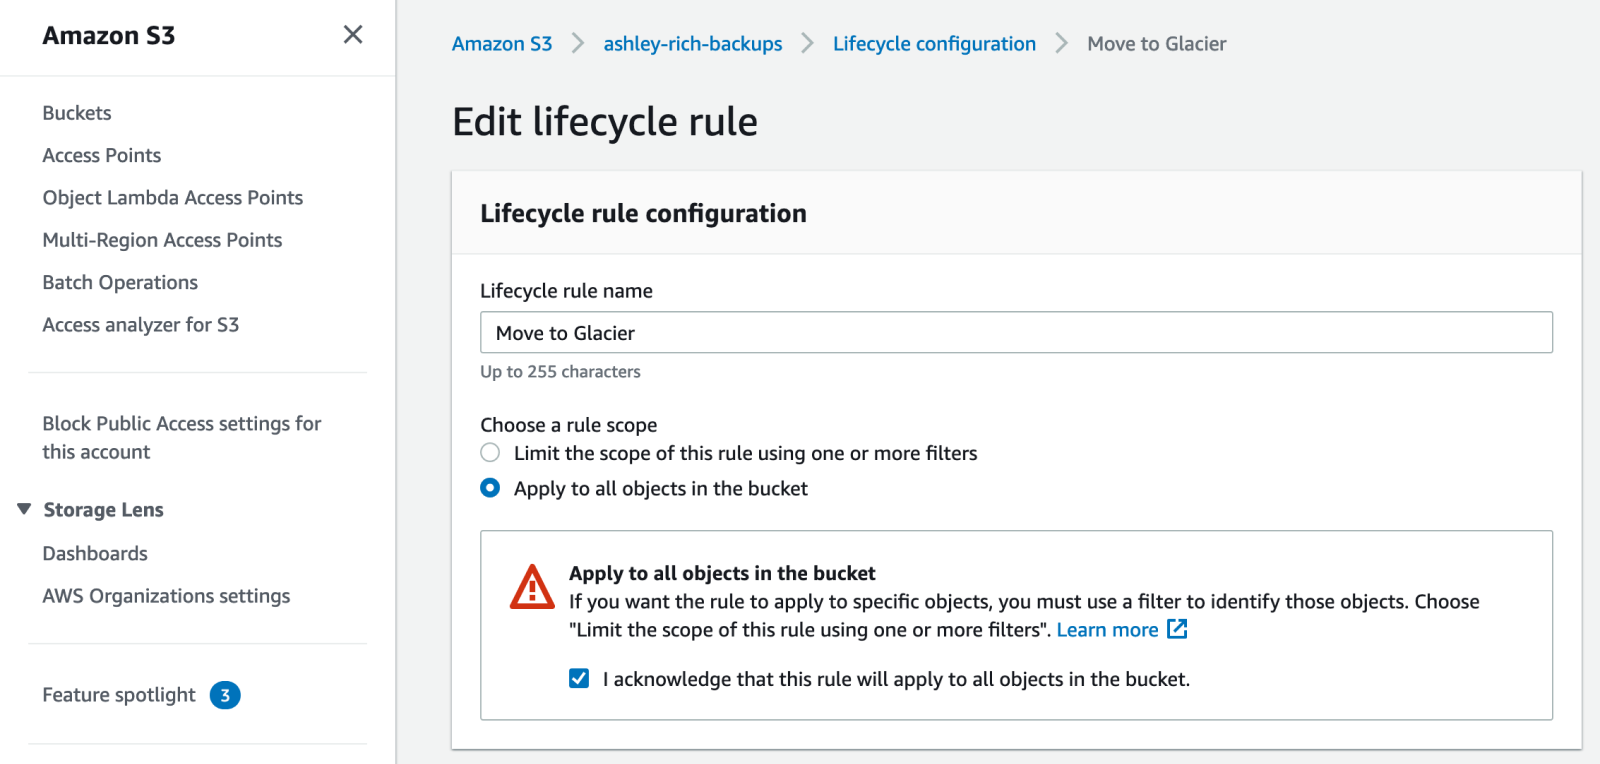
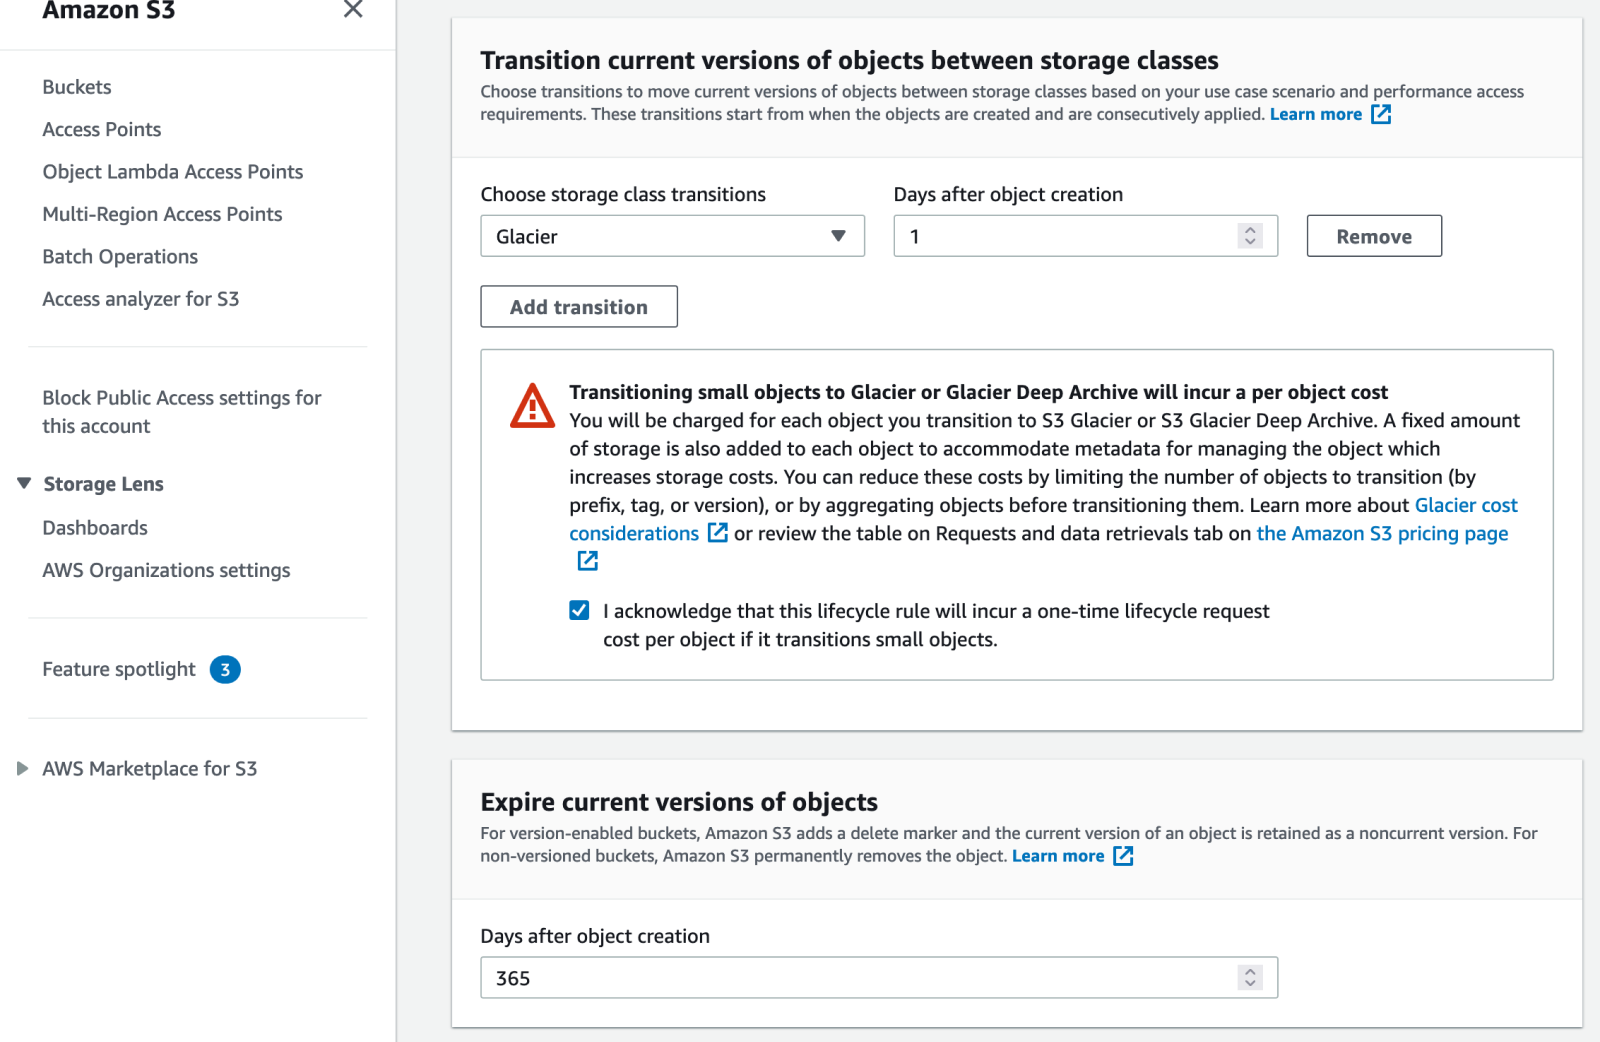
Give the rule a name, and then choose the “Apply to all objects in the bucket” scope. Tick the checkbox to acknowledge that you understand that this rule will apply to all objects in the bucket.
In the “Lifecycle rule actions” area, tick to select the specific actions you want to apply. We want to use the “Move current versions of objects between storage classes” action and the “Expire current versions of objects” action.
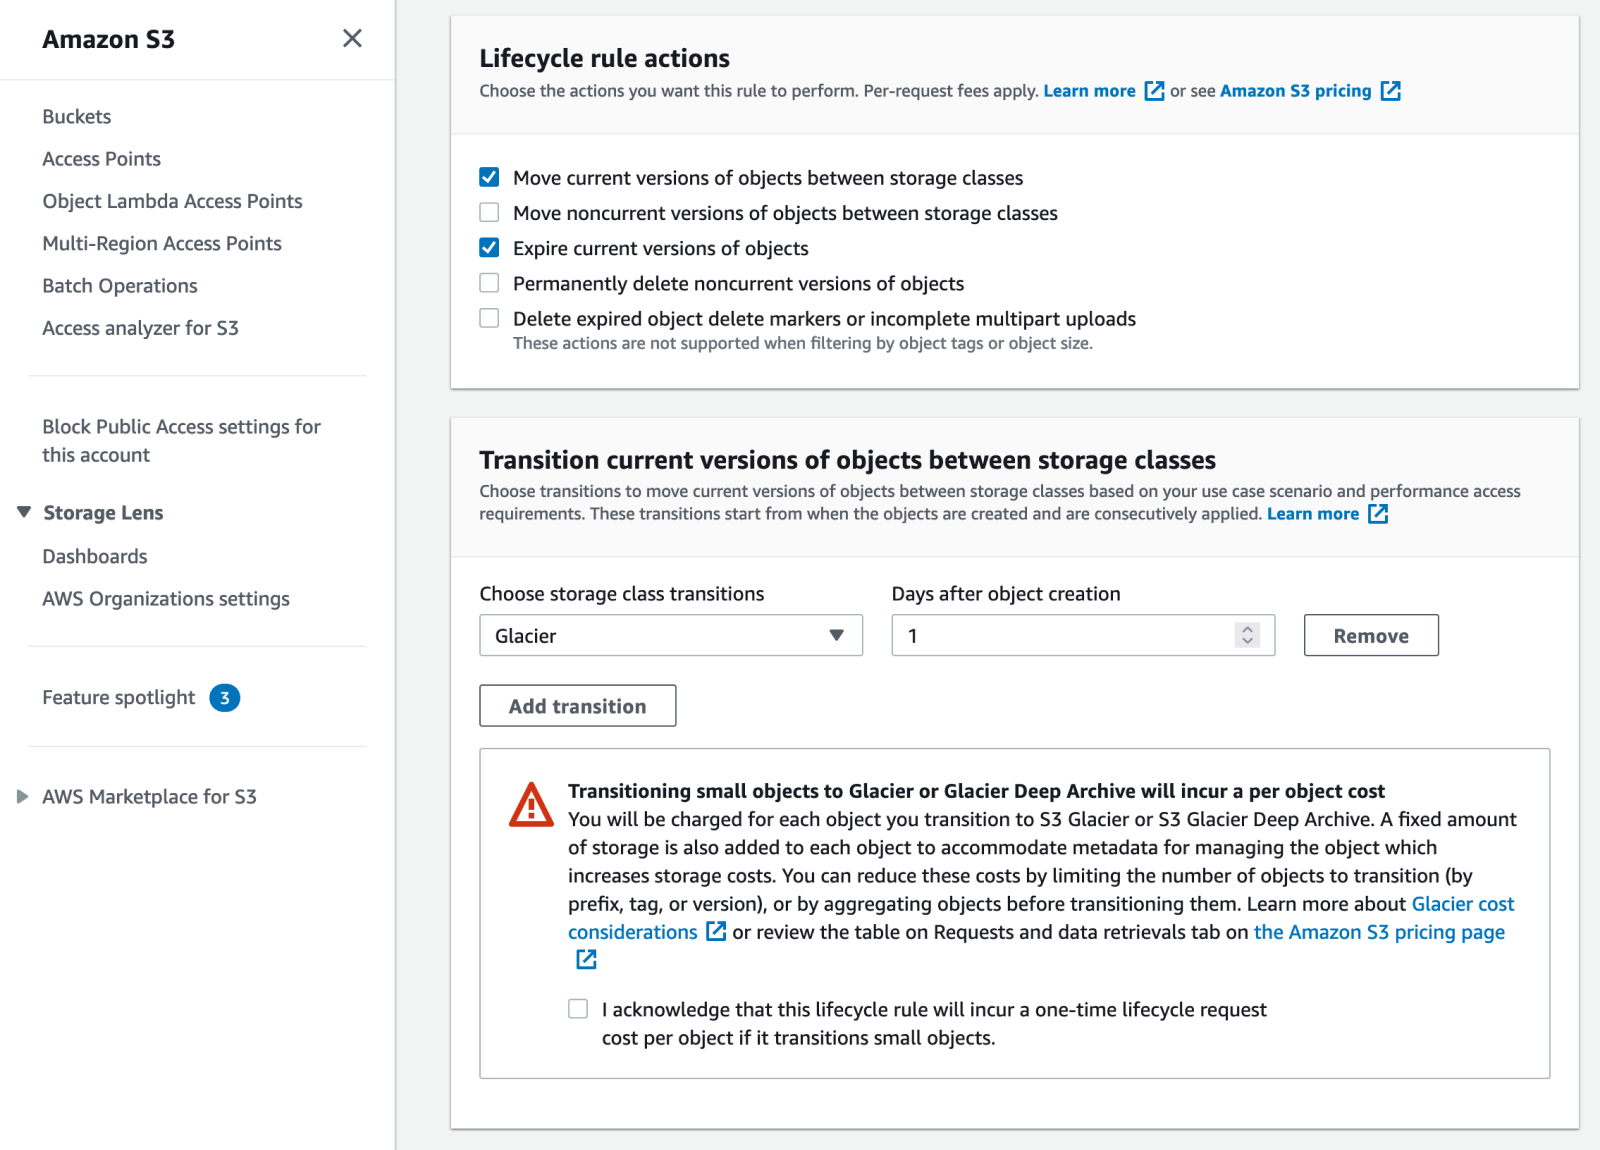
We’re configuring both actions in one Lifecycle rule. However, there is nothing stopping you from creating one rule for the transition and another for the expiration.
The final step is to configure each of the actions.
For the transition rule I’ve selected Glacier for the “Choose storage class transitions” field and 1 for the “Days after object creation” field. This configuration will move the backup files to the Glacier storage class one day after they are copied to the bucket. Tick the checkbox to acknowledge that you understand that this will incur a one-time lifecycle request cost per object on small objects. When taking the Glacier Requests & data retrievals cost on the pricing page into account, the additional one-time cost per transition is still cheaper than leaving your files on Standard S3 storage.
For the expiration rule I’ve set 365 as the value for the “Days after object creation” field, which means it will expire any objects in the bucket after one year.
The bottom of the Lifecycle rule configuration page shows an overview of the actions you’ve configured. As you can see, current versions of objects are uploaded on day 0, moved to Glacier on day 1, and expired on day 365.
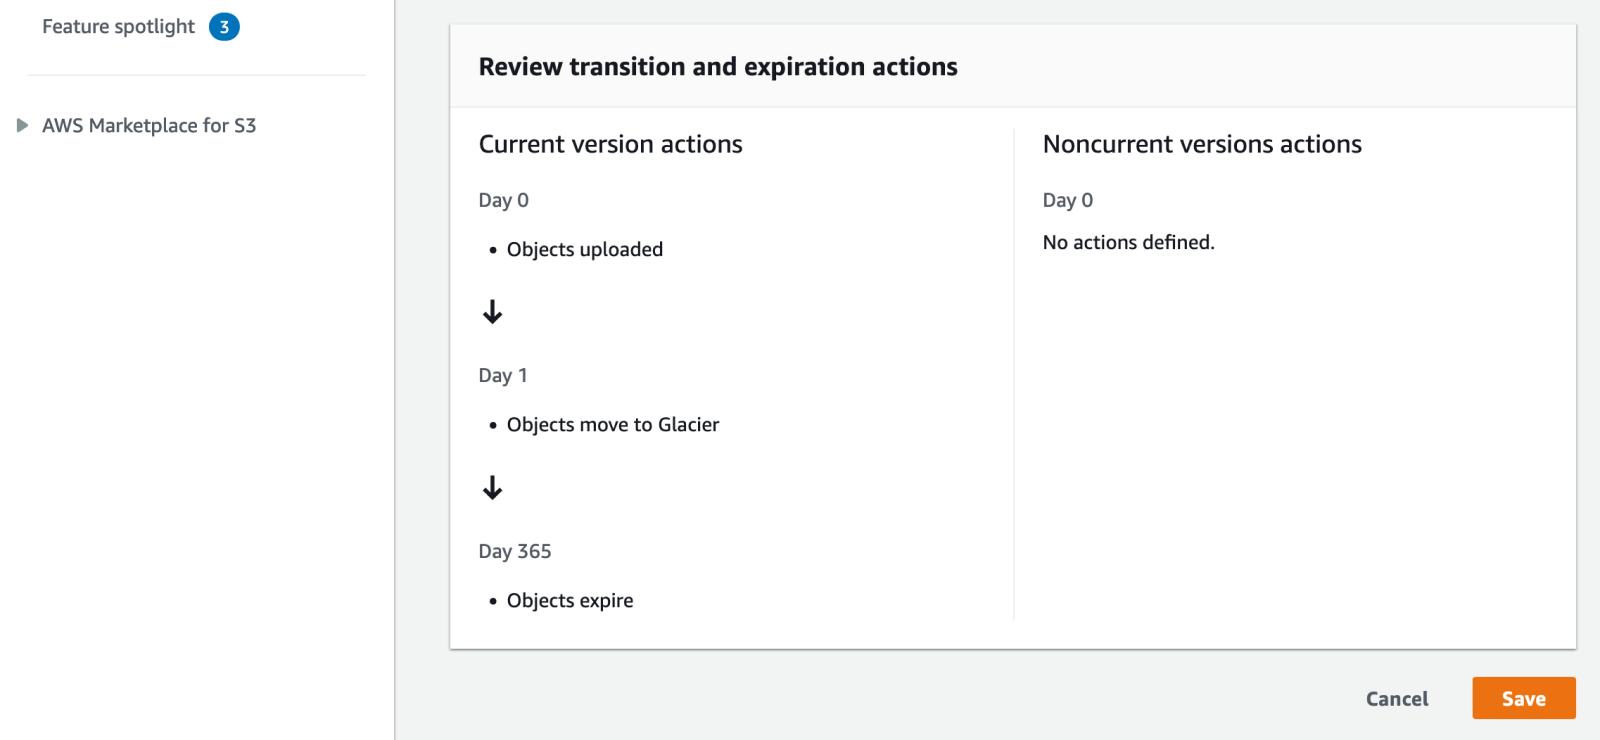
Noncurrent versions are only available if you’ve enabled object versioning on your bucket. This allows you to restore any files in case you delete them by accident, which isn’t something we need since we’re storing backups.
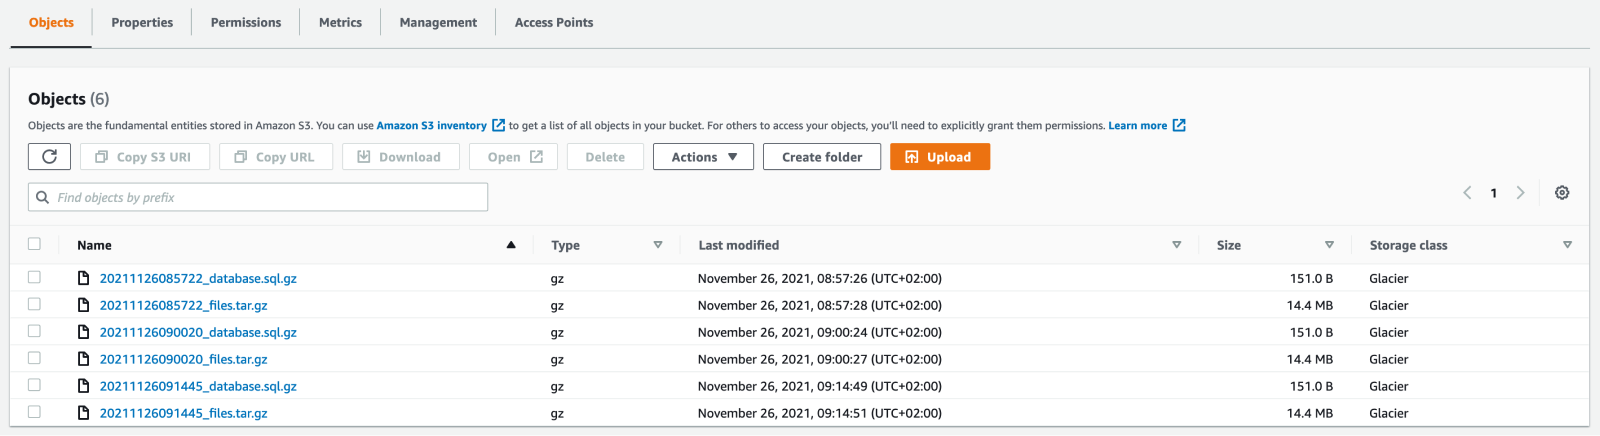
Click the Save button once you’re happy with your rules. If you’ve configured the rule correctly, after a day, you’ll see your backup files have moved from the Standard storage class to Glacier.
Conclusion
So there you have it, a fairly straightforward setup to backup your WordPress site and store it remotely. You may also want to consider using our WP Offload Media plugin to copy files to S3 as they are uploaded to the Media Library. Not only do you save disk space by storing those files in S3 instead of your server, but you can configure Amazon CloudFront or another CDN to deliver them very fast. You can also enable versioning on the bucket so that all your files are restorable in case of accidental deletion.
That concludes this chapter. In the next chapter, we’ll improve the security of our server with tweaks to the Nginx configuration.


