Like any CMS or web application, deploying WordPress can be a complex affair. Missing files during an upload can cause errors, incorrectly migrating the database can cause data loss, and moving a large library of media files can take a long time. In each of these cases, your site may become unusable for your visitors, potentially for some time. This isn’t ideal in the age of “always available” expectations.
In this tutorial, I’ll show you how to automate the process of deploying your WordPress site from GitHub, including details on what you need to prepare for this process, and four ways to do it.
Why Automated Deployments?
Anyone who has been around long enough will remember deploying sites manually using an FTP client and phpMyAdmin. Deploying a WordPress website to a web server usually requires several steps. You may have nearly perfected your manual process, but mistakes are inevitable. Certain errors mean you have to start the deployment from scratch, increasing the possibility of downtime.
Enter automated deployments. This is the process of automating all the manual steps, so a computer can run them automatically and in sequence.
There are several advantages to automating your deployment process, as detailed in The Twelve-Factor App. In particular, factor five, Build, release, run:
- Remove the potential for human error during the deployment process
- Make deployments consistent across environments
- Increase the reliability of deployments
- Reduce (or remove) the downtime of your site during a deployment
- Add the potential for catching errors and easily rolling back a deployment
- Allow anyone to run deployments at any time, without any training
- Deploying to a different location (or multiple locations)
- Deploy more frequently
As a rule, automated deployments should be consistent, reliable, and repeatable.
Preparing Your WordPress Site
There are a few things to consider before setting up your WordPress site for automatic deployment. Taking these steps will ensure that your deployments are consistent, reliable, and repeatable.
We have a detailed guide on storing your WordPress codebase in an accessible Git repository, so I’m not going to go into too much detail here. I recommend reading that guide for all the relevant details, but I’ll give you a quick summary:
- Host your site’s codebase somewhere the deployment process can access using a Version Control System (VCS) like Git. Popular options include GitHub, Bitbucket, and GitLab.
- Setup a development workflow using feature branches which are reviewed through pull requests, tested on a staging environment, and eventually merged into a production-ready branch.
- Use Composer with WordPress Packagist to install WordPress core and any WordPress plugins or themes available from the WordPress.org repositories as dependencies.
- As part of the process above, install WordPress core in a subdirectory of your public web root, which has benefits of a cleaner directory structure and improved security.
- Configure your site so that your WordPress config file (
wp-config.php) is not stored in the Git repository, or located in the public web root directory of your site.
The tutorial includes a number of other handy tips, including how to create a .gitignore file so you can specify which files and folders you want to exclude from being stored in your Git repository.
WordPress Site Boilerplate That Uses Composer
With all this information, you’re probably wondering what the best way is to set up a blank WordPress GitHub repository for your next project, with WordPress core, theme, and plugins installed as dependencies, following the suggested directory structure, and implementing your site configs. To be honest, it’s wiser to use a predefined boilerplate that will do all the work for you. It makes it easier to recreate the same setup for all future sites, and it saves a bunch of time.
For this reason, we created the SpinupWP Composer Site repository. It’s a great way to get a new WordPress repository started with WordPress core in a subdirectory and themes and plugins as dependencies. It even supports .env files, so no more messing around with managing your wp-config.php files.
Disable FTP Access & File Editing
As your site is deployed automatically, site files are overwritten regularly. You can’t allow editing files in the production environment, as any changes you make will be lost during the next deployment. The Git repository should act as a “source of truth,” and any changes should be committed there. Editing files on production is a terrible idea anyway, so this helps enforce that rule. An added benefit is it encourages you to test your plugins/themes in a development environment first.
Disable FTP access for your clients to prevent them from being tempted to log in and edit files. That way, no changes can get lost during a deployment. If you don’t need FTP access to deploy your site (if you’re transferring files using SSH or SFTP, for example), you could even disable FTP access entirely.
You should also disable file editing in the WordPress dashboard. Enable the following constant in your wp-config.php:
define( 'DISALLOW_FILE_EDIT', true );
Auto-Updates
This is a slightly controversial subject.
Using Composer to manage your WordPress site means you should probably disable WordPress auto-updates and handle these updates manually. If you’re controlling WordPress core, your theme, and plugins as dependencies, allowing any of those dependencies to be updated automatically could cause unexpected conflicts and bugs.
However, if you do this, you might take too long to install security updates and run the risk of your site getting hacked. Let’s say a plugin you use on your site has a security flaw reported and patched by the plugin developer. If you didn’t have auto-updates enabled, you would be vulnerable during the time the flaw is made public, and the time you get to update the plugin on your site.
For the majority of WordPress sites, leaving auto-updates enabled is recommended. If you are happy to manage updates through your automatic deployment process, you can disable all auto-updates by adding the following constant in your wp-config.php:
define( 'AUTOMATIC_UPDATER_DISABLED', true );
Deploying the Database
Your site should now be in good condition for deploying any code changes, but what about your database?
Using something like WP Migrate to push your staging or local database to production is perfect for new site deployments. However, we don’t recommend pushing to production for subsequent changes or updates as you could accidentally overwrite important data. Therefore, for an automated deployment process, we recommend implementing a database migrations approach. We use a library we developed, inspired by Laravel migrations. It requires you to control and script every schema change to the database (i.e., changes to the database structure) in migration files and needs to be set up at the start of the project. Using migrations has multiple benefits.
- You have full control over any and all changes to your database.
- It allows multiple developers to add or make changes to the database schema.
- If you have automated testing in place, you can run these tests after the migrations are run, to ensure nothing breaks.
- If something does go wrong, you are able to quickly roll back to previous versions of the database.
Database migrations can also be used to automate changes to the data in your database. However, you should consider the effect this might have on your deployment process. Automating data changes can be cumbersome and time consuming, especially if you have a lot of data to be changed. This could result in failed deployments, or incomplete data updates, which could break your site. If you have a large set of data that needs to be updated, but it only has to happen once, it might be better to perform this update manually in the WordPress dashboard.
Handling Media
Our recommendation is to include the media files needed for your design (anything related to your WordPress theme) in your VCS, and exclude any media files you would upload to your live Media Library. You can do this by adding the uploads directory path to the .gitignore file. This will ensure that any files added to the Media Library during development will not be committed to version control, and nothing can possibly be overwritten on production when you deploy. Alternatively, you can offload your media files to cloud storage with WP Offload Media and stop worrying about it.
Deploying Your Site
Once you have everything ready you can deploy your site. In the next section, we’ll cover four ways you can do this.
Manual Deployment Using Git Push
The most rudimentary way to deploy your WordPress site is using the Git push command. You create a new Git remote on your web server, which is a copy of the hosted repository, and push the changes from your local repository.
To enable this, you first need to set up the remote repository on your server. The example below uses SpinupWP defaults for the SSH connection and server paths. Make sure to replace those with your own values.
ssh deploy@deploy.hellfish.media
cd /sites/deploy.hellfish.media/files
git clone https://github.com/deliciousbrains/deploy-hellfish-media.git .
The next step is to add a new Git remote to the local repository called production that points to the server repository you created.
git remote add production ssh://deploy@deploy.hellfish.media/sites/deploy.hellfish.media/files
Running git remote -v confirms that the new remote has been added:
jonathan@workstation:~/websites/deploy-hellfish$ git remote -v
origin    git@github.com:deliciousbrains/deploy-hellfish-media.git (fetch)
origin    git@github.com:deliciousbrains/deploy-hellfish-media.git (push)
production    ssh://deploy@deploy.hellfish.media/files (fetch)
production    ssh://deploy@deploy.hellfish.media/files (push)
To push changes to the server, use the git push command, specifying the remote and the branch you want to push from.
git push production main
This will push the code from the main branch to the production remote, which is the location on your web server.
Automatic Deployment Using Webhooks
Manually triggering a deployment using git push is not ideal, as it adds the possibility of human error to the deployment. We could improve this workflow by removing the extra step of pushing to the production repository by automatically triggering a pull on the production repository after you push to the origin repository.
Most hosted repository services offer a way to trigger a request to a specific URL with a set of data (called a payload) on a particular event in a repository. In our case, the event is a git push. These are usually called webhooks.
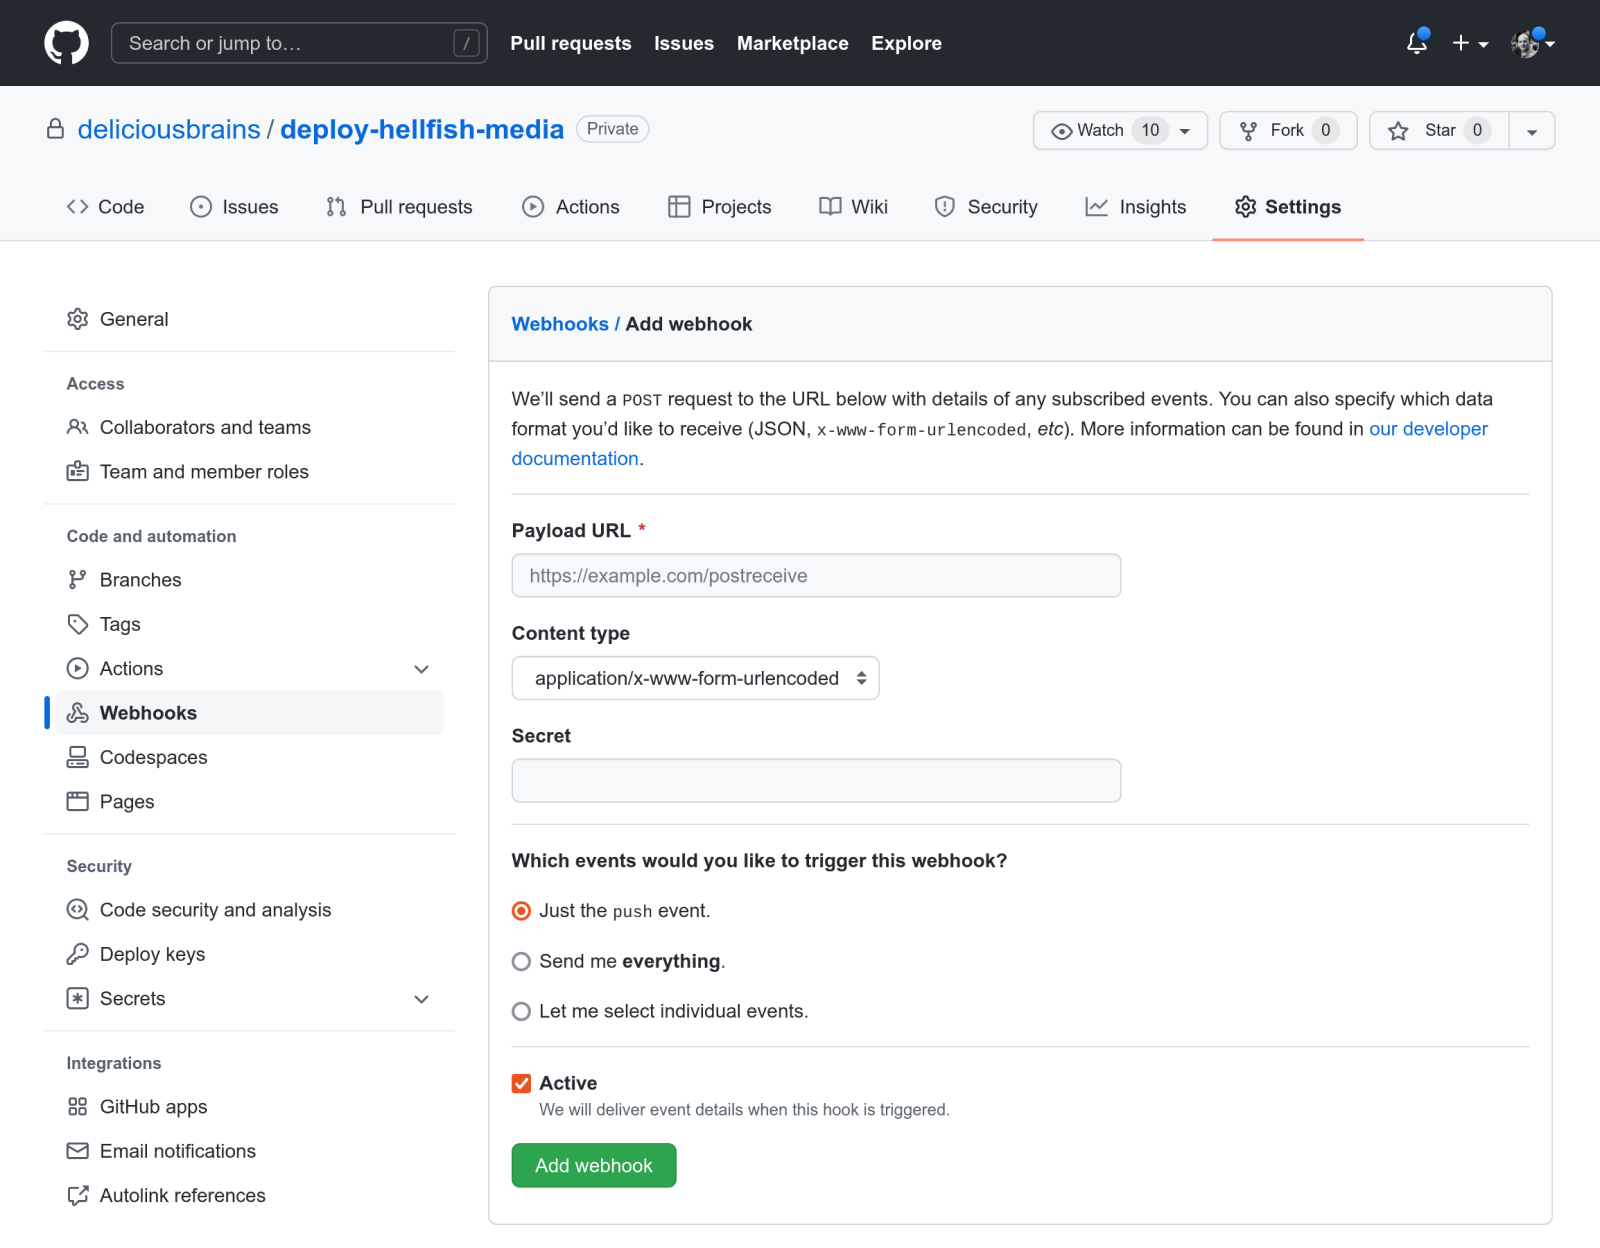
How you handle the webhook payload is entirely up to you. Generally, it’s a good idea to create a script on your web server to handle the payload, do any security checks, and run git pull to fetch the latest code. Payload URLs have to be accessible to the web host, so most webhook configurations offer a way of setting a secret key. Your script can use the secret key to verify the webhook has come from the correct source.
The script used to handle the payload and trigger the git pull can be written in any language. If you’re hosting WordPress, it’s safe to assume your server will have PHP installed, so it makes sense to use PHP. This git-deploy script is a good example of how you might achieve this in PHP.
The GitHub webhook docs offer plenty of information if you want to go the DIY route with your script.
There are a few problems with the webhook option. Your WordPress hosting provider might not be configured with the correct permissions to allow your webhook script to run command line applications like git pull, so it won’t actually be able to deploy the code. You might also have scripts or commands you need to run on the server, like running build scripts to concatenate and minify JavaScript or CSS files, migrating the database, or configuring plugin settings. This is a showstopper for most, which is why third-party deployment services like Buddy and SpinupWP’s Push to Deploy feature are needed.
Automatic Deployment Using SpinupWP’s Push to Deploy Feature
When you create a new site using SpinupWP, you can deploy it from an existing Git repository.
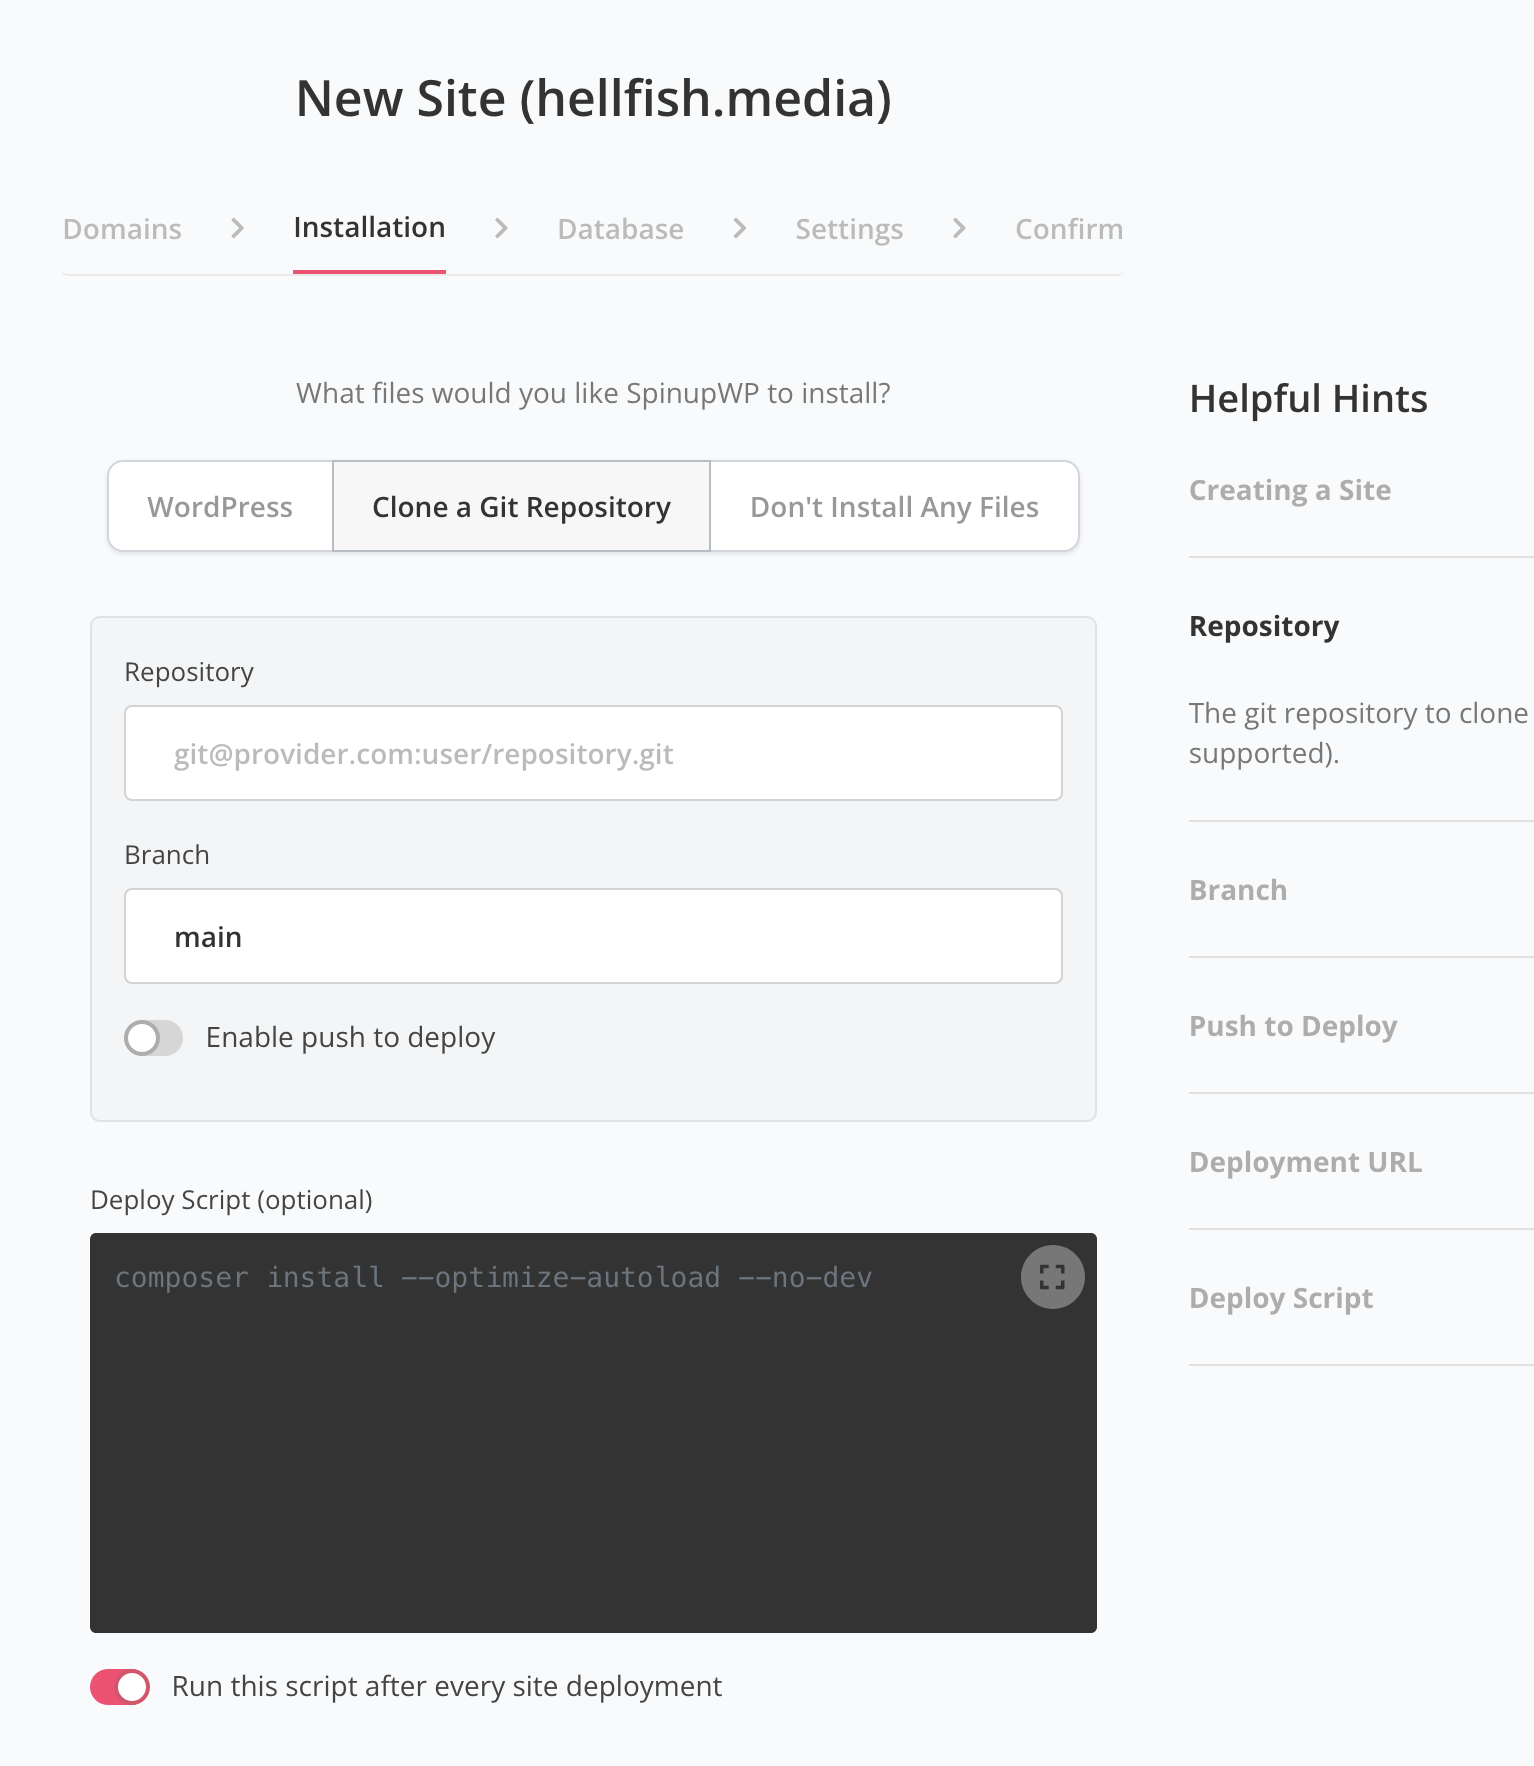
You can also configure an existing site to be deployed from a Git repository.
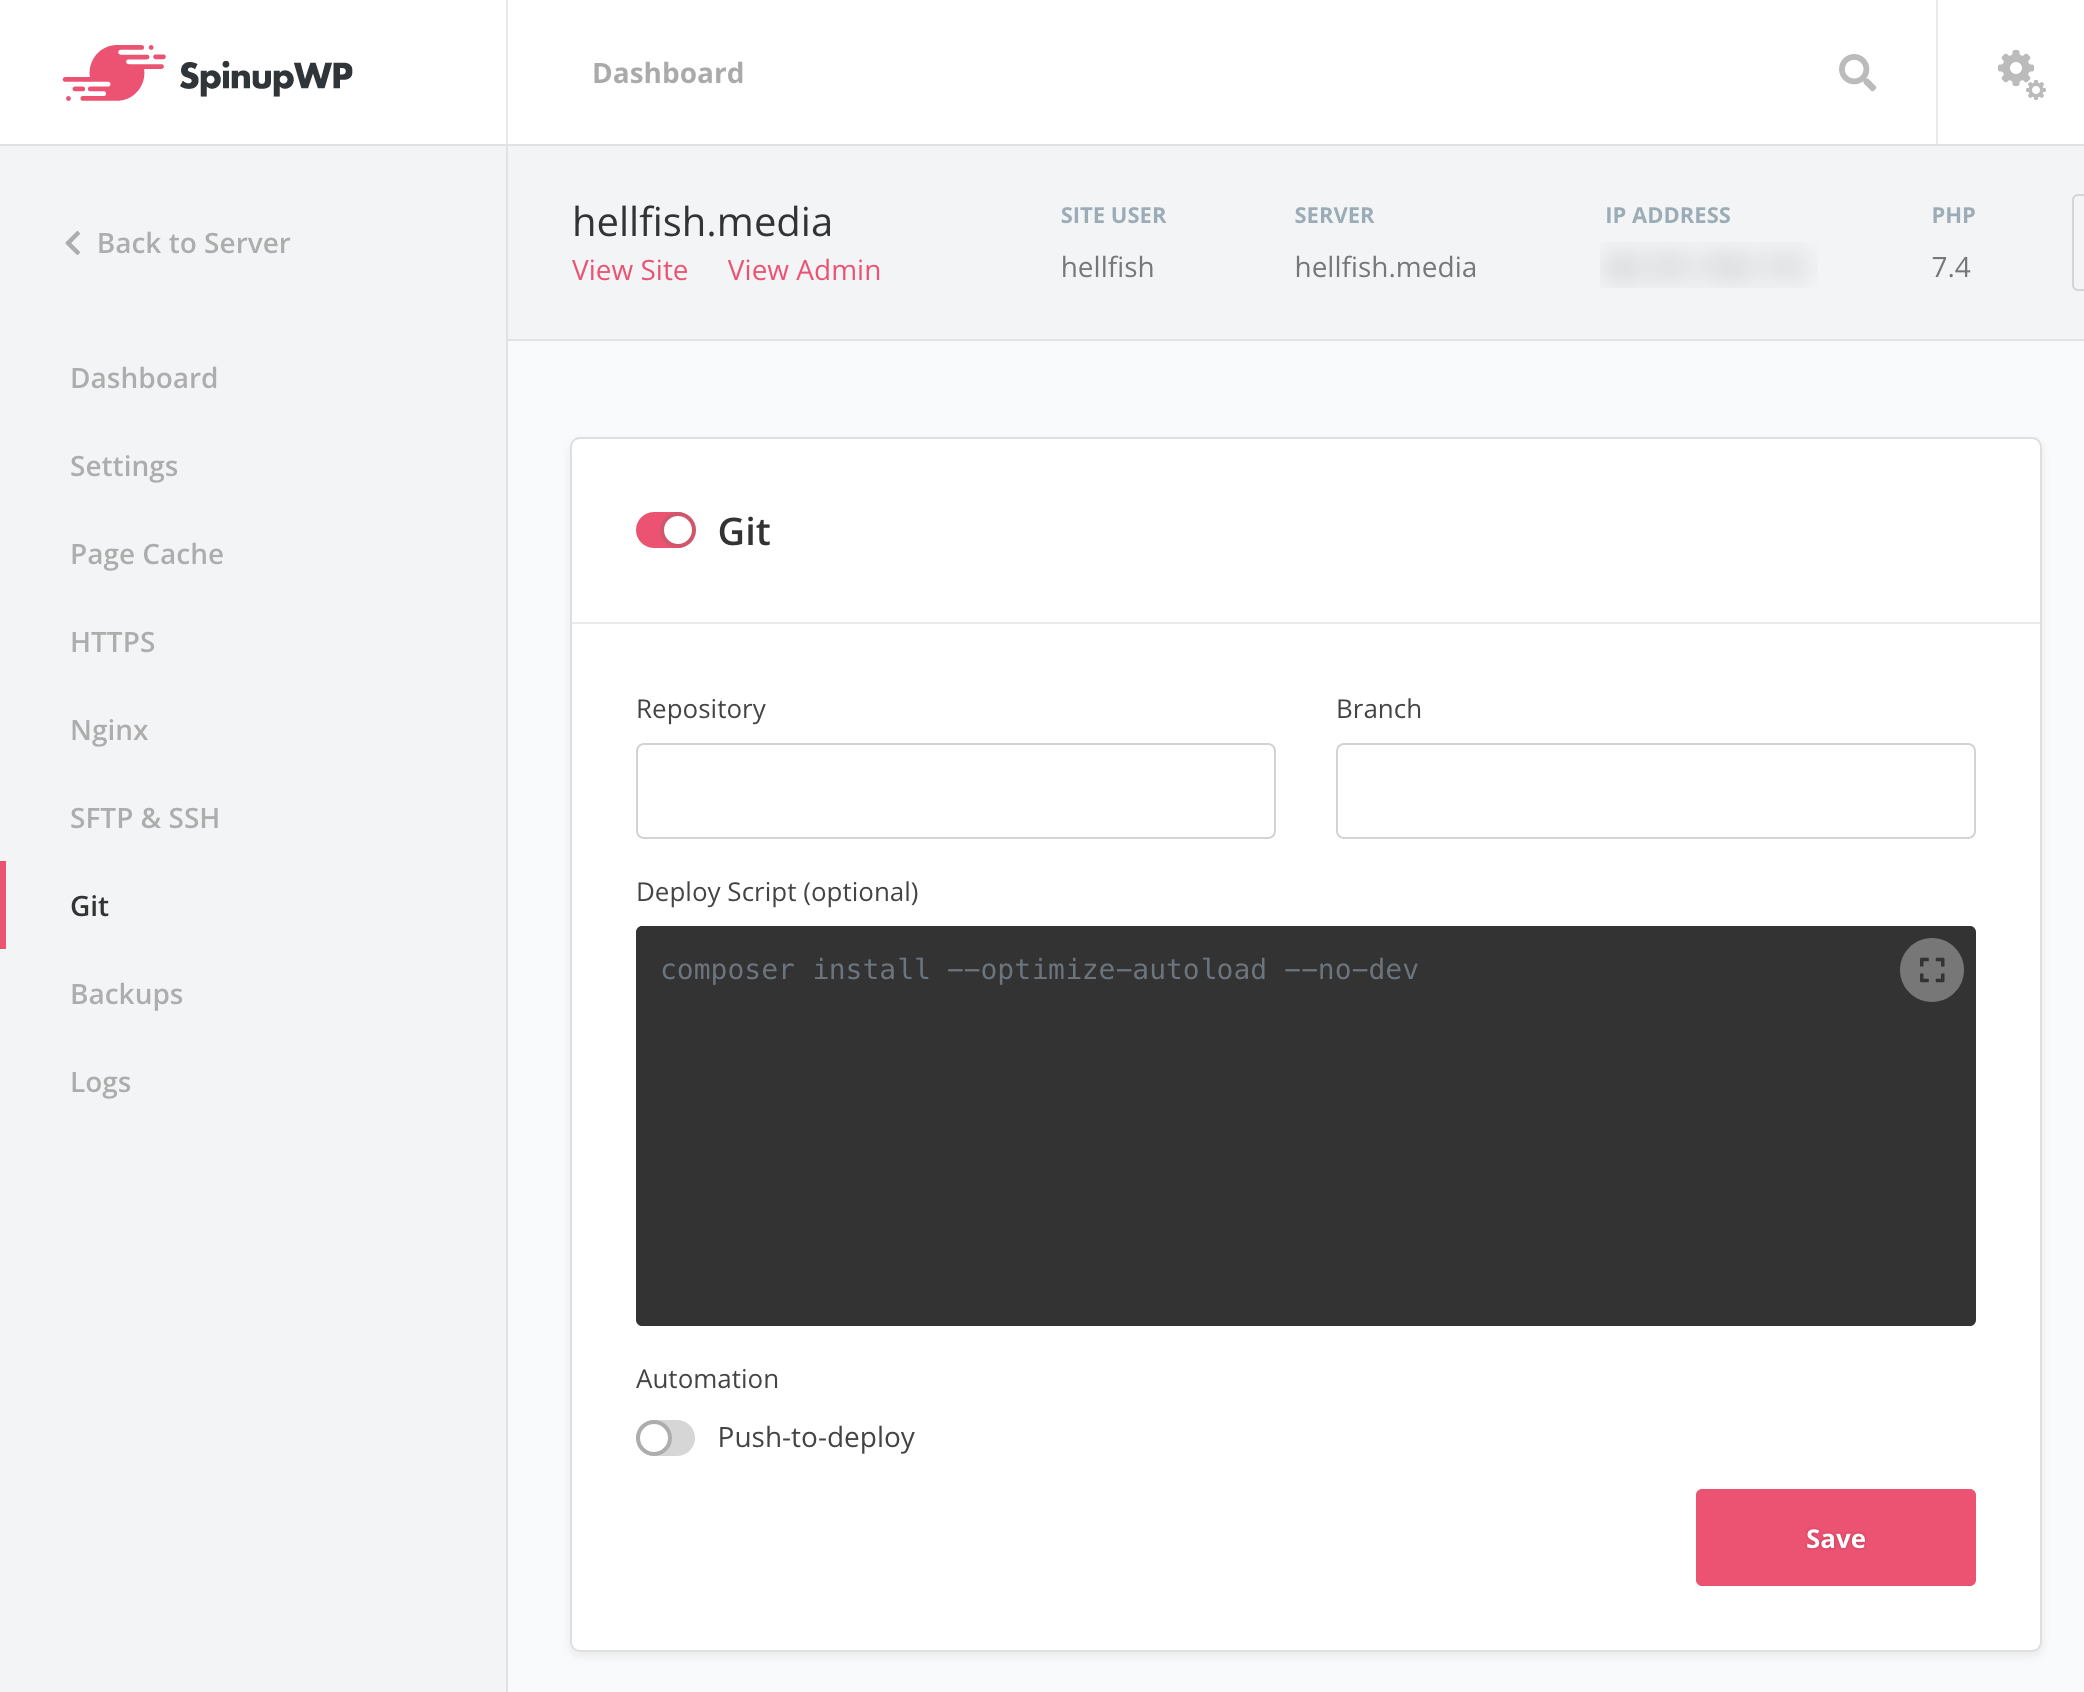
You will need the SSH Path for your Git repository and the specific branch to push from. Once you enable Git, SpinupWP will prompt you to configure an SSH connection with GitHub.
Enable the Push to Deploy toggle once the connection has been made. SpinupWP will generate a deployment URL, which you configure in your Git repository as a webhook.

You can also add any post-deployment scripts you might need in the “Deploy Script” area in SpinupWP, such as installing your Composer dependencies, running build scripts, or migrating the database.
The process is also perfectly suited for site projects built from the SpinupWP Composer Site repository I mentioned earlier, but flexible enough to use for any web project, from Laravel apps to Gatsby powered static sites.
Automated Deployment Using Buddy
While automatic deployments are far better than a developer running git push every time, they still have their limitations.
In the SpinupWP Push to Deploy example above, you would still need to configure or change your post-deploy scripts in the SpinupWP UI. You might also need to manually install specific software required only for the deployment process on the server, like Composer for dependency management or Node.js for build tasks. You can’t easily implement third-party features, like sending a notification to Slack once the deployment is complete or if it fails. Speaking of failures, there’s no way to implement atomic deployments, which can deploy the new code to a temporary location and only update the production site if the deployment completes successfully.
For these more complex deployment scenarios, we recommend using Buddy, a Continuous Integration (CI) and Continuous Deployment (CD) tool that does this, and much more. It has full support for WordPress deployments and DevOps tools like Docker, as well as third-party integrations with services like Slack and New Relic. Pairing Buddy with SpinupWP gives you full control of more complex deployment scenarios, enabling you to set up automated deployments to suit your exact requirements.
Our Advanced WordPress Deployments with Buddy article covers everything you need to set up an automated deployment in detail. I highly recommend checking it out if you want to create consistent, reliable, and repeatable automated WordPress deployments.
Conclusion
Making sure you never have to worry about deployments means you can focus on what you do best. Manually deploying a WordPress site gives you a feeling of satisfaction, as you successfully move all the pieces to the right places. But it gets boring, and you will eventually make mistakes. Why tempt fate, and a loss of visitors and revenue? Take a few hours to automate everything, and save yourself time, money, and above all, stress.
Do you use automated deployments for your WordPress sites? Do you have any WordPress deployment tips or questions you feel we didn’t cover? Let us know in the comments.
