


Multisite Tools
Qualifying licenses of WP Migrate Pro include Multisite Tools. These tools provide complete control of multisite migrations including the ability to migrate the individual subsites of multisite network. Subsite options can be found within migration profiles for Push, Pull, Export, and Find & Replace.
Current Features
- Pull a network subsite to a single site install
- Push a single site install to a network subsite
- Push a network subsite to a single site install
- Pull a single site install to a network subsite
- Push/pull the entire network or a single subsite from one multisite install to another
- Replace a single site with a multisite network
- Replace a multisite network with a single site
- Export a subsite’s data as a SQL file and import it into a single site.
Pull a Network Subsite to a Single Site Install
When running a pull migration into a single site, the Multisite Tools will inform you if the remote site is a multsite install, and give you the option to “Pull from a specific subsite”. If you check this box, you can choose a specific subsite from the list of available network subsites.
Once you’ve picked a subsite from the list, the target table prefix is automatically set and the list of tables and the Find & Replace rows are also updated to match.

The list of tables you can select for migration is automatically narrowed down to those specific to the subsite, plus the global users and usermeta tables.
All the other options usually available for a push migration are still enabled, including the Advanced Options, Backup Tables and Media Files, Theme Files, and Plugin Files.
This means that you no longer need to hunt down the media files, theme files, or plugin files for the subsite and manually transfer them to the single site. Multisite Tools takes care of copying the files to the single site and ensuring all links to them are correct in the newly updated site.
The users migrated to the single site install are only those that are currently a member of the subsite, or are authors of migrated content.
Push a single site install to a network subsite
Similarly, when you run a push migration from a single site to a multisite network, the Multisite Tools will inform you if the remote site is a multisite install, and give you the option to “Push to a specific subsite”. If you select a subsite to push to, the target table prefix is automatically set, and the list of tables and the Find & Replace rows are updated to match.
All the other options usually available for a push migration are still enabled, including the Advanced Options, and Backup Tables. Multisite Tools takes care of copying the media, theme and plugin files into the subsite and ensuring all links to them are correct in the newly updated site.
Where possible, the users being pushed into the subsite are matched up with existing users via their username and email address, as long as they are also a member of the subsite already. If there is no match then the user is imported along with their metadata. Either way, the migrated posts and comments are updated to ensure the correct user record is referenced in the subsite.
Push a network subsite to a single site install
The Multisite Tools in WP Migrate Pro allow you to push a network subsite to a single site install, which is triggered from the multisite network. This functions the same as pulling a network subsite to a single site install, but you run a push migration from the multisite, instead of pulling it into the single site.

The users, media, themes, and plugins are migrated and updated in the same way.
Pull a single site install to a network subsite
Similarly, WP Migrate’s Multisite Tools also allows you to pull a single site install into a network subsite, which is triggered from the multisite network. This functions the same as pushing a single site install to a network subsite, but you pull it into the multisite, instead of pushing it from the single site.

The users, media, themes, and plugins are migrated and updated in the same way.
Great Power, Great Responsibility
You may be thinking, “Finally, I can set up one multisite install for developing all my client sites.” While you certainly can do this easier than ever now, just because you can doesn’t mean you should. Instead, we recommend setting up your development environment to mirror the production environment as closely as possible. So if the site will be a single site install in production, set it up as a single site install in development.
You’re much less likely to run into issues after moving the site to production if the two environments are similar.
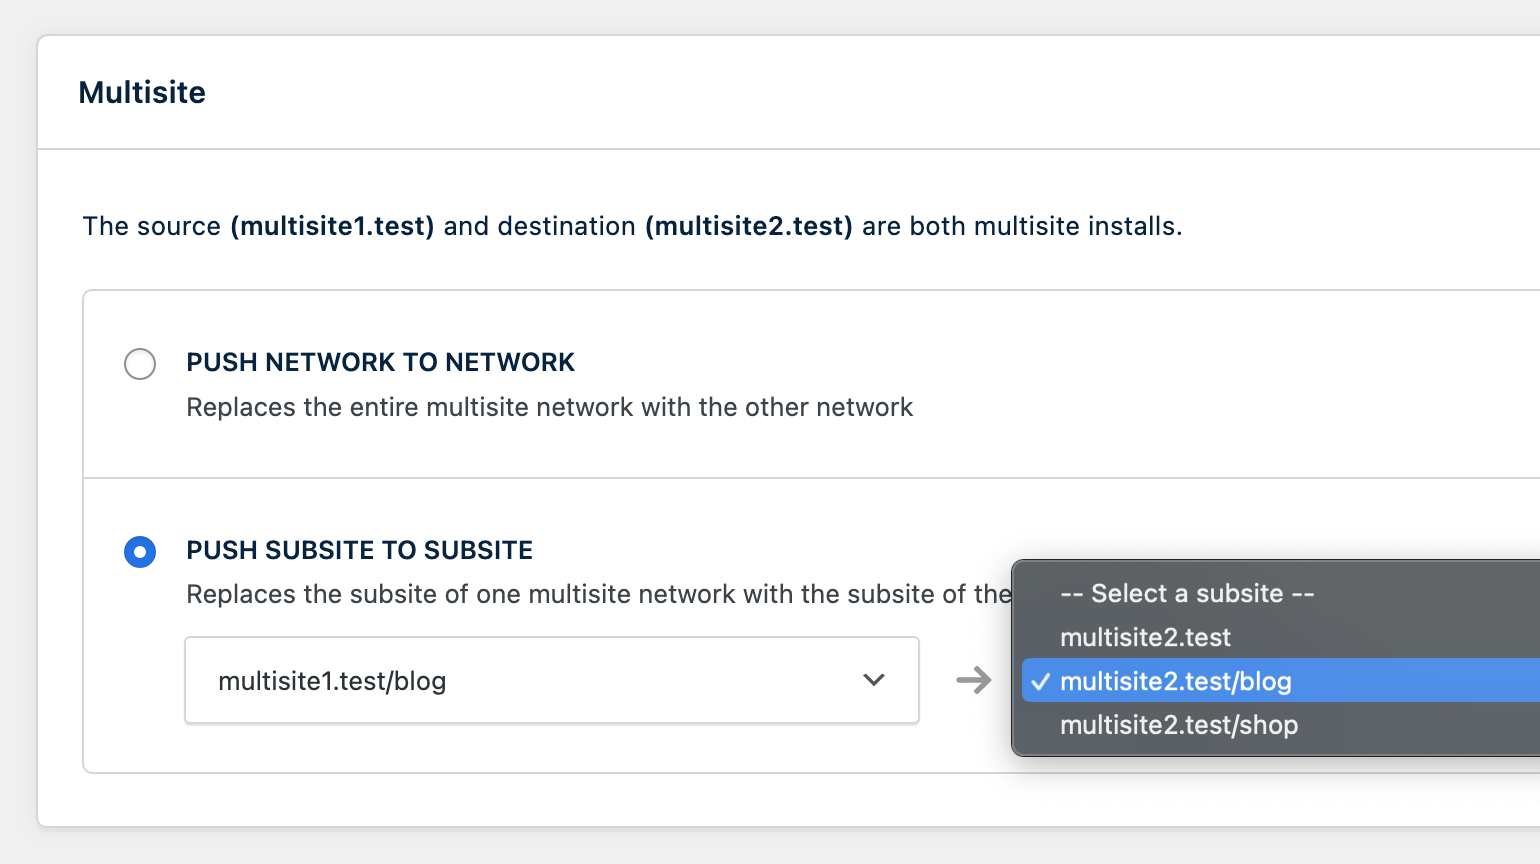
Migrate Between Multisites
Moving a subsite from one multisite network to another is one of the most challenging migrations in WordPress today. Doing so efficiently means copying only the content, users, options, and files that are necessary for the subsite to function in its new environment.
When WP Migrate detects that both the source and destination sites are multisite installs, the new Multisite panel gives you the option to migrate either the entire network, or to migrate directly from one subsite to another.
Replace a single site with a multisite network
While it’s possible to replace an existing single site with a multisite network, it’s highly recommended that you first change the single site to a multisite using the official WordPress multisite method. By creating a network before pushing or pulling, you can run a straightforward network-to-network migration that requires fewer manual steps.
However, if you wish to proceed and replace the single site with a multisite as the result of a migration, then you will need to make some manual changes after the migration completes in order to enable the network. Otherwise your newly migrated site will have the structure of a multisite with the configuration of a single site.
Once the migration is complete, the following values should be copied from the multisite’s wp-config.php file and added to the single site’s wp-config.php. Be sure to change DOMAIN_CURRENT_SITE to the domain of your new site.
define( 'WP_ALLOW_MULTISITE', true );
define( 'MULTISITE', true );
define( 'SUBDOMAIN_INSTALL', false );
define( 'DOMAIN_CURRENT_SITE', 'hellfish.media' );
define( 'PATH_CURRENT_SITE', '/' );
define( 'SITE_ID_CURRENT_SITE', 1 );
define( 'BLOG_ID_CURRENT_SITE', 1 );
Depending on your host and server configuration, you may also need to update the .htaccess file.
Replace a multisite network with a single site
Replacing a multisite network with a single site requires manually removing the multisite configuration from wp-config.php after the migration completes. Otherwise your newly migrated site will have the structure of a single site with the configuration of a multisite.
Once the migration is complete, open wp-config.php of the former multisite and remove the following values.
define( 'WP_ALLOW_MULTISITE', true );
define( 'MULTISITE', true );
define( 'SUBDOMAIN_INSTALL', false );
define( 'DOMAIN_CURRENT_SITE', 'hellfish.media' );
define( 'PATH_CURRENT_SITE', '/' );
define( 'SITE_ID_CURRENT_SITE', 1 );
define( 'BLOG_ID_CURRENT_SITE', 1 );
Depending on your host and server configuration, you may also need to update the .htaccess file.
Export Subsite as Single Site Install
When WP Migrate Pro is installed and activated on a multisite install of WordPress, you will see an “Export a subsite as a single site install” checkbox above the Find & Replace rows when the “Export File” migration option is selected.

When this new checkbox is checked a new select box is shown for selecting the subsite to export.

Below the subsite select box, you’ll also see a “New Table Name Prefix” textbox. By default, this textbox shows the multisite’s base table name prefix, but you can change it to match the table name prefix that your single site install will use. In version 2.0 of the plugin, we simplified this process.
When exporting a subsite for a single site install the “Tables” select box will show only the tables that belong to the selected subsite, plus the usermeta and users tables that all subsites use. By default, all the tables are selected for export, but you can select just the tables you need.

When you are happy with all the selected options, you can click the Export button to create the SQL file.
Now you can use your preferred MySQL administration tool (e.g. phpMyAdmin, Sequel Pro, the CLI) to import the SQL file and overwrite update the database for a single site install of WordPress with the content and settings from the subsite.
Once the data has been imported into the single site install you can then edit or delete the imported users as required.
How It Works
Each subsite of a multisite network install of WordPress has a unique ID number (often called the blog_id). This number is used in the table name prefix for the tables that are created specifically for the subsite as well as in the keys of various settings.
You can read more about the table structure of a WordPress multisite database in our Ultimate Developer’s Guide to the WordPress Database post.
When the tables for a subsite are exported for use in a single site install they are renamed to remove the blog_id.
For example, if a subsite with blog_id 3 is being exported from a site with base table prefix wp_, the table wp_3_posts will be renamed to wp_posts. If the subsite with blog_id 1 (usually the primary site) is being exported then there is no blog_id to be removed from the table names.
If a new table name prefix is entered for the migration, then the prefix is also changed. So in our example above, if we are using the new table name prefix xyz_, the table wp_3_posts will be renamed to xyz_posts in the export file.
There are often records in the options and usermeta tables that are subsite specific, hence when those tables are exported for a subsite their keys are updated to work for a single site install and subsite records for other subsites are removed from the exported data.