If you’ve spent any amount of time messing with PHP config files to get a file to upload, you know that uploading large files can be a real pain. You have to find the loaded php.ini file, edit the upload_max_filesize and post_max_size settings, and hope that you never have to change servers and do all of this over again.
I ran into this problem some years back, while working on WP Migrate. One of its features is the ability to upload and import an SQL file. WP Migrate is used on a ton of servers, so I needed to create an upload tool that can handle large files without hitting upload limits.
Meet the JavaScript FileReader API. It’s an easy way to read and process a file directly in the browser. The JavaScript FileReader API now has major browser support including Chrome, Firefox, Safari, and Edge.
With that in mind, let’s create a basic (no Vue or React here!) JavaScript file upload example in a WordPress plugin to learn about the FileReader API.
Getting Started
Since the FileReader API is baked into JavaScript, the HTML side of things is easy and relies on a basic HTML form with a file input element:
<form>
    <input type="file" name="dbi_import_file" /><br><br>
    <input type="submit" value="Upload" />
</form>
To make things easier, we’re going to create a small class to contain most of our code. We’ll place the above form inside a WordPress dashboard widget:
<?php
/**
 * Plugin Name: DBI File Uploader
 * Description: Upload large files using the JavaScript FileReader API
 * Author: Delicious Brains Inc
 * Version: 1.0
 */

class DBI_File_Uploader {

    public function __construct() {
        add_action( 'admin_enqueue_scripts', array( $this, 'enqueue_scripts' ) );
        add_action( 'wp_dashboard_setup', array( $this, 'add_dashboard_widget' ) );
        add_action( 'wp_ajax_dbi_upload_file', array( $this, 'ajax_upload_file' ) );
    }

    public function enqueue_scripts() {
        $src = plugins_url( 'dbi-file-uploader.js', __FILE__ );
        wp_enqueue_script( 'dbi-file-uploader', $src, array( 'jquery' ), false, true );
        wp_localize_script( 'dbi-file-uploader', 'dbi_vars', array(
            'upload_file_nonce' => wp_create_nonce( 'dbi-file-upload' ),
            )
        );
    }

    public function add_dashboard_widget() {
        wp_add_dashboard_widget( 'dbi_file_upload', 'DBI File Upload', array( $this, 'render_dashboard_widget' ) );
    }

    public function render_dashboard_widget() {
        ?>
        <form>
            <p id="dbi-upload-progress">Please select a file and click "Upload" to continue.</p>

            <input id="dbi-file-upload" type="file" name="dbi_import_file" /><br><br>

            <input id="dbi-file-upload-submit" class="button button-primary" type="submit" value="Upload" />
        </form>
        <?php
    }
}
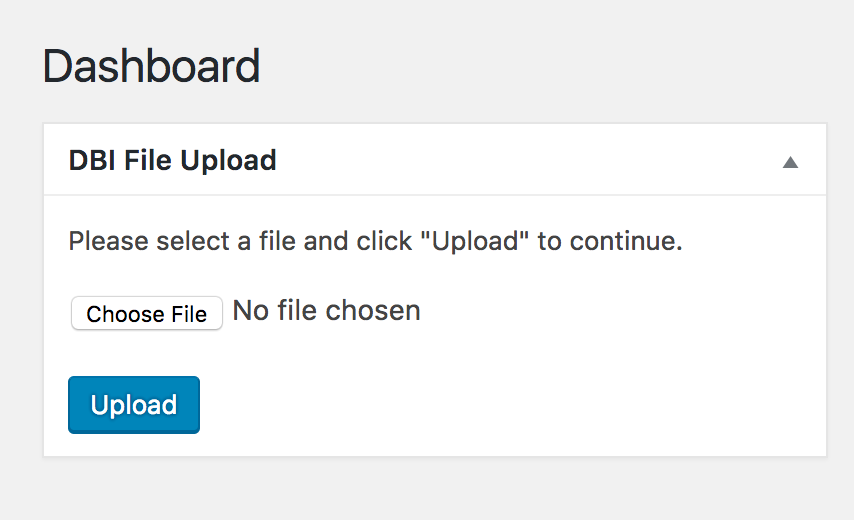
With the upload form in place, we should see a basic file upload form when we visit the WordPress dashboard:

Uploading the File
The HTML form doesn’t do anything yet, so let’s create the dbi-file-uploader.js file and add an event handler for the upload button. After selecting the file object and creating the FileReader object, it will call upload_file() to start the read operation:
(function( $ ) {

    var reader = {};
    var file = {};
    var slice_size = 1000 * 1024;

    function start_upload( event ) {
        event.preventDefault();

        reader = new FileReader();
        file = document.querySelector( '#dbi-file-upload' ).files[0];

        upload_file( 0 );
    }
    $( '#dbi-file-upload-submit' ).on( 'click', start_upload );

    function upload_file( start ) {

    }

})( jQuery );
Now we can start working on the upload_file() function that will do most of the heavy lifting. First we grab a chunk of the selected file using the JavaScript slice() method:
function upload_file( start ) {
    var next_slice = start + slice_size + 1;
    var blob = file.slice( start, next_slice );
}
We’ll also need to add a function within the upload_file() function that will run when the FileReader API has read from the file.
reader.onloadend = function( event ) {
    if ( event.target.readyState !== FileReader.DONE ) {
        return;
    }

    // At this point the file data is loaded to event.target.result
};
Now we need to tell the FileReader API to read a chunk of the file content. We can do that by passing the blob of data that we created to the FileReader object:
reader.readAsDataURL( blob );
It’s worth noting that we’re using the readAsDataURL() method of the FileReader object, not the readAsText() or readAsBinaryString() methods that are in the docs.
The readAsDataURL() method is better here since it is read as Base64 instead of plain text or binary data. This is important because the latter will likely run into encoding issues when sent to the server, especially when uploading anything other than basic text files. Base64 will usually just contain the A-Z, a-z, and 0-9 characters. It’s also easy to decode with PHP 🙂.
Now let’s add the AJAX call that sends the chunk to the server. That AJAX call will call upload_file() again when the request has completed. Here’s what upload_file() looks like in its entirety:
function upload_file( start ) {
    var next_slice = start + slice_size + 1;
    var blob = file.slice( start, next_slice );

    reader.onloadend = function( event ) {
        if ( event.target.readyState !== FileReader.DONE ) {
            return;
        }

        $.ajax( {
            url: ajaxurl,
            type: 'POST',
            dataType: 'json',
            cache: false,
            data: {
                action: 'dbi_upload_file',
                file_data: event.target.result,
                file: file.name,
                file_type: file.type,
                nonce: dbi_vars.upload_file_nonce
            },
            error: function( jqXHR, textStatus, errorThrown ) {
                console.log( jqXHR, textStatus, errorThrown );
            },
            success: function( data ) {
                var size_done = start + slice_size;
                var percent_done = Math.floor( ( size_done / file.size ) * 100 );

                if ( next_slice < file.size ) {
                    // Update upload progress
                    $( '#dbi-upload-progress' ).html( `Uploading File -  ${percent_done}%` );

                    // More to upload, call function recursively
                    upload_file( next_slice );
                } else {
                    // Update upload progress
                    $( '#dbi-upload-progress' ).html( 'Upload Complete!' );
                }
            }
        } );
    };

    reader.readAsDataURL( blob );
}
And that’s it for the frontend of our JavaScript file upload example. It’s still pretty simple, but that should be enough to get the file upload going on the client side.
Saving Chunks Server-Side
Now that JavaScript has split the file up and sent it to the server, we need to reassemble and save those chunks to the filesystem. To do that, we’re going to add the ajax_upload_file() method to our main plugin class:
public function ajax_upload_file() {
    check_ajax_referer( 'dbi-file-upload', 'nonce' );

    $wp_upload_dir = wp_upload_dir();
    $file_path     = trailingslashit( $wp_upload_dir['path'] ) . $_POST['file'];
    $file_data     = $this->decode_chunk( $_POST['file_data'] );

    if ( false === $file_data ) {
        wp_send_json_error();
    }

    file_put_contents( $file_path, $file_data, FILE_APPEND );

    wp_send_json_success();
}

public function decode_chunk( $data ) {
    $data = explode( ';base64,', $data );

    if ( ! is_array( $data ) || ! isset( $data[1] ) ) {
        return false;
    }

    $data = base64_decode( $data[1] );
    if ( ! $data ) {
        return false;
    }

    return $data;
}
This is about as simple as it gets. The ajax_upload_file() method does a quick nonce check and then decodes the data in decode_chunk(). If the data can be decoded from Base64, it is added to the file and the upload continues.
With that in place we should be able to run our uploader and the file should get saved to the chosen path:

And that’s it, we have a working AJAX file uploader! If you’ve been following along and want to see the full code, I’ve uploaded it to GitHub so you can take a look.
Conclusion
I like how easy it is to create an AJAX file uploader that can handle large files without needing to adjust any settings server-side. It’s always interesting when ideas that were just pipe dreams in the past become common and greatly improve today’s workflows.
It’s worth noting that there are several existing JavaScript libraries like jQuery File Upload that can also upload large files. In many cases, it makes more sense to use existing code instead of reinventing the wheel. But it never hurts to understand what is going on behind the scenes in case you ever need to fix a bug or add a new feature.
If you’re going to use something like this in a real app, you should definitely look up any security issues. This could include file type validation, preventing uploads of executable files, and making sure that uploaded files have a random string in the filename. You may also want to add a way for users to pause or cancel the upload and come back to it later, and log any errors that come up during the upload. To speed things up, you could look at using the REST API instead of admin-ajax.php.
Have you ever had to handle large file uploads? If so, did you take a similar approach or did you do something completely different? Let me know in the comments below.