


The extensibility of WordPress has always been one of its strong points. Not only are there thousands of plugins available, you can build your own. At some point, you might decide to distribute your plugin. This usually requires replacing hard coded data with options that future users of the plugin could set. In this article, I’ll discuss five different ways to create a settings page in your WordPress plugin.
- WordPress Settings API
- A Custom Fields Framework
- Using a Code Generator
- Using the REST API
- VueJS
- React
WordPress Settings API
The WordPress Settings API, added in WordPress 2.7, allows developers to register settings fields on existing settings forms in the dashboard, as well as create new settings forms that WordPress will display and take care of saving the data:
It lets you define settings pages, sections within those pages and fields within the sections.
This is definitely the most manual of the methods discussed in this post, but it’s worth understanding how it works. In some cases, it’s a simple enough approach that might be all that’s needed.
First, we need to register a new menu item and page that will contain our settings form. Let’s add the page under the “Settings” top-level menu item in the WordPress dashboard:
<?php

function dbi_add_settings_page() {
    add_options_page( 'Example plugin page', 'Example Plugin Menu', 'manage_options', 'dbi-example-plugin', 'dbi_render_plugin_settings_page' );
}
add_action( 'admin_menu', 'dbi_add_settings_page' );
The fifth argument to add_options_page is the name of the function used to display the contents of the page, in this case it will be the settings form. That function needs to have a form element and some function calls to communicate with the Settings API:
<?php
function dbi_render_plugin_settings_page() {
?>
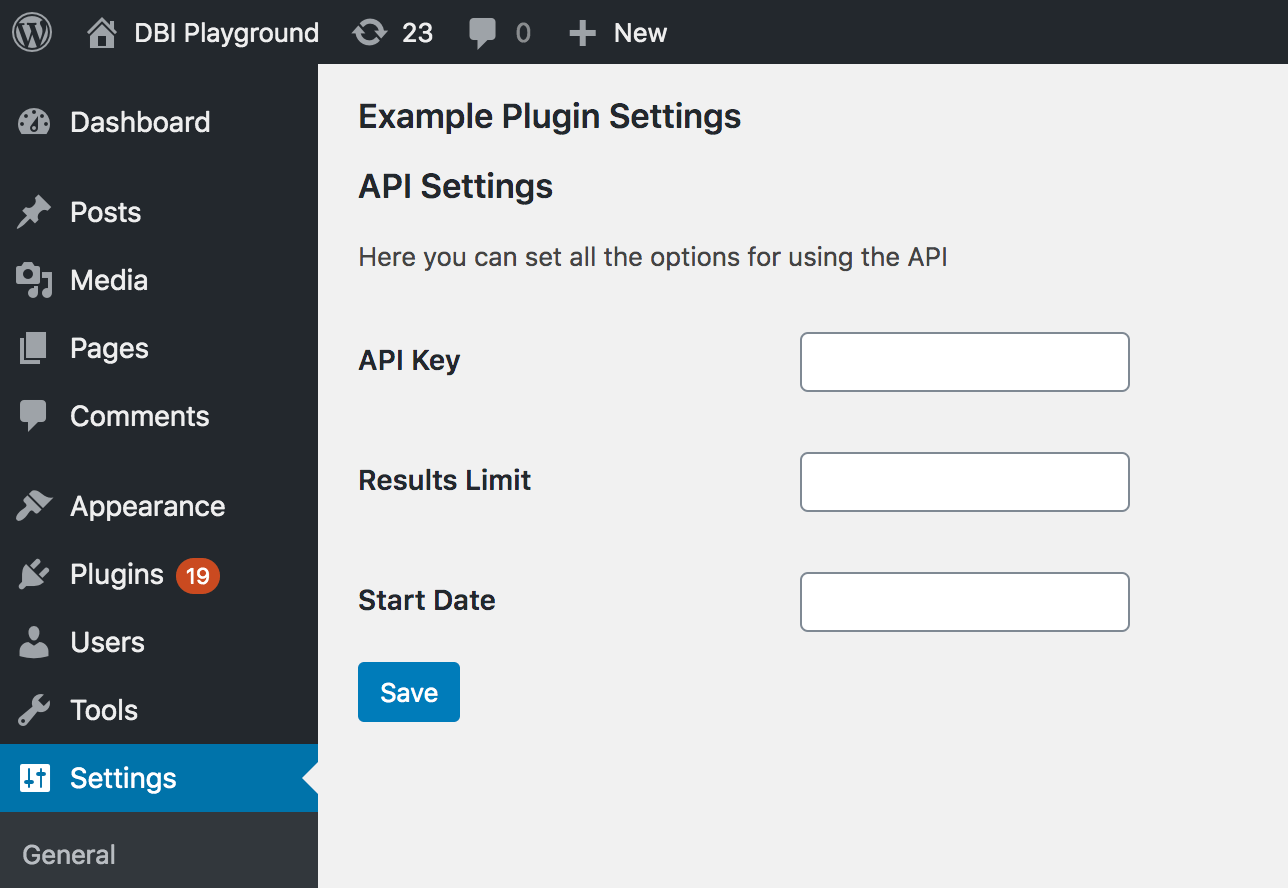
<h2>Example Plugin Settings</h2>
<form action="options.php" method="post">
<?php
settings_fields( 'dbi_example_plugin_options' );
do_settings_sections( 'dbi_example_plugin' ); ?>
<input name="submit" class="button button-primary" type="submit" value="<?php esc_attr_e( 'Save' ); ?>" />
</form>
<?php
}
The function settings_fields renders code to tell the form what to do, as well as a hidden input to make it secure using a nonce. The argument passed to the function is a name for the settings group that will be registered later.
The function do_settings_sections is the key part of the form. This is where all the sections and fields are output–textboxes, selects, checkboxes, etc.–so data can be entered by the user. Again, that function argument is arbitrary but needs to be unique. We will use that when registering fields.
Let’s do that:
<?php

function dbi_register_settings() {
    register_setting( 'dbi_example_plugin_options', 'dbi_example_plugin_options', 'dbi_example_plugin_options_validate' );
    add_settings_section( 'api_settings', 'API Settings', 'dbi_plugin_section_text', 'dbi_example_plugin' );

    add_settings_field( 'dbi_plugin_setting_api_key', 'API Key', 'dbi_plugin_setting_api_key', 'dbi_example_plugin', 'api_settings' );
    add_settings_field( 'dbi_plugin_setting_results_limit', 'Results Limit', 'dbi_plugin_setting_results_limit', 'dbi_example_plugin', 'api_settings' );
    add_settings_field( 'dbi_plugin_setting_start_date', 'Start Date', 'dbi_plugin_setting_start_date', 'dbi_example_plugin', 'api_settings' );
}
add_action( 'admin_init', 'dbi_register_settings' );
There’s three things going on here. First, we are using register_setting to create a new record in the wp_options table for our settings, with ‘dbi_example_plugin_options’ as the option_name.
Our individual settings will be stored as a serialized array of data. This is great for grouping all our plugin settings together in one place, but serialization of data can lead to issues when migrating the WordPress database, unless handled properly. The third argument is the name of the function which handles validating data entered when saving the option.
For example, making sure the API key is a 32-character string containing only numbers and letters:
<?php

function dbi_example_plugin_options_validate( $input ) {
    $newinput['api_key'] = trim( $input['api_key'] );
    if ( ! preg_match( '/^[a-z0-9]{32}$/i', $newinput['api_key'] ) ) {
        $newinput['api_key'] = '';
    }

    return $newinput;
}
Second, we are registering a group section for the settings, tied to the option. Finally, we are registering three fields for the group with add_settings_field. All of these are text fields to hold our plugin’s settings.
Next, we need to create functions to display helpful text for the section and render the fields on the form:
<?php

function dbi_plugin_section_text() {
    echo '<p>Here you can set all the options for using the API</p>';
}

function dbi_plugin_setting_api_key() {
    $options = get_option( 'dbi_example_plugin_options' );
    echo "<input id='dbi_plugin_setting_api_key' name='dbi_example_plugin_options[api_key]' type='text' value='" . esc_attr( $options['api_key'] ) . "' />";
}

function dbi_plugin_setting_results_limit() {
    $options = get_option( 'dbi_example_plugin_options' );
    echo "<input id='dbi_plugin_setting_results_limit' name='dbi_example_plugin_options[results_limit]' type='text' value='" . esc_attr( $options['results_limit'] ) . "' />";
}

function dbi_plugin_setting_start_date() {
    $options = get_option( 'dbi_example_plugin_options' );
    echo "<input id='dbi_plugin_setting_start_date' name='dbi_example_plugin_options[start_date]' type='text' value='" . esc_attr( $options['start_date'] ) . "' />";
}
Phew! That’s it, we have a settings page:
Using the settings in our code is then a case of using get_option('dbi_example_plugin_options') and using the array key for the setting we need.
There’s quite a few moving parts here, registering this and that, duplicating code, and making sure it’s all put together correctly. It’s not the easiest of the WordPress APIs to use or even explain. So it’s no surprise that there are a handful of wrapper libraries around, aiming to simplify the process of adding a settings page to your WordPress plugin.
When I created my Instagram WordPress plugin, I built the settings page using the WordPress Settings Framework, created by Gilbert Pellegrom.
A Custom Fields Framework
Talking of PHP frameworks, I wanted to show an alternative approach to creating a settings page without using the WordPress Settings API. When I’m building sites, if I need a settings page I default to using Advanced Custom Fields to create an options page, and then define the fields using ACF.
It’s one of the many reasons I love using ACF: it takes a complicated WordPress thing and makes it simple. You can even use ACF Blocks, to register blocks for the Block Editor without touching React.
However, when building a plugin or theme for distribution, you can’t rely on the user having ACF installed. You could build your plugin to require ACF via Composer, but it isn’t considered a best practice for a WordPress plugin to require another plugin.
Enter the Carbon Fields framework. Unlike ACF, Carbon Fields isn’t a plugin and is generally installed as a library inside a plugin and their recommended approach is using Composer.
Once installed, ensuring you are requiring the Composer autoload.php file if you haven’t already, you need to boot the Carbon Fields library:
<?php

function dbi_load_carbon_fields() {
    \Carbon_Fields\Carbon_Fields::boot();
}
add_action( 'after_setup_theme', 'dbi_load_carbon_fields' );
To replicate what we did above with the WordPress Settings API, it’s as simple as using the following code:
<?php

use Carbon_Fields\Container;
use Carbon_Fields\Field;

function dbi_add_plugin_settings_page() {
    Container::make( 'theme_options', __( 'Example Plugin Page' ) )
        ->set_page_parent( 'options-general.php' )
        ->add_fields( array(
            Field::make( 'text', 'dbi_api_key', 'API Key' )
                ->set_attribute( maxLength, 32 ),
            Field::make( 'text', 'dbi_results_limit', 'Results Limit' )
                ->set_attribute( 'min', 1 )
                ->set_attribute( 'max', 100 )
                ->set_default_value( 10 ),
            Field::make( 'date', 'dbi_start_date', 'Start Date' ),
        ) );
}
add_action( 'carbon_fields_register_fields', 'dbi_add_plugin_settings_page' );
As you can see, the framework makes it extremely easy to make the fields more user-friendly, like adding a default, minimum, and maximum to the “Results Limit” field, as well as turning the “Start Date” field into a date picker – something that would have required a fair bit of coding to achieve with the Settings API.

To use the saved data of a setting, you need to use the carbon_get_theme_option() function:
<?php

$api_key = carbon_get_theme_option( 'dbi_api_key' );
Frameworks can be overkill for smaller sized projects, but they are a great way to achieve a lot with less code, allowing you to concentrate on writing the code for your plugin, and not reinventing the wheel by building another settings page.
Using a Code Generator
Another approach that leverages the WordPress Settings API, along with the ease of use of a framework, is to use a WordPress code generator such as the WordPress Option Page Generator or the premium version of GenerateWP.
Let’s recreate our settings page using the WordPress Option Page Generator. It only supports a handful of field types: text, textarea, select, radio, checkbox, so no date picker either.

Here’s the generated code that I can use directly in my plugin, and use the data in the same way as the WordPress Settings API.
Generators are a very helpful tool to kickstart your plugin with a ready-made settings page, that can be tweaked without requiring extensive coding. They can also be good for learning how things work, picking apart existing code and seeing how it all fits together. However, they might not be the best choice over the long term for a plugin that requires lots of changes to the settings code.
Using the REST API
One of the many great uses for the WordPress REST API is improving your plugin or theme settings screens.
In this excellent article, Josh Pollock dives into how to create a settings page using the REST API and jQuery. I won’t recreate my settings page with this technique, as the article is an extremely thorough tutorial.
The REST API can offer performance benefits over traditional admin-ajax.php requests, and coupled with the improved user experience of clicking ‘Save’ and the form settings being saved in the background without a page refresh, this type of approach feels much more modern than the WordPress Settings API.
Josh notes that as you add settings and your form gets more complicated, “you’re going to be doing more and more with jQuery that is a pain to manage and would be simpler, and provide a better user experience if you used VueJS or React”, which takes me nicely to the next approach, a VueJS powered settings page.
Using VueJS
During the process of acquiring my WordPress membership plugin, I investigated the codebase to see how it was written and discovered the settings page was powered by a package that uses the REST API and VueJS – wp-optionskit:

The package can be installed with Composer, and the settings page instantiated and configured using the code found here. This is what our example settings page would look like:

What I like about this approach is that it allows you to generate complex settings pages, with multiple tabs and subsections, just by configuring arrays of data in PHP. Like some of the other approaches, the settings data is stored in one record in the options table, so it’s a familiar approach to retrieving and using the saved data.
Using React
As we’ve seen with wp-optionskit, using the REST API opens the door for using VueJS or React extensively in the WordPress admin.
I wrote the first version of this article in 2020, at a time when there just weren’t that many React frameworks around. Today, you’ve got quite a few options to consider. In fact, you might already have a preferred React framework that you can use. However, the most straightforward method is to simply use wp-scripts. It’s a set of scripts and tools that’s dedicated to building React applications for WordPress.
It’s specifically designed for building WordPress plugins and themes, so it provides built-in support for WordPress APIs and conventions. I strongly suggest digging into the documentation for @wordpress/scripts if you want to go this route, but here’s the basic process:
- Install
wp-scripts: Runnpm install @wordpress/scriptsto installwp-scripts. - Create a new plugin: Run
npx @wordpress/scripts create-plugin my-pluginto create a new plugin with a basic structure. - Build your plugin: Run
npm run buildto build your plugin. - Enqueue your script: Use the
wp_enqueue_scriptfunction to enqueue your script in the WordPress admin area.
Wrapping Up
As with all things development, there’s many ways to achieve the same thing, and the approach you choose for one project might be different for another. My personal favorite at the moment is wp-optionskit, as it allows multiple settings tabs and subsections, and a nicer user experience on save.
What is the approach you use for creating WordPress settings pages for your plugins? Have I missed any popular options? Let us know in the comments.