


WordPress multisite networks offer flexibility, but a subsite often needs its own single installation for client needs, scaling, or simplified management. Separating a subsite is complex due to Multisite’s unique database structure, making manual migrations prone to errors, especially with serialized data. In this article, we look at the precise steps to migrate a subsite using WP Migrate Lite, and discuss the advanced automation and time-saving features available with WP Migrate.
The Unique Nature of Multisite Subsite Data
Migrating a subsite isn’t a simple copy-and-paste job because of how WordPress Multisite stores data. Unlike single WordPress installations, a multisite network uses a combination of shared and unique database tables.
- Shared Tables: The main network (site ID 1) uses standard WordPress tables like
wp_options,wp_users,wp_usermeta,wp_posts, etc. These tables often contain data relevant to the entire network or default settings. - Unique Subsite Tables: Each subsite within the network has its own set of dedicated tables. These tables are prefixed with
wp_X_, whereXrepresents the unique numerical ID of that specific subsite (e.g.,wp_2_posts,wp_3_options). These tables hold all the content, settings, and user data specific to that individual subsite.
The importance of precision here cannot be overstated. A successful split demands the careful extraction of only the subsite’s relevant data. This includes its wp_X_ tables and, often, a subset of the wp_users and wp_usermeta tables if you intend to migrate specific users with the subsite. Furthermore, meticulous URL replacement is critical to prevent broken links and corrupted content after the migration.
Attempting this manually with raw SQL exports and basic find-and-replace operations is highly risky. WordPress stores a lot of data in a serialized format. This means simple text replacements can corrupt the data structure, leading to broken widgets, theme settings, and plugin configurations. This is where tools like WP Migrate become invaluable, as they are specifically designed to handle serialized data safely during migrations.
Pre-Migration Checklist: Essential Preparations
Thorough preparation is paramount for any migration. Skipping these steps can lead to data loss or significant headaches down the line.
1. Create a Full Backup of Your Entire Multisite Network
This is the single most crucial step. Before you touch anything, create a complete backup of your entire multisite network. This includes:
- All Database Tables: Both shared and subsite-specific.
- All Files: Your
wp-contentdirectory (themes, plugins, uploads), core WordPress files, and any custom files (e.g.,.htaccess,wp-config.php).
For a full site backup, consider your hosting provider’s backup solutions or a dedicated backup plugin. This backup is your safety net, allowing you to revert if anything goes wrong.
2. Choose Your Destination Environment
Determine where your subsite will live as a single installation. This could be a new hosting provider and domain, a new domain on your existing hosting, or a local development environment like Local. It’s worth noting that Local integrates with WP Migrate.
Ensure your chosen destination meets the minimum WordPress requirements (PHP version, MySQL version, etc.).
3. Create a Fresh WordPress Single Site Installation
On your chosen destination, perform a completely fresh installation of WordPress. It’s critical that this is a clean install, without any existing content, themes, or plugins (other than the default ones). This provides a clean slate for your migrated subsite data.
4. Install WP Migrate Lite on Both Sites
To facilitate the migration, you’ll need WP Migrate Lite installed and activated on your source multisite network, and on the single-site destination.
Having WP Migrate Lite on both ends will enable the smooth export from the multisite and prepare the destination for the incoming data.
Step-by-Step Guide: Migrating a Subsite with WP Migrate Lite
Now that your preparation is complete, let’s dive into the core migration process using WP Migrate Lite.
Exporting the Subsite Database from the Multisite
The first critical step is to accurately export only the necessary database tables from your multisite network.
Access WP Migrate Lite
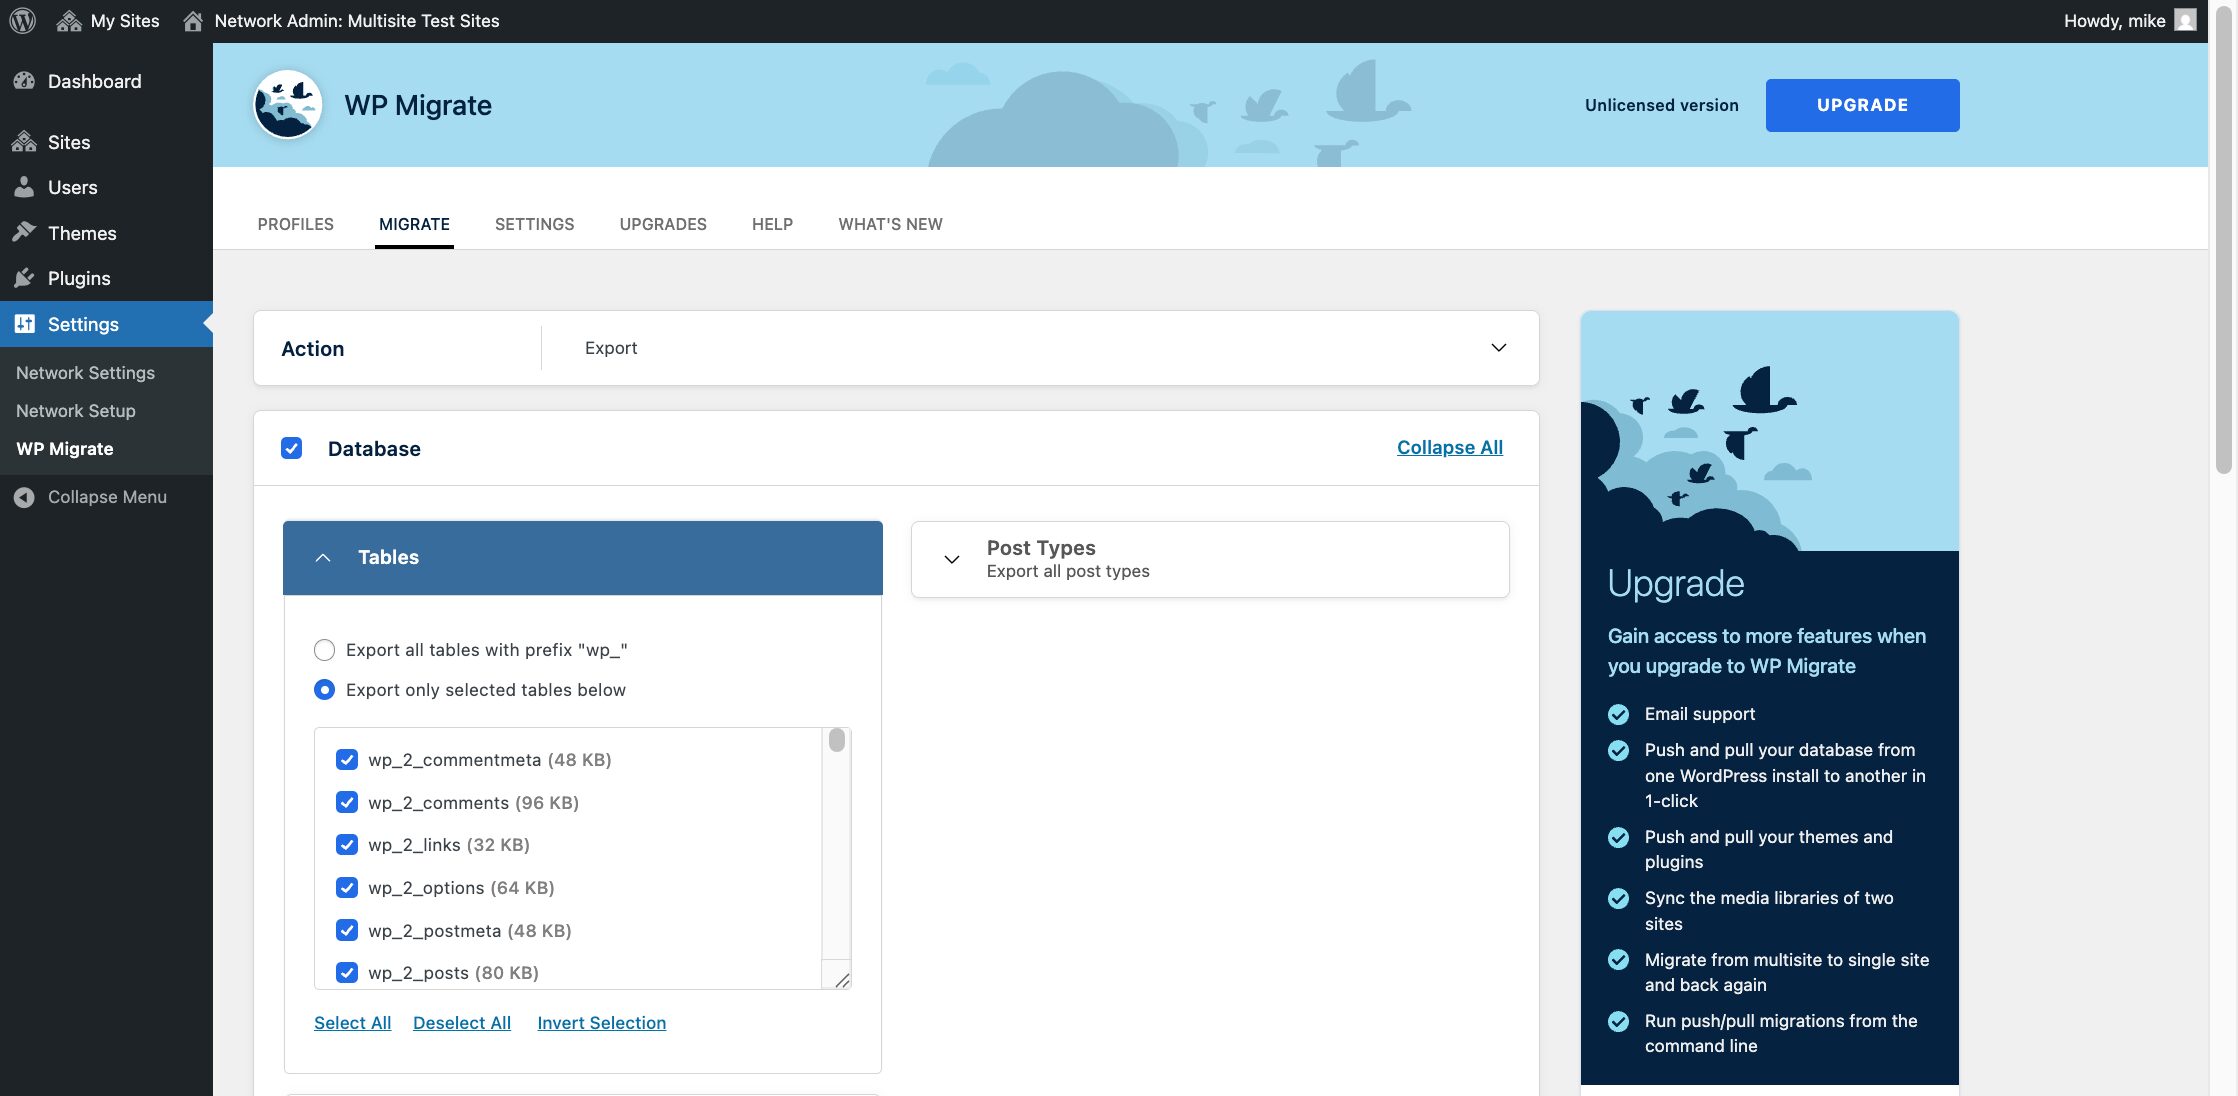
Log in to your multisite network’s WordPress admin area. Navigate to Settings > WP Migrate to go to the WP Migrate Lite dashboard.
Target the Subsite’s Database Tables
This is the most crucial part of a multisite split. You must select only the tables associated with the specific subsite you are migrating.
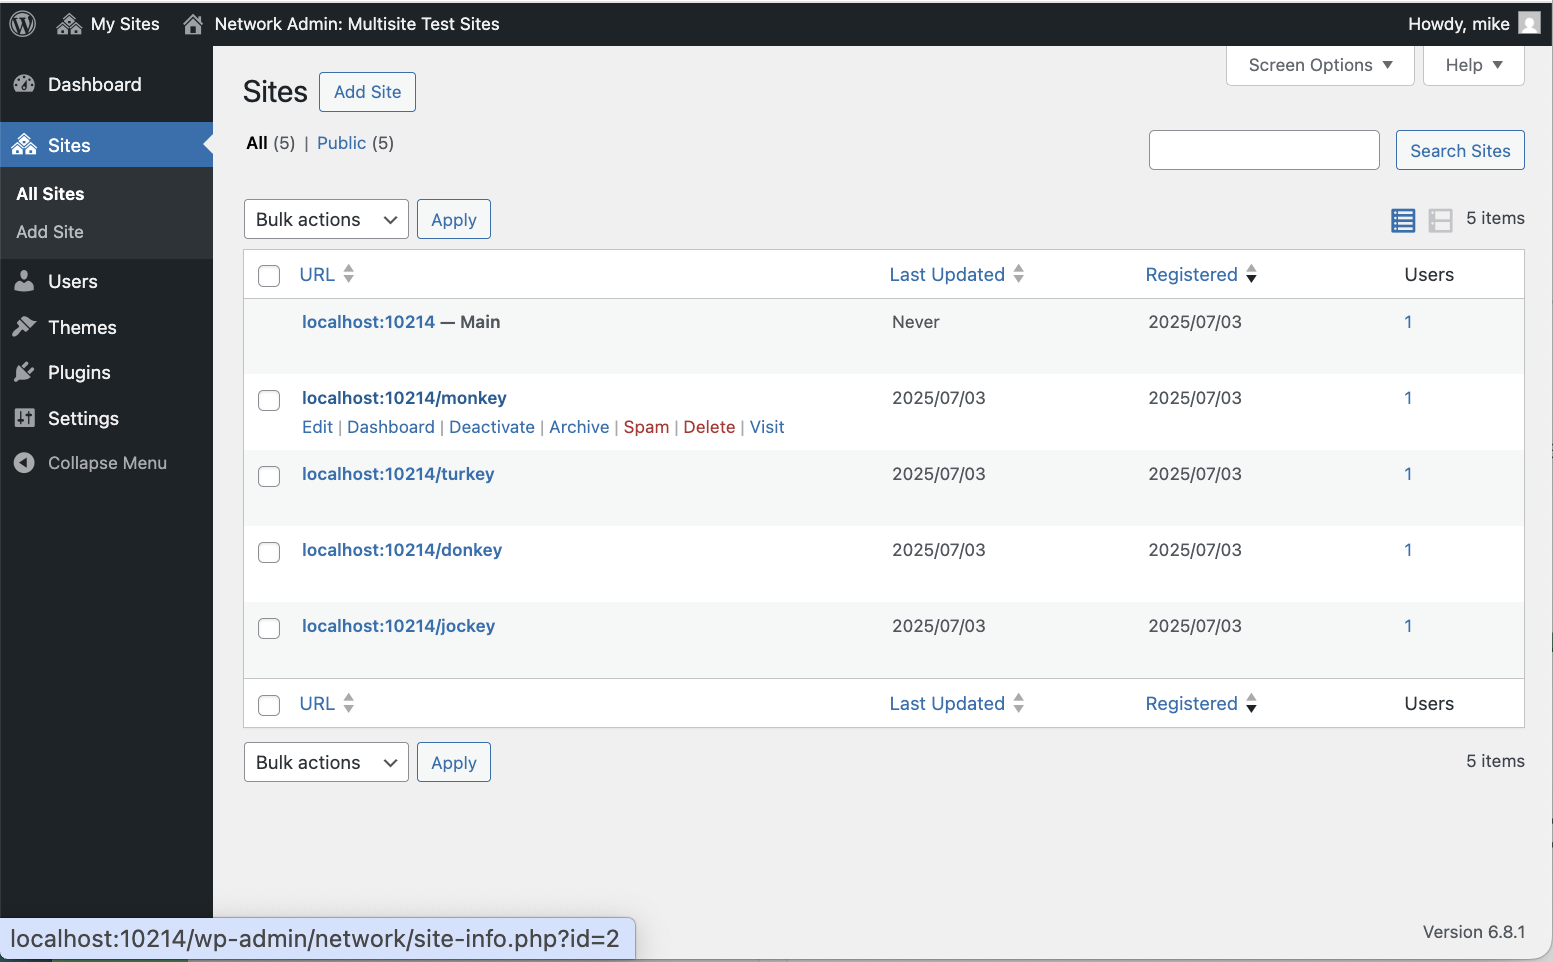
To identify your subsite’s unique ID, go to Sites > All Sites. Hover over the subsite you intend to migrate, and its ID will appear in the URL preview (for example, site-edit.php?id=X, where X is the ID).
Next, return to the WP Migrate interface. Click on the Migrate tab, and then click Export. Open the “Tables” dropdown, and click Export only selected tables below.
WP Migrate defaults to selecting all of the tables. It’s certainly possible to manually deselect all of the tables you don’t want to migrate, but it’s probably easier to just click Deselect All and then select only those tables that begin with wp_X_ (where X is your subsite’s ID). In other words, if your subsite ID is 2, you would select tables like wp_2_posts, wp_2_options, and wp_2_terms.
Additionally, you will typically need to include the main network’s wp_users and wp_usermeta tables if you intend to migrate the existing users of that subsite, and potentially other users, to the new single installation. If you plan to create new users on the destination and only need the subsite’s content, these tables can be omitted.
Perform Find & Replace for URLs
WP Migrate’s find and replace feature is vital for updating all instances of your old subsite URL to the new single site URL.
In the “Find” field, enter the full URL of your subsite on the Multisite network. This could be a subdirectory (e.g., https://your-main-domain.com/subsite-name/) or a subdomain (e.g., https://subsite.your-main-domain.com/). In the “Replace” field, enter the full URL of your new single site installation, such as https://new-subsite-domain.com/. WP Migrate automatically manages serialized data during this process, ensuring no data corruption occurs.
Configure Export Options
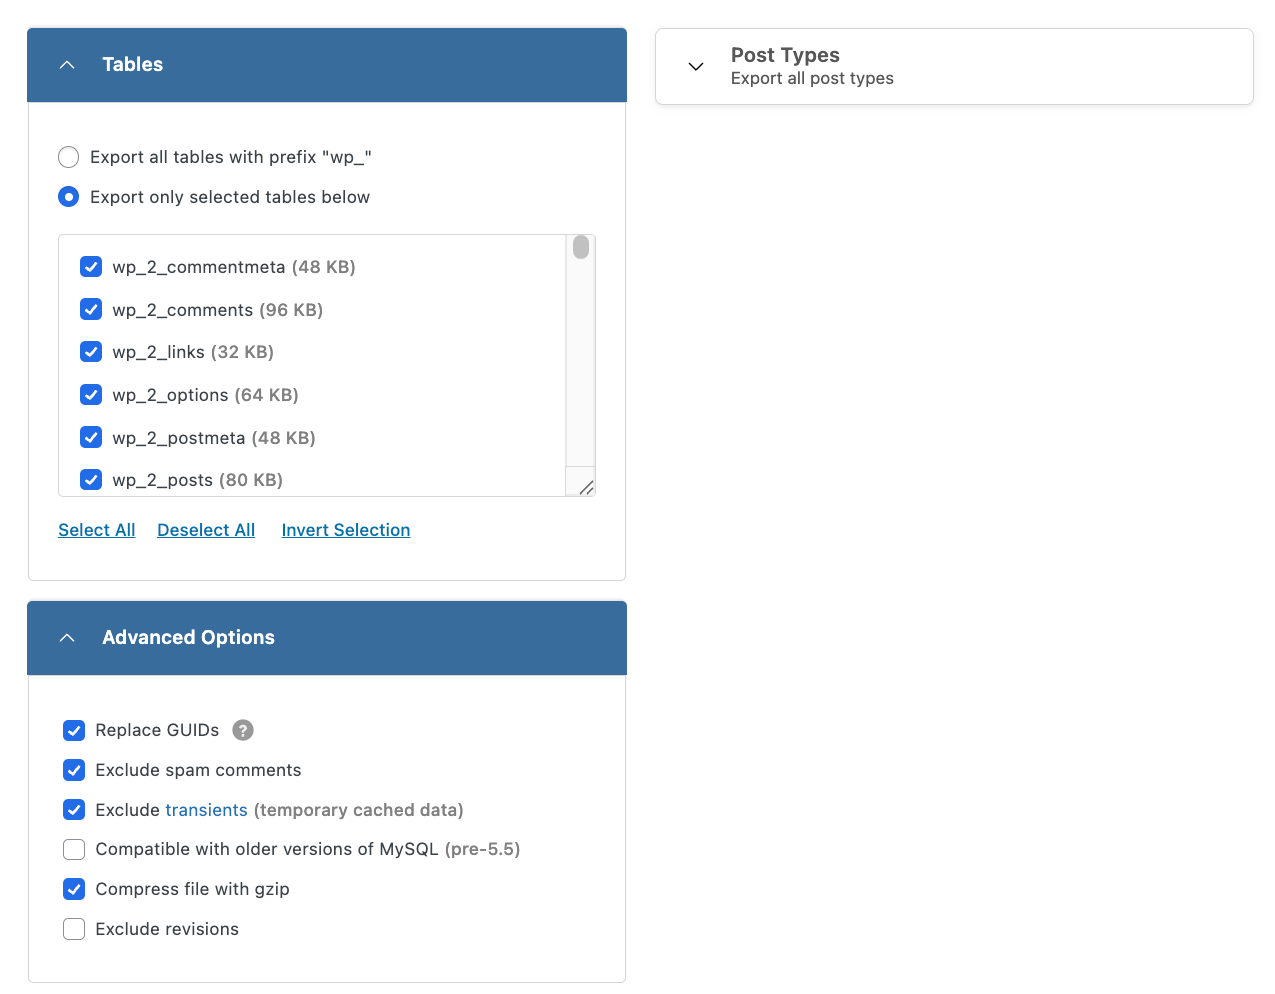
When configuring export options, the plugin will generate an SQL file by default. The “Advanced Options” section provides checkboxes to refine this SQL export. You may choose to Exclude spam comments and Exclude transients to help keep your new database cleaner and reduce its size. The “Compress file with gzip” option will create a smaller .gz archive of your SQL file.
The “Replace GUIDs” box is checked by default. GUIDs are typically not changed on live sites, but in the specific case of splitting a subsite from a multisite to a new standalone installation, updating GUIDs is recommended. This ensures the new site’s content correctly references its new domain and maintains its independence from the old multisite structure.
Initiate Export
Finally, initiate the export by clicking Export. WP Migrate Lite will process the selected tables, generate an SQL file, and download it to your local machine. This file contains all the database content for your subsite, pre-processed with the new URLs.
Preparing and Importing into the New Single Site
With your subsite’s database exported, the next step is to prepare your new single WordPress installation and import the data.
Access New Site’s Database
Log into phpMyAdmin or your hosting provider’s equivalent database management tool for the new, fresh single WordPress installation. Ensure you are connected to the correct database associated with your new site.
Clear Existing Tables
This is a critical step. Before importing your subsite’s data, you must clear the existing tables in the new database. Proceed with extreme caution here, as this will permanently delete all data in the selected database. Select all tables in the new single site’s database (which are typically prefixed with wp_) and use the “Drop” or “Delete” function to remove them. This creates a clean slate for the incoming subsite data.
Import and Verify
The exact method you use to do this will depend on the tool you’re using and/or your host.
After the import is complete, briefly browse the tables in your new database. You should now see the subsite’s tables (which WP Migrate automatically re-prefixes to the standard wp_ during export) present, containing your subsite’s content.
Migrating Media Files, Themes, and Plugins
WP Migrate Lite gives you the option of exporting your media files, themes, plugin and WordPress core files from within the dashboard. However, in the specific case of splitting a site off of a multisite install, transferring your media files, themes, and plugins requires manual steps when using the Lite version. This approach ensures precise control over the subsite’s specific assets and avoids potential complexities that can arise when using the full site export functionality for a multisite split.
WP Migrate allows you to use .gitignore patterns to exclude specific files from a migration, however this won’t transform the file paths from a multisite structure to a single site structure during export.
For a multisite subsite, manually transferring ensures you correctly extract only the subsite’s media (from its unique wp-content/uploads/sites/X/ directory) and place it in the standard wp-content/uploads/ directory of the new single site. Similarly, while WP Migrate Lite allows for the selection of individual themes and plugins for export, ensuring their seamless integration and correct pathing after a subsite split is best achieved by installing fresh copies or manually placing them.
Media Files
Your subsite’s media files are stored in a specific location within the multisite’s wp-content/uploads/ directory. To transfer these, connect to your multisite network via FTP or SFTP.
Navigate to the wp-content/uploads/sites/X/ directory, where X represents your subsite’s unique ID. Download the entire contents of this sites/X/ folder to your local machine.
Once downloaded, connect to your new single site via FTP or SFTP. Upload the previously downloaded media files directly into the wp-content/uploads/ directory on the new site. The sites/X/ structure is no longer necessary in a standard single site installation.
Themes
First, identify the theme that was active on your subsite within the multisite network. The most reliable method for transferring this is to install a fresh copy of the same theme directly onto your new single site through the WordPress admin interface. If the theme is custom, you will need to download the theme folder from wp-content/themes/ on your multisite and then upload it to wp-content/themes/ on your new single site. After the theme is successfully transferred to your new site, activate it from the Appearance > Themes section of the WordPress admin.
Plugins
Begin by making a comprehensive list of all plugins that were active on your subsite in the multisite network. Similar to themes, the best practice is to install fresh copies of these plugins directly on your new single site. For any custom or premium plugins, download their respective folders from wp-content/plugins/ on your Multisite and then upload them to wp-content/plugins/ on your new single site. Once installed, activate the necessary plugins from the “Plugins” section of your new WordPress admin.
Post-Migration Steps
After the database and files are in place, a few final steps are necessary to ensure your new single site functions correctly.
Re-Save Permalinks
This is a crucial step to refresh WordPress’s rewrite rules. Log into the new single site’s WordPress admin, go to Settings > Permalinks, and click Save Changes. You don’t need to make any actual changes to the permalink structure, just saving it will regenerate the .htaccess file or the equivalent rules for Nginx.
Thorough Testing
Dedicate time to comprehensively test your newly migrated site. Browse all pages and posts to ensure content displays correctly. Check all internal links, images, and embedded media to confirm they point to the new domain. Test forms, comments, and any custom functionality specific to your subsite, and verify user logins and roles.
Delete Old Subsite
Once you are absolutely confident that your new single site is fully functional and stable, you can safely delete the original subsite from your Multisite network. This step should only be performed after extensive testing and confirmation that the migration was successful.
Streamline and Automate with WP Migrate
WP Migrate Lite gives you a good foundation for splitting a multisite subsite, but WP Migrate makes the entire process practically painless with time-saving features and powerful automation that are invaluable for professional developers and agencies. These premium advantages transform a multi-step manual process into a streamlined, often one-click, operation.
One-Click Subsite Push/Pull
This is arguably the most significant game-changer offered by WP Migrate Pro, specifically through its Multisite Tools. .
Instead of manually exporting a database, clearing tables, importing, and then separately transferring files via FTP, WP Migrate allows you to directly “push” a subsite from your network to a fresh single site installation. Conversely, you can also “pull” a single site into a subsite on your network.
This functionality automates the entire database and file transfer process between the two sites, eliminating the need for tedious manual FTP operations for media, themes, and plugins. It intelligently handles all the underlying complexities, including serialized data, making the migration incredibly efficient and less prone to human error.
Automated File Migration
Beyond the database, WP Migrate seamlessly handles the comprehensive transfer of all associated files. This means your media library, active themes, and installed plugins are migrated directly between your multisite and the new single installation. This automated file handling negates the need for manual downloading from wp-content/uploads/sites/X/ and re-uploading to the new site’s wp-content/uploads/ directory, saving substantial time and ensuring all assets are correctly linked and available on the new standalone site.
WP-CLI Integration for Scripting
For developers who manage numerous migrations or integrate them into their deployment workflows, WP Migrate’s WP-CLI integration is a powerful asset. This allows you to execute and automate the entire migration process from the command line. You can script complex migration routines, making it incredibly efficient for repetitive tasks, continuous integration, or managing large-scale deployments without needing to interact with the WordPress admin interface.
Granular Control and Targeted Migrations
WP Migrate offers even finer control over your migrations. While WP Migrate Lite allows table selection, the premium version provides more advanced options for precisely including or excluding specific database tables and even particular post types. This granular control is especially useful for complex scenarios where you only need to migrate a subset of data, ensuring your new single site is as lean and optimized as possible from the outset.
Wrapping Up
Splitting a subsite from a multisite network is more straightforward with the right tools. WP Migrate Lite provides the essential functionality for database export, intelligent URL replacement, and manual file transfer.
For professional developers and agencies, the premium version, WP Migrate, offers much greater automation and efficiency. Its one-click push/pull capabilities, automated file migration, WP-CLI integration, and granular control over data ensure that even the most challenging multisite splits become seamless operations.
Have you split off part of a multisite into a single-site installation? How did it go, and which tools did you use? Let us know in the comments!