WordPress functionality is largely defined by the available plugins, and many clients want functionality that’s best served with a custom plugin. The initial setup is often a tedious affair, with a lot of what’s needed not varying much from plugin to plugin. In this article, I take a look at four of the most popular tools to quickly bootstrap new plugins using plugin boilerplates.
It’s important to note the difference between a plugin boilerplate and template files loaded by a plugin. A plugin boilerplate serves as a starting point for plugin development by preloading a lot of what you’ll need for further development. Template files loaded by a plugin are PHP files that also include HTML and Template Tags in addition to the PHP code.
This article will look at four options for creating plugin boilerplates. If there’s a particular option you’re interested in, feel free to jump straight to that review.
- Review Criteria
- WP-CLI Scaffold Plugin Command
- hlashbrooke/WordPress-Plugin-Template
- DevinVinson/WordPress-Plugin-Boilerplate
- Plugin Machine
- Wrapping Up
Review Criteria
Ease of setup is key, but this article will also look at how many and what kind of options the plugin boilerplate creator provides, and how much manual work you’d have to do to make the output your own.
I’m also going to dig into other features it may offer, such as task runners, build tools, and testing. Each review will also make sure to note whether there’s a cost involved with any of these tools.
Finally, each review will look at the tool’s intended audience. There’s a big difference between someone who just wants a “bare bones” plugin that they can manually customize and a full-blown solution with frontend templating, admin options, etc. I’ll give you my opinion on where each option fits into that range.
WP-CLI Scaffold Plugin Command
The wp scaffold command is essentially a code generator. You can use it to create code for post types, taxonomies, plugins, child themes, and so on. You’ll need to have WP-CLI installed to use it.
WP-CLI commands require a subcommand to do anything useful. In this case, the subcommand is plugin. Just using the command and the subcommand will create a WordPress plugin and all of its associated files. It won’t do anything, but it’s definitely a plugin.
You can also include options with the command. Again, these don’t actually add any functionality to the plugin, but they’ll help fill in some information.
A word of warning. The first option after the subcommand will set the plugin’s slug. I’m using myplugin here because I have no intention of developing this plugin any further and the only place it will ever appear will be in this article. This is important, because while you can change the name of a plugin later, you can’t change the slug once it’s in the WordPress plugin repository. If you go with something like super-sexy-plugin, then that’s what it will be forever and ever.
I’m also going to use --plugin_description to let people know what it does, as well as --plugin_author and --plugin_author_uri so they know who to blame.
wp scaffold plugin myplugin --plugin_name=My_Plugin --plugin_description=Nothing --plugin_author=mediummikeyd --plugin_author_uri=https://profiles.wordpress.org/mediummikeyd
Success: Created plugin files.
Success: Created test files.
I checked the admin on my test site and it’s there, right next to a useful plugin that actually does something.

The wp scaffold plugin command creates a bunch of files every time you use it, including a readme.txt and package.json. To add functionality to your new plugin, look for a PHP file named after your plugin’s slug.
<?php
/**
 * Plugin Name:     My_Plugin
 * Plugin URI:      PLUGIN SITE HERE
 * Description:     Nothing
 * Author:          mediummikeyd
 * Author URI:      https://profiles.wordpress.org/mediummikeyd
 * Text Domain:     myplugin
 * Domain Path:     /languages
 * Version:         0.1.0
 *
 * @package         Myplugin
 */

// Your code starts here.
WP Scaffold Plugin Pros and Cons
Assuming you already have WP-CLI installed, there’s really no setup at all. Just open your terminal and you can create a plugin in less than 60 seconds.
The options, such as they are, are somewhat limited. You can insert URLs and descriptions on the command line, but frankly I found it easier to edit those in the PHP file itself.
I ran into trouble trying to provide a good description of the plugin through WP-CLI, as it kept popping up warnings about having too many positional arguments. A couple of minutes in the PHP file and I had it whipped into better shape:

On the plus side, it’s really easy to use, it’s fast, and it’s free. The wp scaffold plugin command is a great starting point for building your plugins if you’re comfortable on the command line and don’t need a lot of fancy options.
hlashbrooke/WordPress-Plugin-Template
This is the first of two GitHub repos that I’ll look at in this article. Initially created by Hugh Lashbrooke, the repo contains all the files you need to create a WordPress plugin that complies with standards.
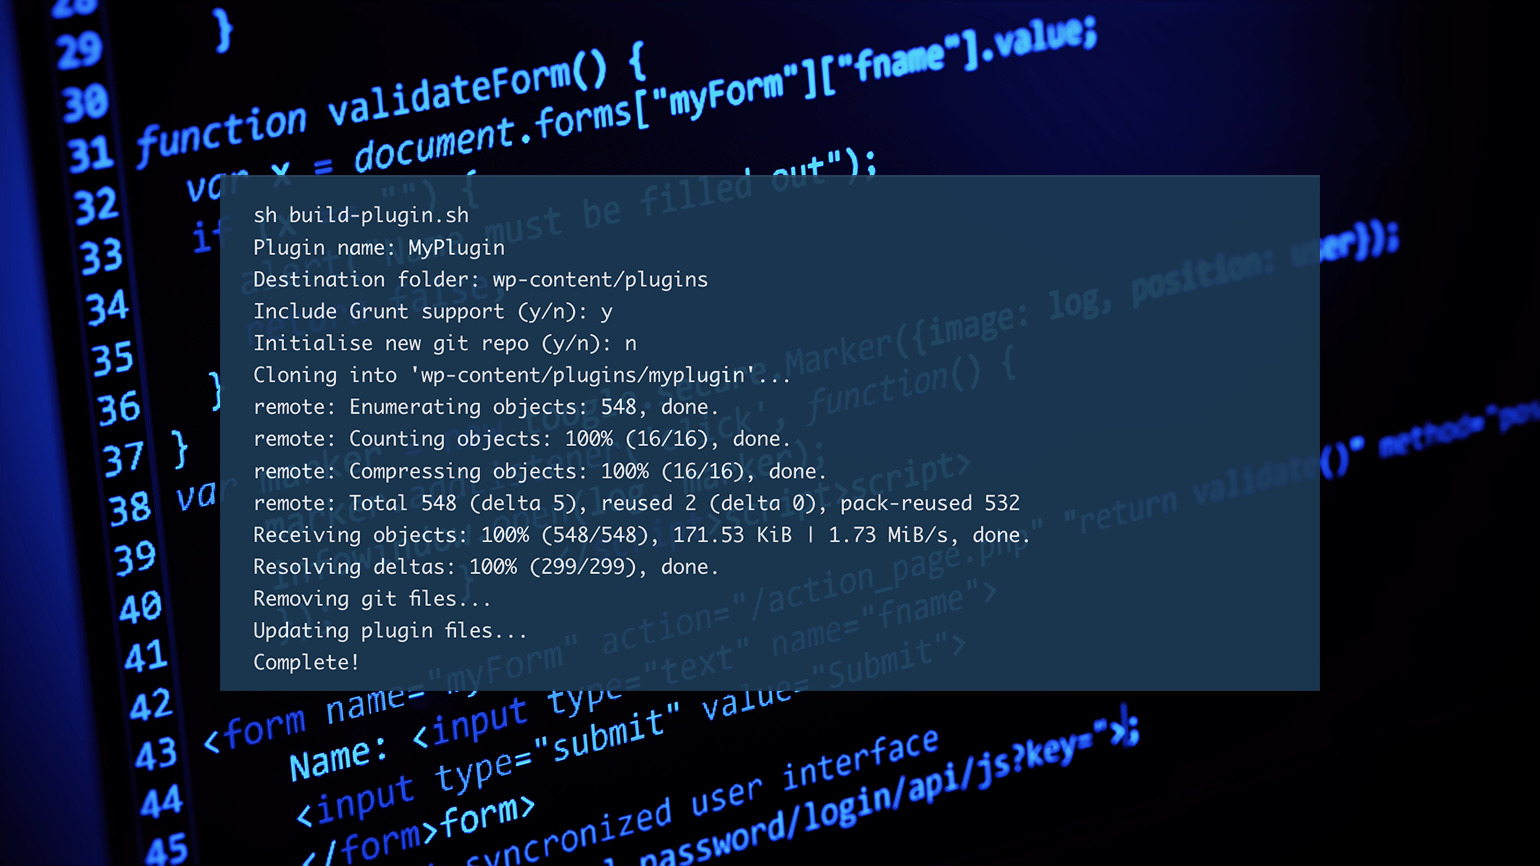
You can copy the entire repo, rename everything, and you should be up and running with your new plugin template. However, there’s also a shell script included that does all of this for you, and even initializes a new git repo if you want.
I decided to go with the shell script, so I copied it and placed it in my root WordPress directory. Then I ran the script:
sh build-plugin.sh
Plugin name: MyPlugin
Destination folder: wp-content/plugins
Include Grunt support (y/n): y
Initialise new git repo (y/n): n
Cloning into 'wp-content/plugins/myplugin'...
remote: Enumerating objects: 548, done.
remote: Counting objects: 100% (16/16), done.
remote: Compressing objects: 100% (16/16), done.
remote: Total 548 (delta 5), reused 2 (delta 0), pack-reused 532
Receiving objects: 100% (548/548), 171.53 KiB | 1.73 MiB/s, done.
Resolving deltas: 100% (299/299), done.
Removing git files...
Updating plugin files...
Complete!
The plugin was immediately available on my test site, with the authorship attributed to Hugh Lashbrooke. To be fair, the GitHub repo has done all the work so far.

A quick look at the PHP file shows that this template gives you more than the wp scaffold plugin command does. It automatically loads both classes and libraries, and the shell script lets you activate Grunt support automatically.
<?php
/**
 * Plugin Name: MyPlugin
 * Version: 1.0.0
 * Plugin URI: http://www.hughlashbrooke.com/
 * Description: This is your starter template for your next WordPress plugin.
 * Author: Hugh Lashbrooke
 * Author URI: http://www.hughlashbrooke.com/
 * Requires at least: 4.0
 * Tested up to: 4.0
 *
 * Text Domain: myplugin
 * Domain Path: /lang/
 *
 * @package WordPress
 * @author Hugh Lashbrooke
 * @since 1.0.0
 */

if ( ! defined( 'ABSPATH' ) ) {
    exit;
}

// Load plugin class files.
require_once 'includes/class-myplugin.php';
require_once 'includes/class-myplugin-settings.php';

// Load plugin libraries.
require_once 'includes/lib/class-myplugin-admin-api.php';
require_once 'includes/lib/class-myplugin-post-type.php';
require_once 'includes/lib/class-myplugin-taxonomy.php';

/**
 * Returns the main instance of MyPlugin to prevent the need to use globals.
 *
 * @since  1.0.0
 * @return object MyPlugin
 */
function myplugin() {
    $instance = MyPlugin::instance( __FILE__, '1.0.0' );

    if ( is_null( $instance->settings ) ) {
        $instance->settings = MyPlugin_Settings::instance( $instance );
    }

    return $instance;
}

myplugin();
hlashbrooke/WordPress-Plugin-Template Pros and Cons
Copying a repo isn’t that difficult, but you’ll have to rename everything manually. The shell script is a nice touch, as it does all of that for you. You run the script, answer a few questions, and you’ve got a plugin. The script can even set it up to include Grunt support and/or initialize a new git repo in the plugin folder.
The plugin generated includes libraries for registering new post types and taxonomies, as well as a library for handling common admin functions.
All in all, it’s slightly more difficult to use than wp scaffold plugin, but not by much, and it gives you a lot more to work with.
DevinVinson/WordPress-Plugin-Boilerplate
Originally created by Tom McFarlin, this repo is currently maintained by Devin Vinson.
Often abbreviated as WPPB, this boilerplate documents all of the classes, functions, and variables so you know what you need to change. It can be installed directly into your plugins folder, but the author advises renaming it and all of its classes to suit your needs. Just as with the other boilerplates we’ve looked at so far, it’s perfectly safe to activate it at this point, as it has no functionality.
However, there’s an even easier way to use this boilerplate. Enrique Chávez has created a site that uses the WPPB repo to generate a zip file with all of the renaming of classes done for you.

The zip file contains all of the same files you would get from the GitHub repo, organized in the same way. The original version of the boilerplate included the file structure you need to host your plugin in the official repository, but the directory structure boilerplate has since been put into its own repo.
<?php

/**
 * The plugin bootstrap file
 *
 * This file is read by WordPress to generate the plugin information in the plugin
 * admin area. This file also includes all of the dependencies used by the plugin,
 * registers the activation and deactivation functions, and defines a function
 * that starts the plugin.
 *
 * @link              https://profiles.wordpress.org/mediummikeyd/
 * @since             1.0.0
 * @package           My_Plugin
 *
 * @wordpress-plugin
 * Plugin Name:       My Plugin
 * Plugin URI:        https://myplugin.com
 * Description:       This plugin does nothing until you add some code.
 * Version:           1.0.0
 * Author:            Mike Davey
 * Author URI:        https://profiles.wordpress.org/mediummikeyd/
 * License:           GPL-2.0+
 * License URI:       http://www.gnu.org/licenses/gpl-2.0.txt
 * Text Domain:       my-plugin
 * Domain Path:       /languages
 */

// If this file is called directly, abort.
if ( ! defined( 'WPINC' ) ) {
    die;
}

/**
 * Currently plugin version.
 * Start at version 1.0.0 and use SemVer - https://semver.org
 * Rename this for your plugin and update it as you release new versions.
 */
define( 'MY_PLUGIN_VERSION', '1.0.0' );

/**
 * The code that runs during plugin activation.
 * This action is documented in includes/class-my-plugin-activator.php
 */
function activate_my_plugin() {
    require_once plugin_dir_path( __FILE__ ) . 'includes/class-my-plugin-activator.php';
    My_Plugin_Activator::activate();
}

/**
 * The code that runs during plugin deactivation.
 * This action is documented in includes/class-my-plugin-deactivator.php
 */
function deactivate_my_plugin() {
    require_once plugin_dir_path( __FILE__ ) . 'includes/class-my-plugin-deactivator.php';
    My_Plugin_Deactivator::deactivate();
}

register_activation_hook( __FILE__, 'activate_my_plugin' );
register_deactivation_hook( __FILE__, 'deactivate_my_plugin' );

/**
 * The core plugin class that is used to define internationalization,
 * admin-specific hooks, and public-facing site hooks.
 */
require plugin_dir_path( __FILE__ ) . 'includes/class-my-plugin.php';

/**
 * Begins execution of the plugin.
 *
 * Since everything within the plugin is registered via hooks,
 * then kicking off the plugin from this point in the file does
 * not affect the page life cycle.
 *
 * @since    1.0.0
 */
function run_my_plugin() {

    $plugin = new My_Plugin();
    $plugin->run();

}
run_my_plugin();
DevinVinson/WordPress-Plugin-Boilerplate Pros and Cons
This boilerplate adds a lot of functionality to the basic template. In addition to the already mentioned libraries, it also includes a versatile class for creating a WordPress options page for your plugin.
There are extensive comments throughout the bootstrap file generated by the repo, showing you precisely what each hook does. Combined with the ease of renaming and file generation provided by wppb.me, this makes WPPB the most beginner-friendly boilerplate I’ve seen so far.
Plugin Machine
Plugin Machine goes a bit further than most of the options we’ve looked at. It not only creates boilerplate, but you can also use it to add features to plugins you’ve already created.
This is also the only tool in this article that you’d have to pay for. Pricing depends on the level of license you want, with “Solo” licenses starting at $15 a month. Plugin Machine also offers a 14-day free trial so you can try it out with purchasing a license.
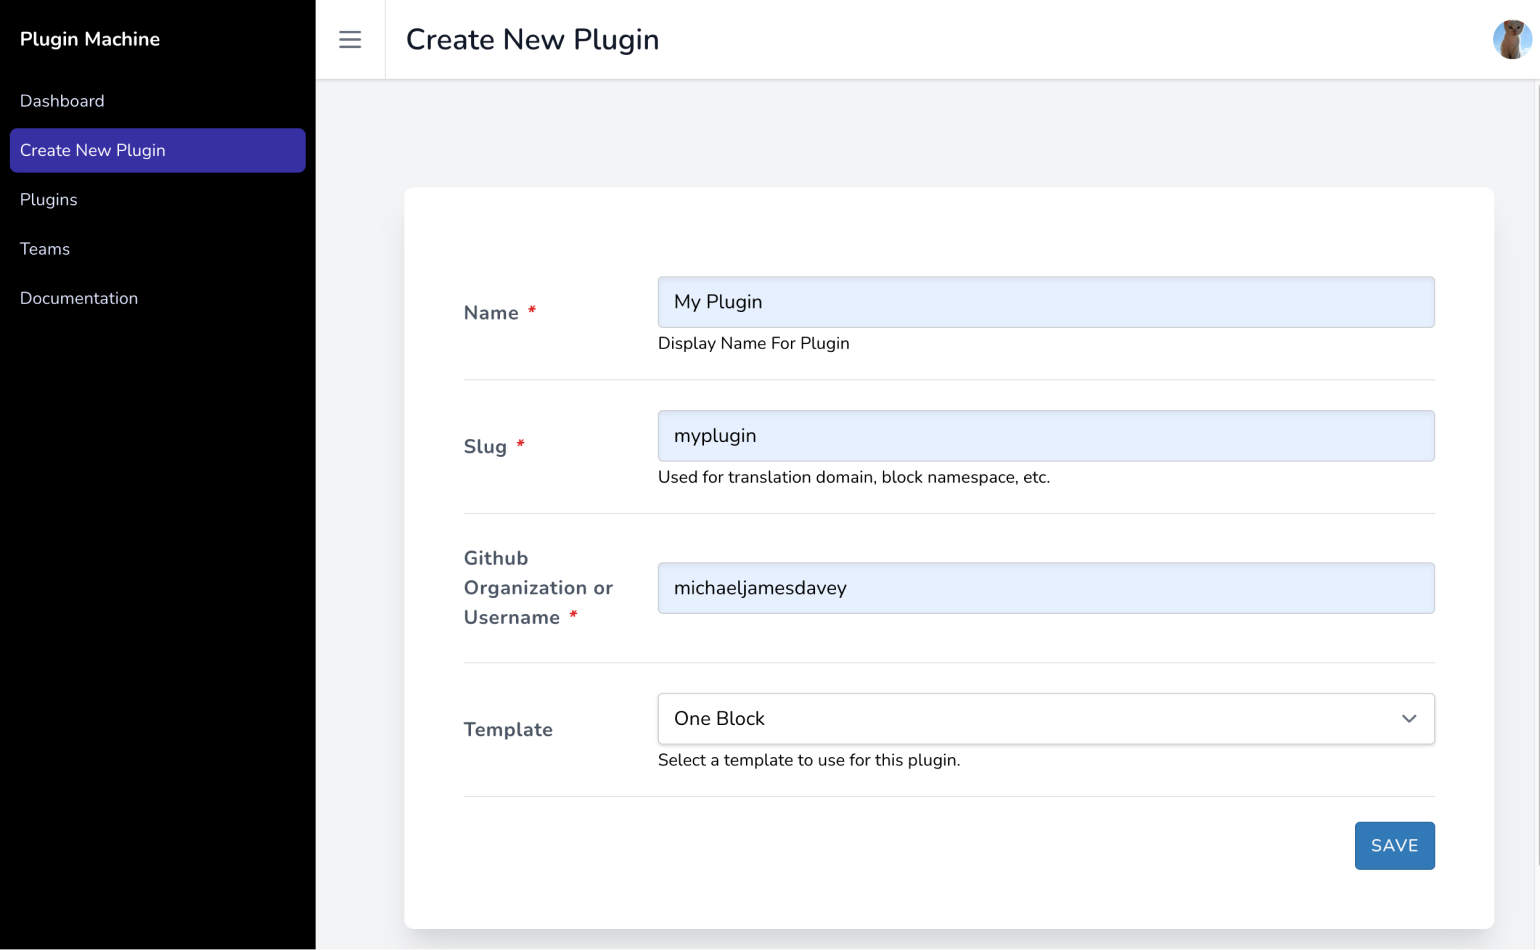
The initial stage of plugin creation with Plugin Machine is similar to the boilerplates I’ve looked at in this article. You’re prompted to enter a name, a slug, and your GitHub organization or username. In addition, though, you can also choose from one of four templates: One block, Block tooling only, All PHP tooling, and React settings app.
The next step is to choose features. Clicking on the information icon next to any of the features opens a short explanation of exactly what that feature does, usually with a “Learn More” link to provide more insight.
- Admin Menu Pages: This adds a menu page in wp-admin that allows users to change your plugin’s settings.
- Blocks: This will allow your plugin to register new block types in Gutenberg. It will configure React build tools for you, as well as documenting them in the plugin’s
readmefile. - Block Plugins: Checking this will produce a plugin that functions as a new block type in Gutenberg.
- Custom Post Types: Checking this box will allow your plugin to register custom post types with their own templates, taxonomies, etc.
- Composer and PHP Tests: Enabling this option allows you to add testing, a PHP autoloader, and a code linter.
- Actions and Filters: This adds a hooks file to your plugin.
- Remote Updater: Enabling this allows you to update the plugin remotely, such as on a client’s site.
I ticked all the boxes and clicked Save. The next step is to configure “Composer and PHP Tests”. Most of the features don’t need any configuration, but including tests requires a PHP namespace and a description of the plugin.
After that, you must fill in your plugin’s name, slug, and your GitHub username or organization. You can also choose to enter the PHP function prefix, block namespace, and translation domain. These last three are optional, but recommended, especially if you plan to distribute your plugin.
Once all the changes are saved, Plugin Machine shows an overview of the current features, with tabs for “Edit Features”, “Versions”, “Plugin Meta”, and “Name Things”. You can add information like plugin author, URL, etc., in the “Plugin Meta” tab. When you’re done reviewing, you can click on Package to move to the next stage.

The packaging step provides a chance to check your metadata again, and offers two ways to get the plugin you’ve created. “Download” provides a link to download the files, as well as instructions for working with them in JavaScript and PHP. The “Create Release” tab links to the documentation on how to create an installable zip file of your plugin using the Plugin Machine CLI.
Plugin Machine Pros and Cons
There’s a lot to recommend Plugin Machine. It’s fast, easy to use, and it goes considerably further than just giving you a boilerplate. You get all the files you’ll need for further development, packaged in a handy zip file, and it even gives you some instructions for how to move forward with it in your local development environment.
Another advantage is that you can easily create a basic plugin with Plugin Machine, duplicate it, and make whatever changes are needed. This could be very handy if you frequently develop plugins for client sites that need minor variations.
Extensive documentation also makes this a great choice for anyone just starting out. The options you’re given are clearly explained, often with links leading to more in-depth information contained in the WordPress Codex.
On the downside, it is the only tool I’ve looked at in this article that carries any sort of cost. This is somewhat improved by the fact that there’s a free trial. You can try it out for free for 14 days and make your own decisions about whether or not it’s worth the money.
Wrapping Up
Which of these options is the best one for you is heavily dependent on how you plan to use it. If you frequently create custom plugins to use on client sites, I would seriously consider Plugin Machine for its ability to quickly create a wide variety of plugins and its ease of modification.
Both of the GitHub repos I looked at are good options as well, with the additional advantage that they’re completely free and open-source. Thanks to the included shell script, hlashbrooke/WordPress-Plugin-Template is very easy to set up. However, I’d rate DevinVinson/WordPress-Plugin-Boilerplate slightly higher for its extensive code comments and the WPPB.me website that’s even easier to use than running a shell script.
Finally, we have wp scaffold plugin. It works just fine, but it doesn’t provide any of the bells and whistles you get with the other options. I can’t see a lot of reasons to use it when there are other options that are also available for free and do more for you when you’re creating the boilerplate. This may still be the best option for you if you just really love WP-CLI.
What do you use to create plugin boilerplates? Did I miss your favorite option? Let me know in the comments.