
Running a site that sends a lot of emails, like an ecommerce or membership site, needs a reliable service to keep up with that volume. Using an existing email provider through SMTP (such as Gmail), means you’ll often hit the rate limits. In this article, we show you how to set up WordPress to use Amazon SES to send your site and transactional emails, as well as techniques to help those emails avoid the recipient’s spam folder.
Why Use Amazon SES?
In short, standard personal email services such as Gmail aren’t designed for mass emailing, especially when you add transactional emails into the mix. You need a lot of bandwidth to send out invoices, password reset emails, support requests, and much more.
The danger is that you’ll hit the rate limit of your service, which isn’t structured to handle the volume and frequency of transactional emails. With Amazon Simple Email Service (SES), you can leverage big tech infrastructure for your WordPress emails.
A big draw of Amazon SES is the pricing structure. Amazon SES starts at a flat rate of $0.10 per 1,000 emails sent, with an additional charge of $0.12 for each GB of attachments. There’s also a free tier that lets you send 62,000 messages per month, but this is only from an application hosted in Amazon EC2.
Here’s how Amazon SES compares to other services. All prices are in USD. We’ll start with a small number of monthly emails, say 50,000 emails per month:
- Amazon SES: $5
- Mailgun: $35
- MailJet: $35
- SendGrid: $19.95
- Brevo: $39 (up to 60,000 emails)
- Postmark: $55
Naturally, the more emails you send, the more you’ll have to pay. Here are the costs of sending 200,000 emails per month on the same services:
- Amazon SES: $20
- Mailgun: $215 (up to 250,000 emails)
- MailJet: $225 (up to 250,000 emails)
- SendGrid: $89.95
- Brevo: $160 (up to 250,000 emails)
- Postmark: $197.50
If you are running a site with a very high volume of emails, say 1 million emails a month, this is what each service would cost:
- Amazon SES: $100
- Mailgun: $700
- SendGrid: $449
- Brevo: $863
- Postmark: $695
MailJet isn’t included in the last list, as their pricing calculator maxes out at 500,000 emails for $425 per month. If you want to go above that, you need to contact them for a quote.
The difference in pricing is dramatic. With Amazon SES, you only pay for what you send. Most other services use tiered pricing, with a certain number of emails baked into your plan. It’s wasteful and inefficient to send fewer emails than the maximum number allowed. Sending more than your plan limit may be even worse for your bottom line, though, as it often carries additional charges.
How to Set Up WordPress for Amazon SES
There are just four steps to setting up WordPress to work with Amazon SES. We’ll also include some information on how our WP Offload SES plugin can help make setup as simple as possible.
1. Sign Up to AWS
First, you’ll need to start an AWS account or sign in to one you already have. You’ll also need to create an Identity and Access Management (IAM) user to generate access keys for Amazon SES.
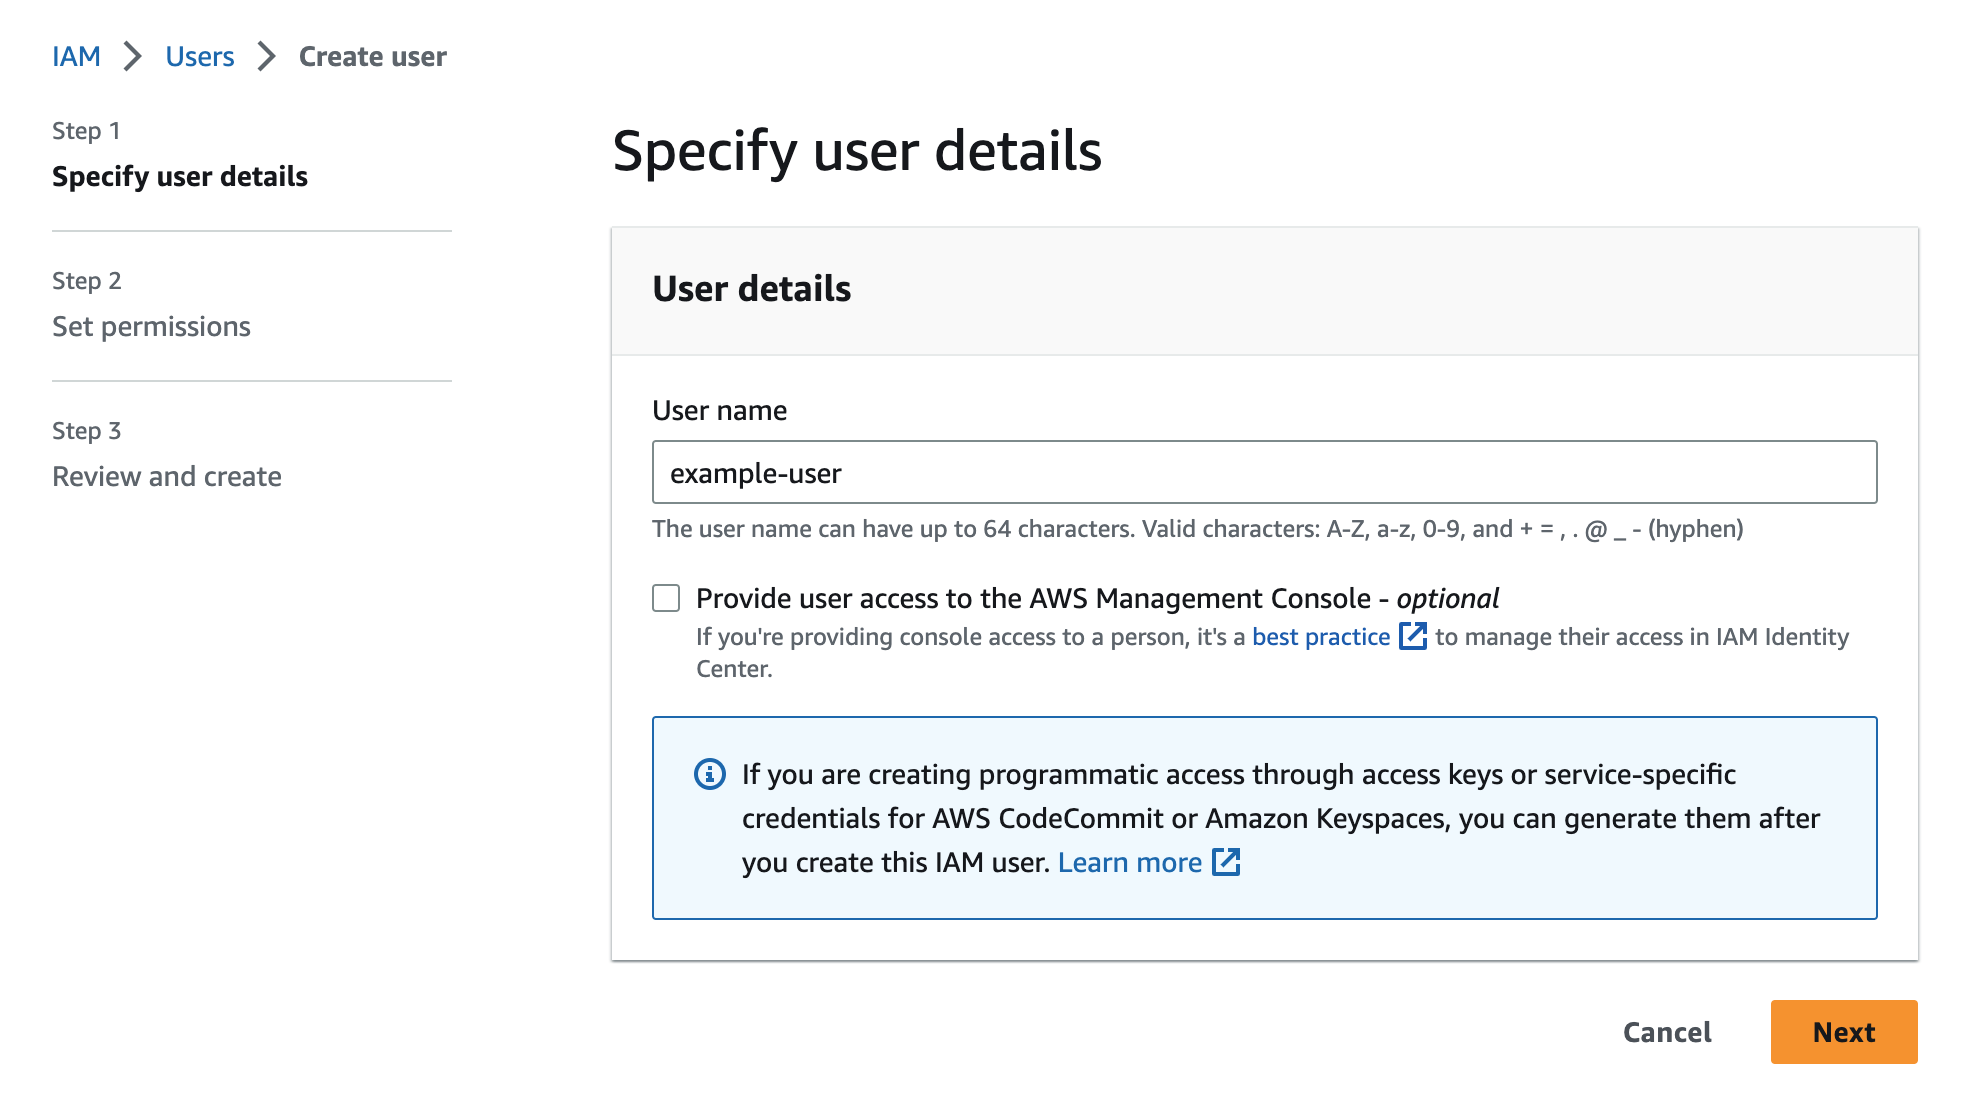
Create an account or login to AWS, and navigate to the Identity and Access Management dashboard. Click Users in the sidebar under “Access management”, and then click Add users in the upper right. Provide a username and click Next.
Do not check the Provide user access to the AWS Management Console – optional box. This setting is not necessary for granting programmatic access.
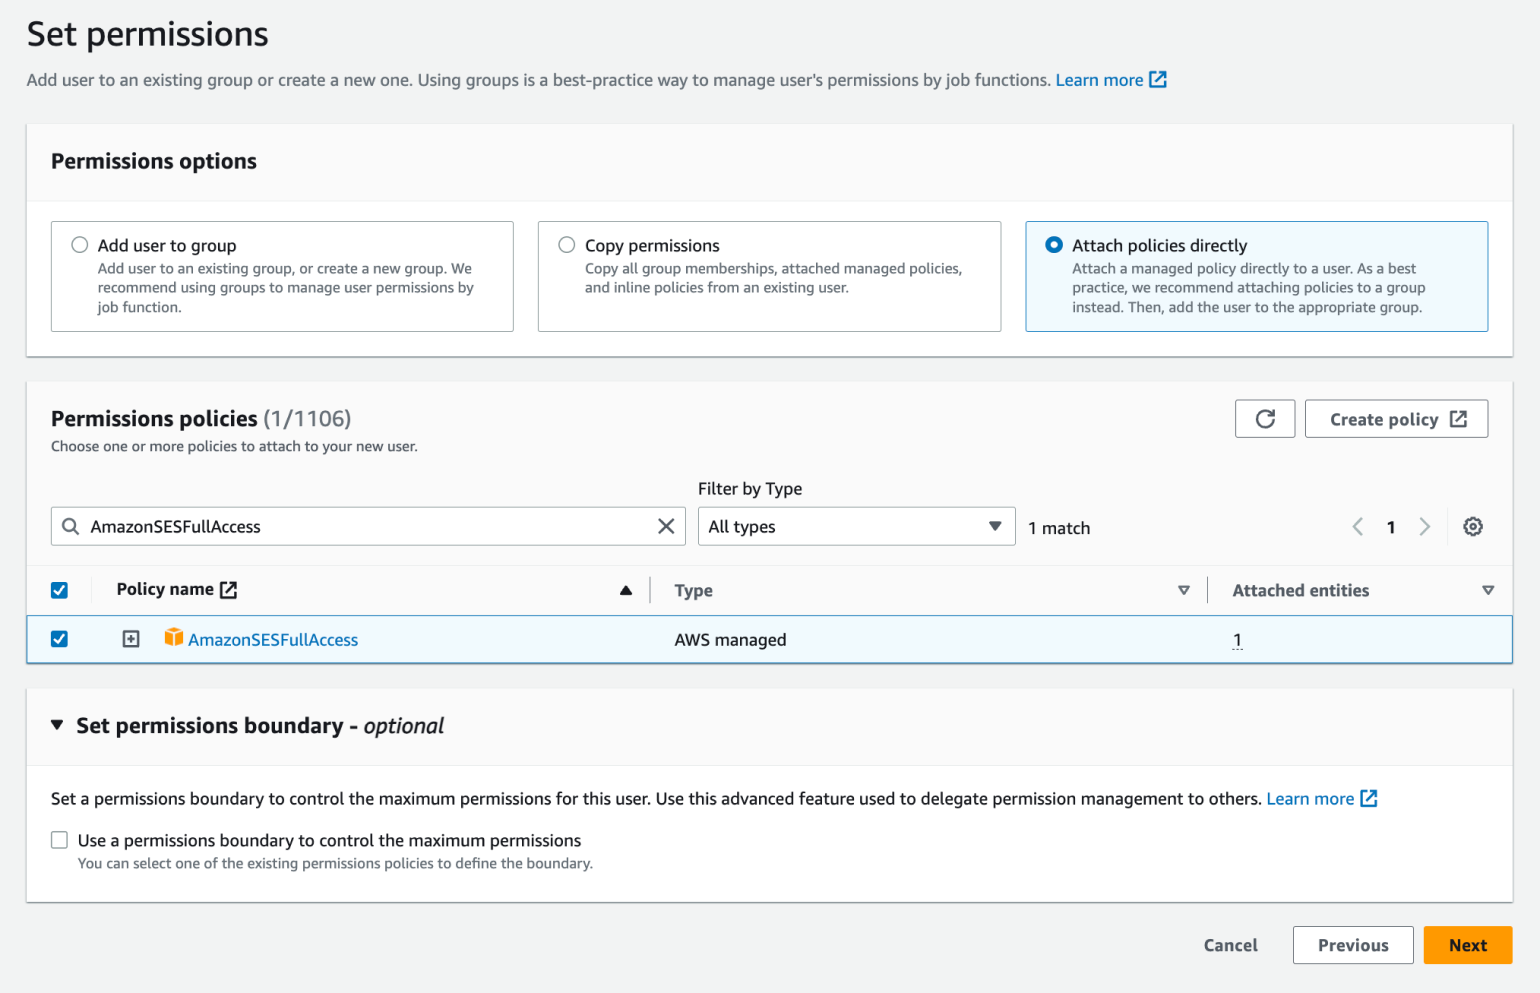
You should now see a screen that allows you to set permissions for the IAM User. Choose Attach policies directly, and type “AmazonSESFullAccess” in the search area to filter the policies. Next, check the “AmazonSESFullAccess” policy in the result list to grant the user full access.
Repeat the process, but this time searching for “AmazonSNSFullAccess”. Check this box as well. This will allow the user to access services related to Amazon’s notifications system, Amazon SNS. Click Next once you have both policies attached to the user.
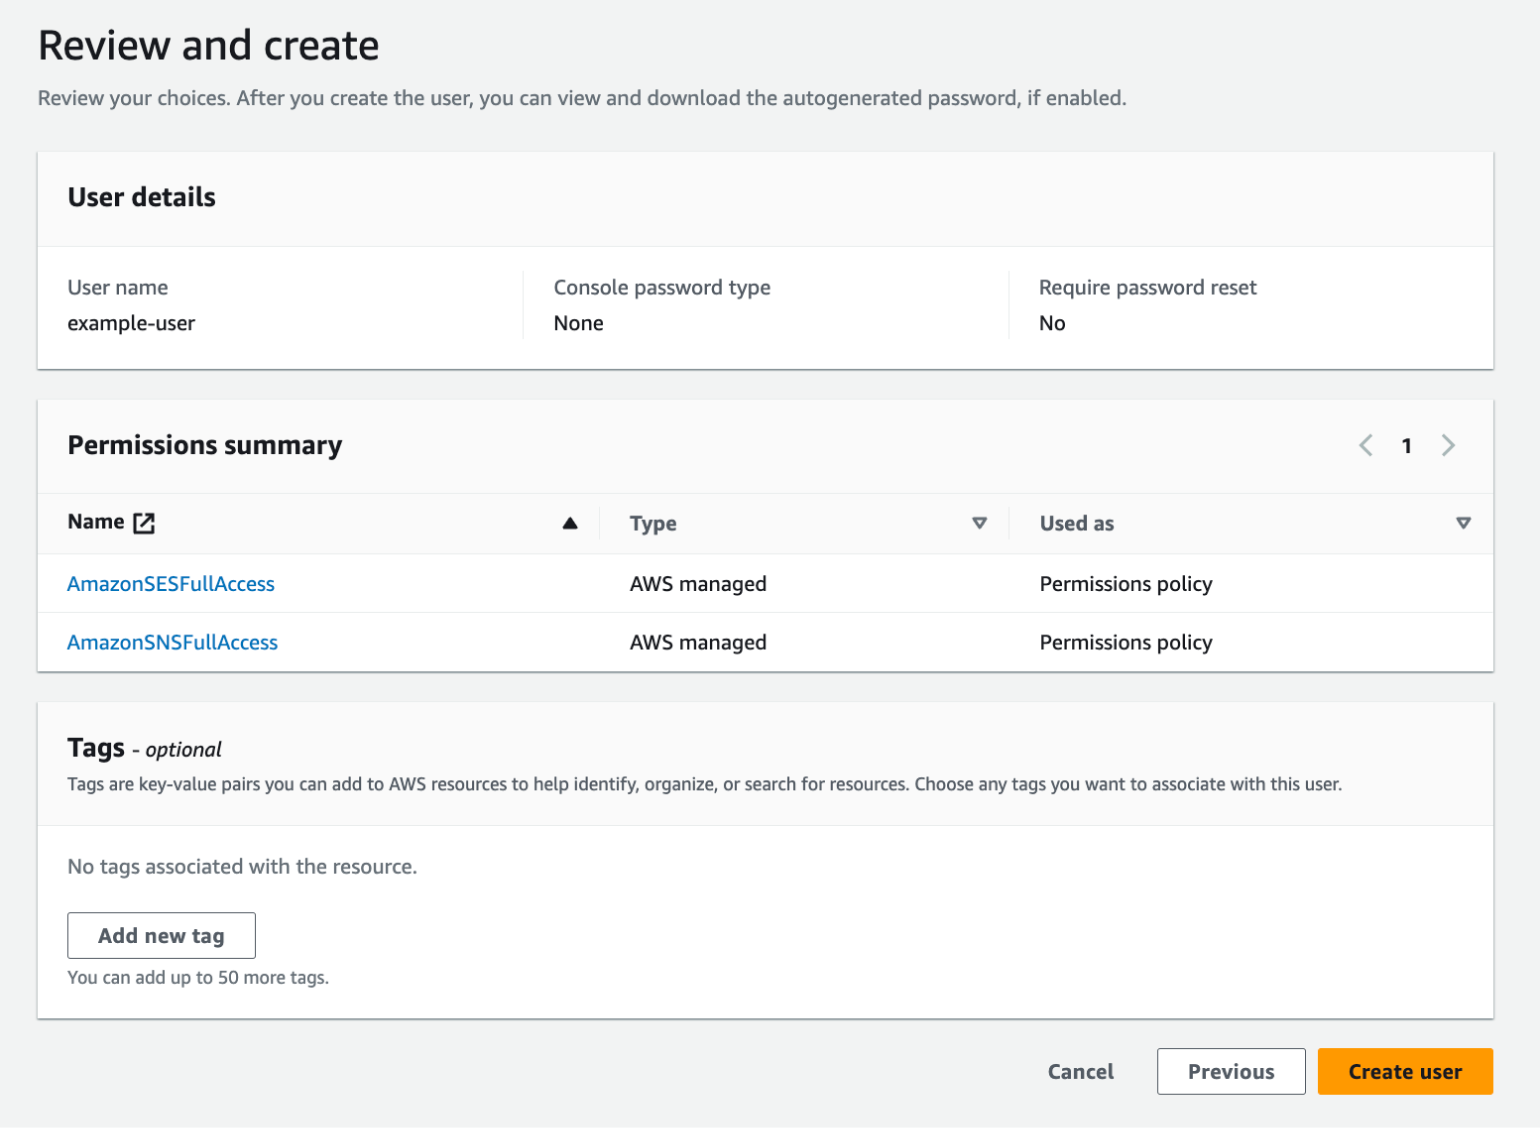
Confirm the correct permissions have been added on the “Review and create” screen. Click Create user once you have reviewed the user’s permissions. Optionally, you can associate the user with tags. This is helpful if you need to manage a lot of AWS resources.
2. Remove Sending Restrictions From Your Account
When you first sign up, your Amazon SES account is placed in sandbox mode. This places a lot of limitations on your account, such as only sending mail to verified addresses and domains, limits on the number of messages per 24-hour period, and limits on the rate at which they’re sent. In addition, for account-level suppression, accounts in sandbox mode have bulk actions and SES API calls related to suppression list management disabled.
As such, you’ll need to open a request to lift the sandbox restriction. This process can take some time, so it’s best to start as soon as possible.
It’s vital to follow the guide linked above and be as descriptive as possible, as this will help AWS approve your request. Once they do so, you’ll get a confirmation email.
3. Configure Your WordPress Site to Send Emails Through SES
When you’re out of sandbox mode, you can start to send emails through Amazon SES. There are two ways to do this:
SMTP is simpler to set up, but it will be slower since the connection requires multiple authentication requests. In contrast, API calls can send batch requests, which is definitely beneficial in this case.
To help your WordPress site and Amazon SES account work together, you could use our WP Offload SES WordPress plugin.
The best place to start is with WP Offload SES Lite. This gives you almost all the functionality of its big brother, including a sending queue. WP Offload SES keeps emails in the queue if they fail to send, and automatically resends any failed emails.
WP Offload SES greatly speeds up the process of getting Amazon SES to work with your WordPress site emails. An onboard Setup Wizard guides you through the entire process. The first time you activate the plugin, you’ll see an information screen that outlines the required steps.
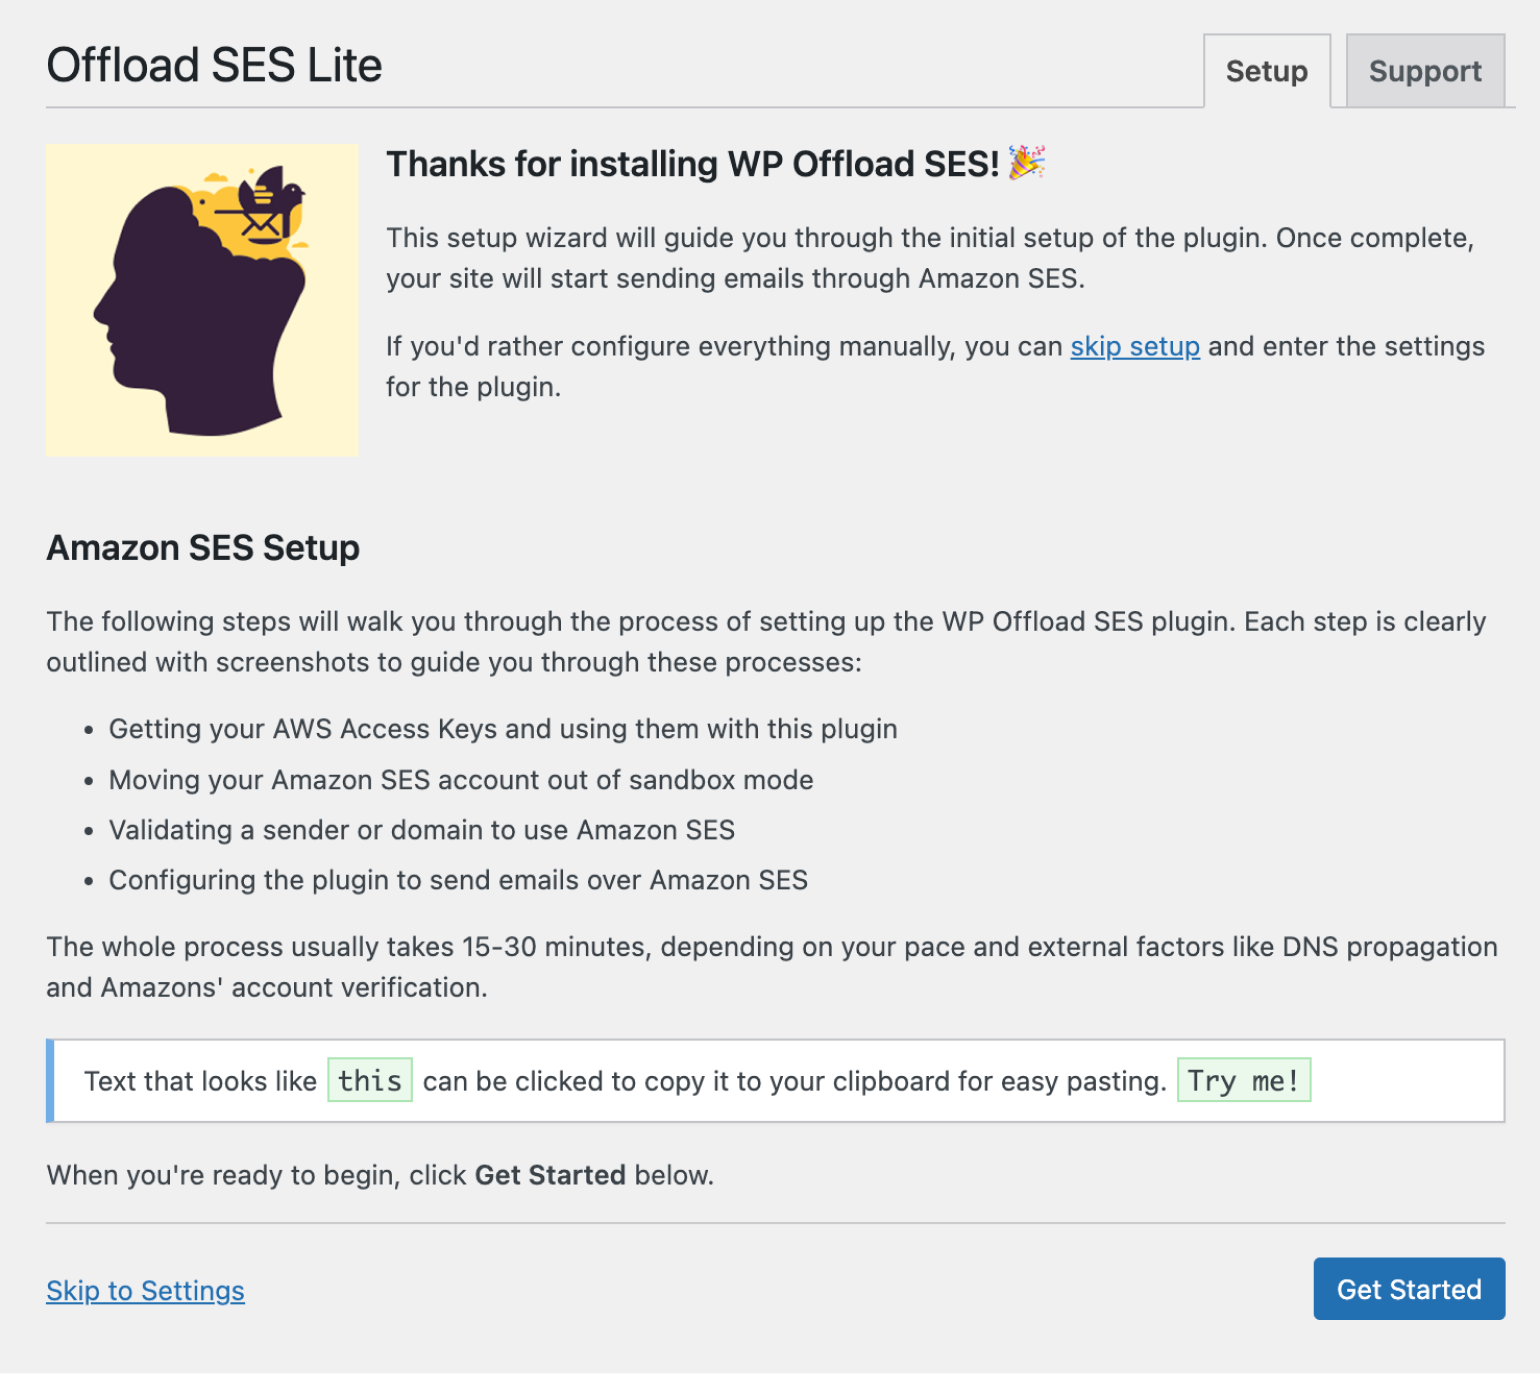
Click the Get Started button to proceed to the next stage. This outlines the process you followed earlier to create an IAM user, and also provides instructions for creating access keys.
On the AWS IAM Users page, click on the user you created earlier, and then click the Security tab. Scroll down to the “Access keys” section, and click Create access key. Select Application running outside AWS. This will display some best practices for managing your access keys, such as rotating them regularly.
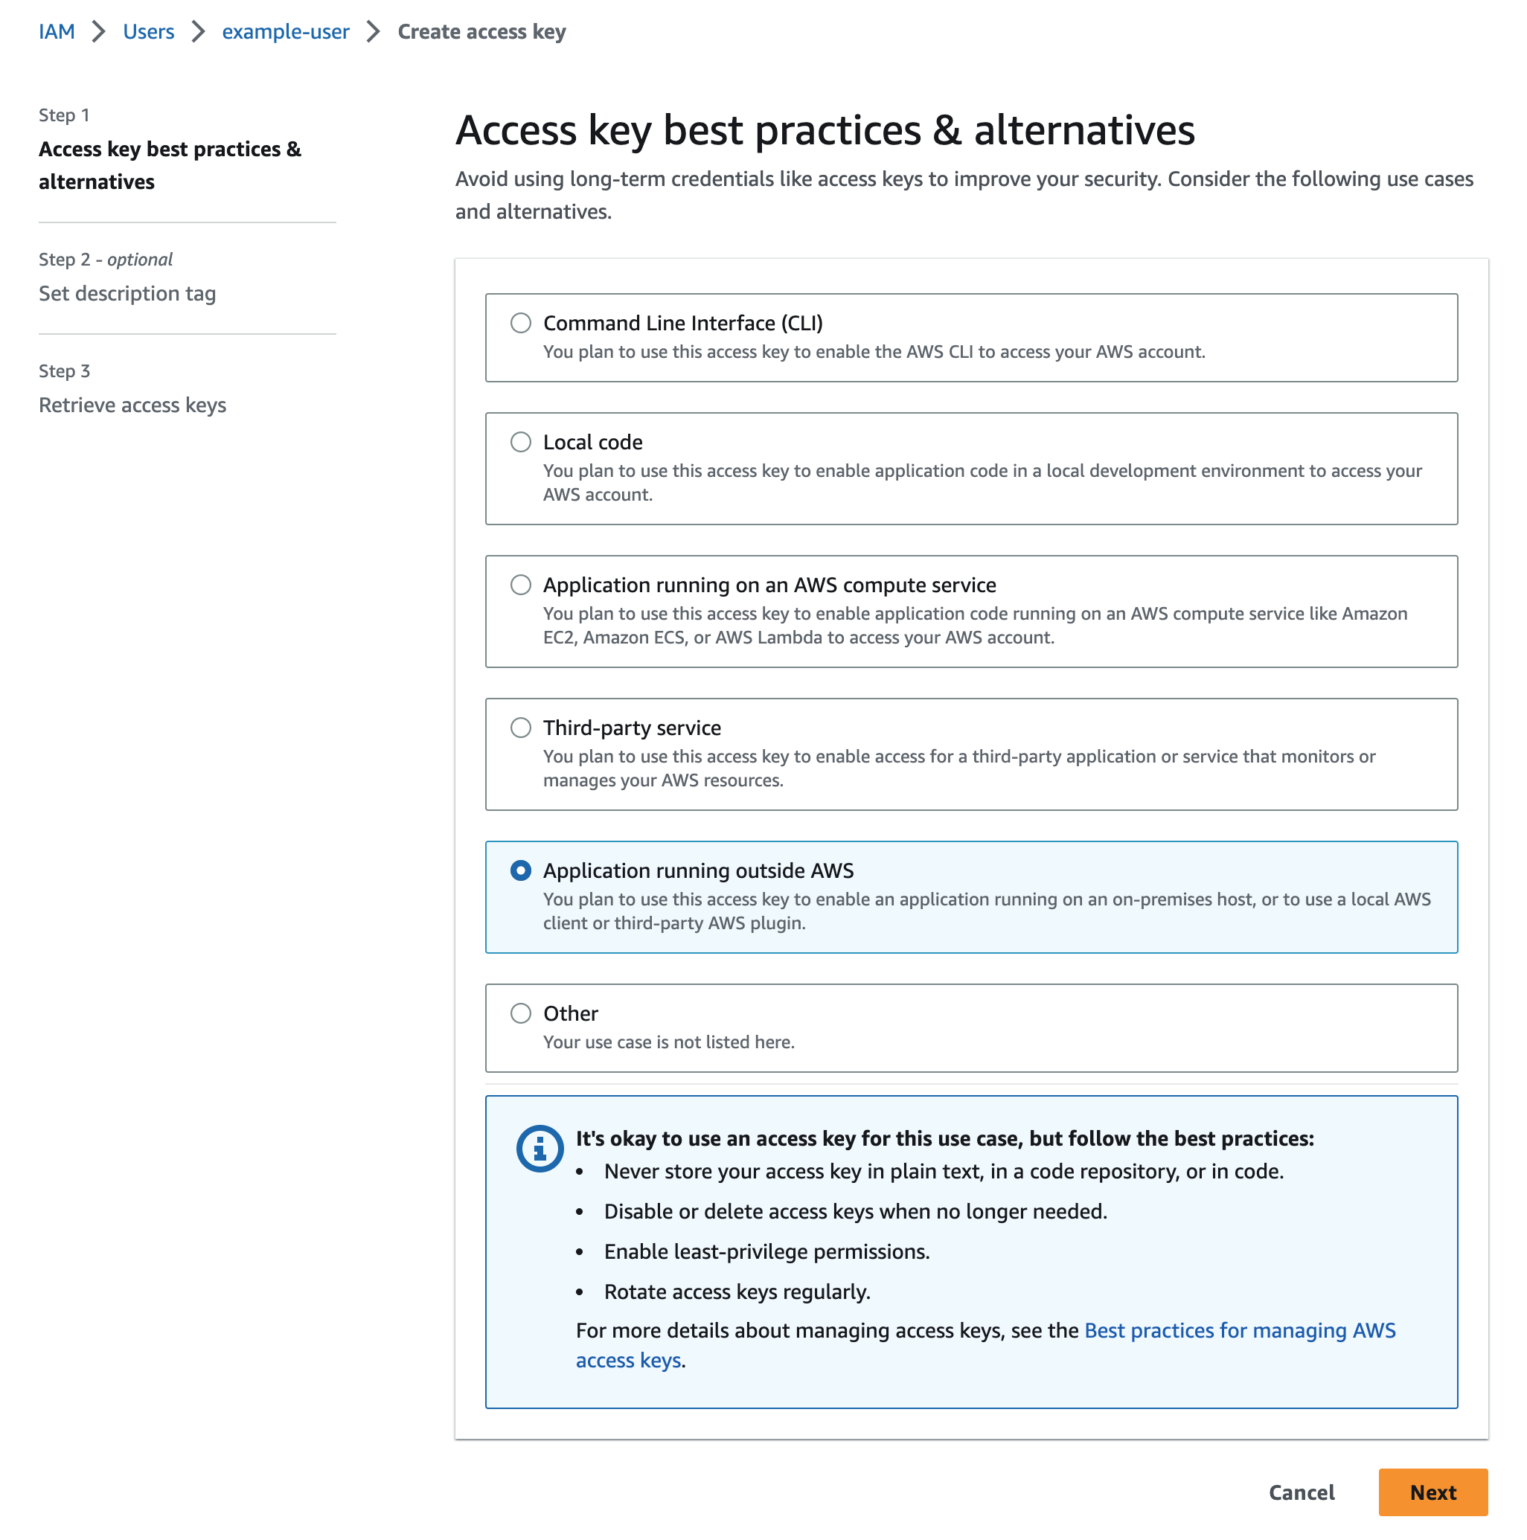
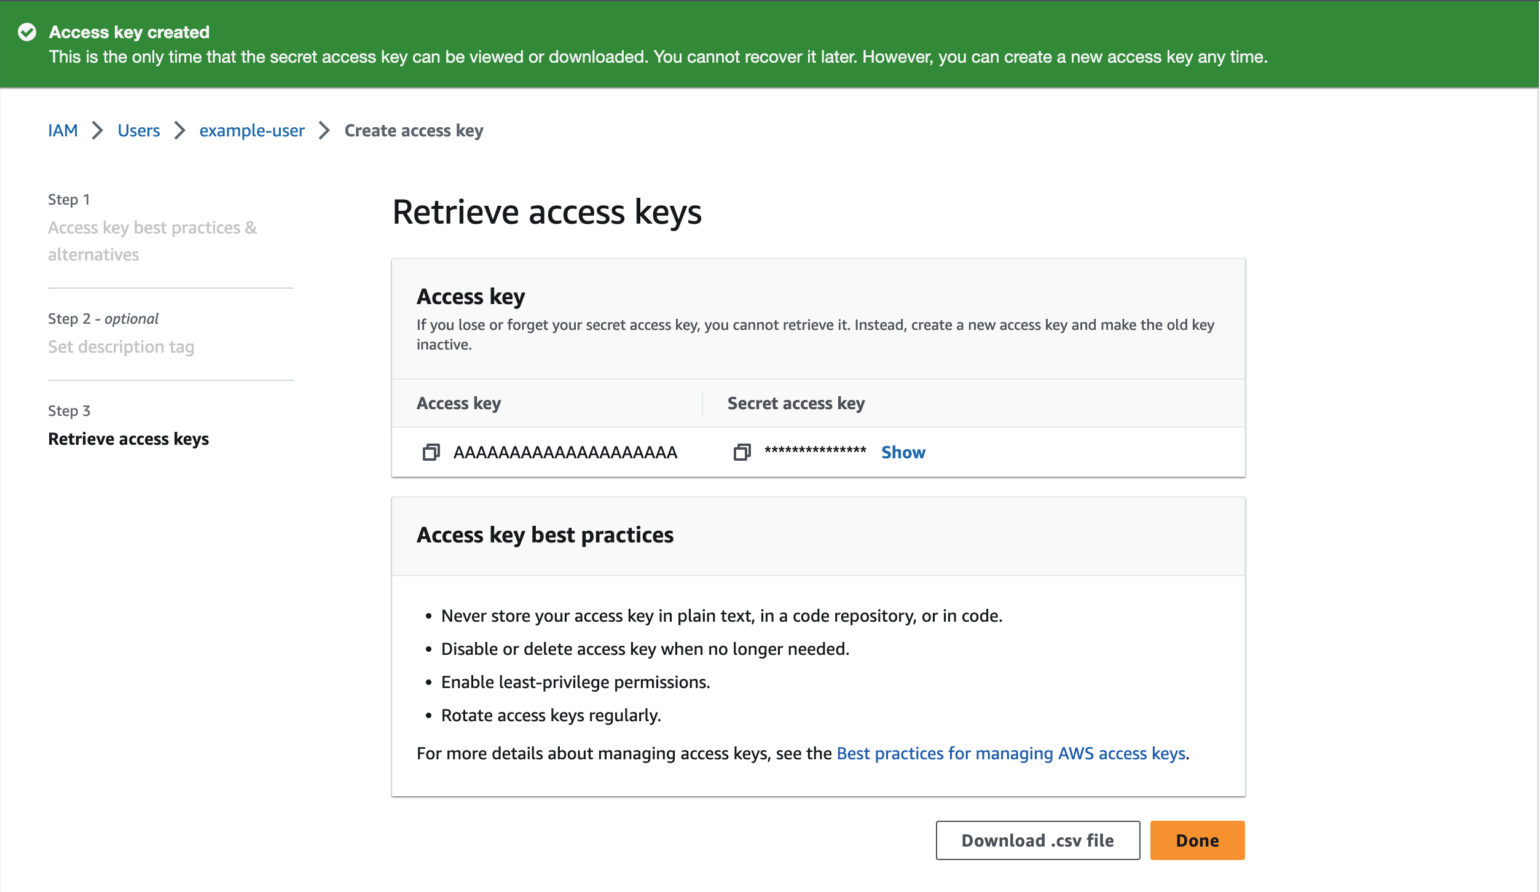
Click Next, and then enter a description tag for your access key if you wish. Next, click Create access key. You should now have your new access keys. Make sure to copy both the “Access key” and “Secret access key” and store them in a secure location. This is the only time you will be shown the secret key. Once you’ve copied them, click Done to be returned to the IAM User screen. You should see that your IAM user now has an active access key.
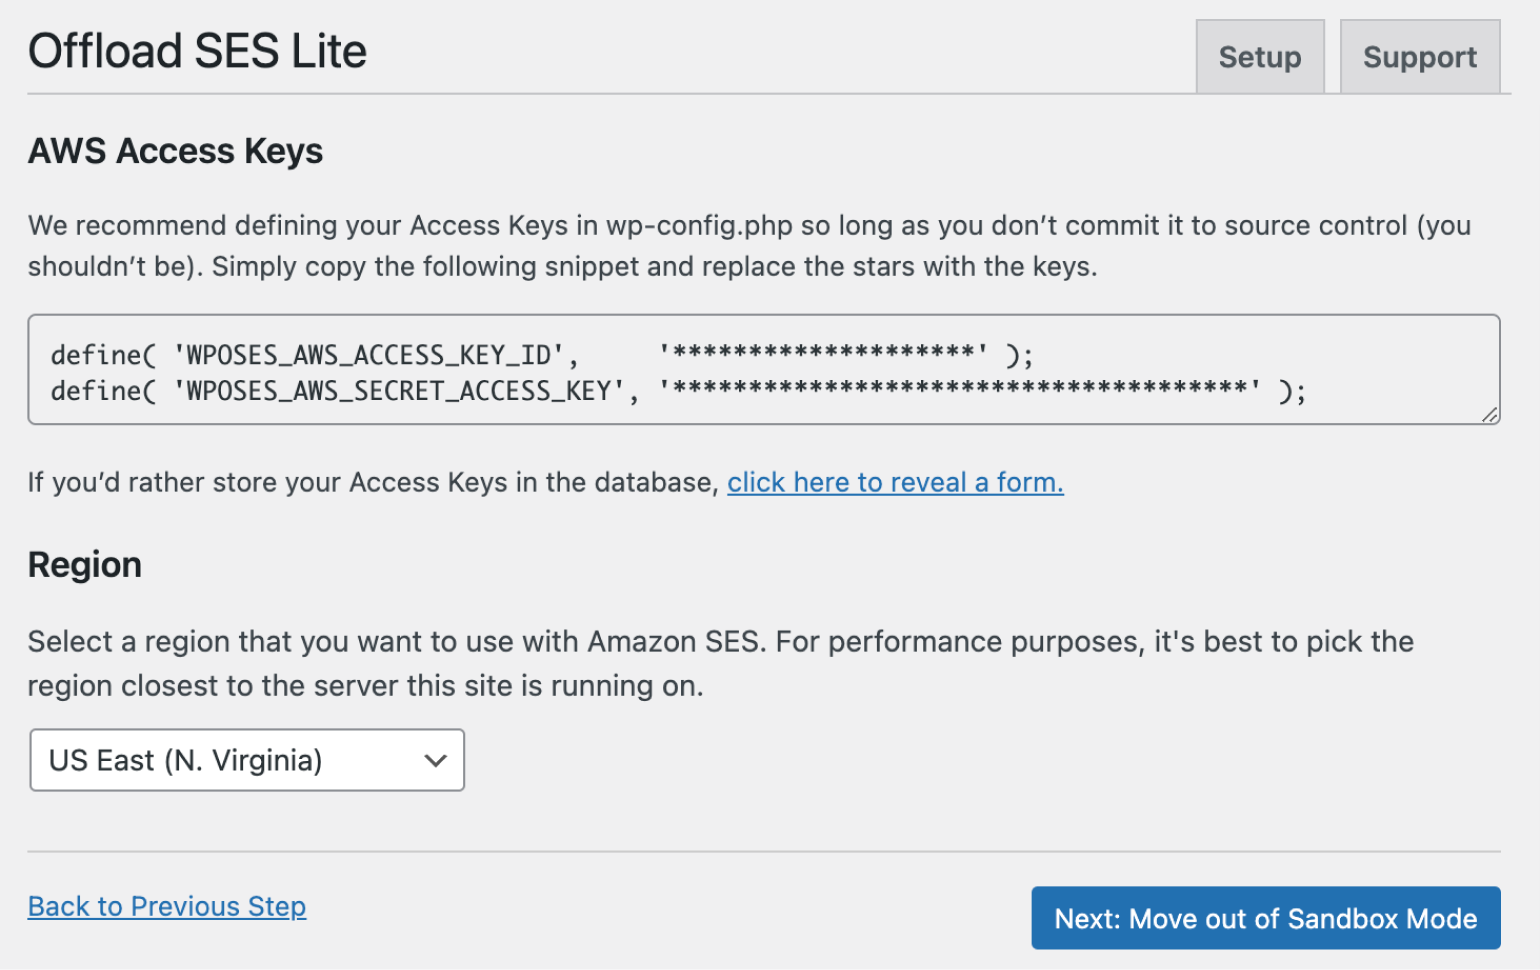
Now, armed with your access keys, you can return to your WordPress site and click Next: Enter Access Keys in WP Offload SES. You can either define your access keys in wp-config.php or store them in the database. We recommend defining them in wp-config instead of the database, as this provides greater security.
You can define the keys by adding the lines below to your wp-config. Make sure to replace the asterisks with your actual keys.
define( 'WPOSES_AWS_ACCESS_KEY_ID',     '********************' );
define( 'WPOSES_AWS_SECRET_ACCESS_KEY', '**************************************' );
Alternatively, you can define them with a serialized array, again making sure to replace the asterisks with your keys:
define( 'WPOSES_SETTINGS', serialize( array(
    'access-key-id' => '********************',
    'secret-access-key' => '**************************************',
) ) );
A final word about this step. If you’re hosting your WordPress site on an EC2 instance, you may want to consider creating an IAM Role instead.
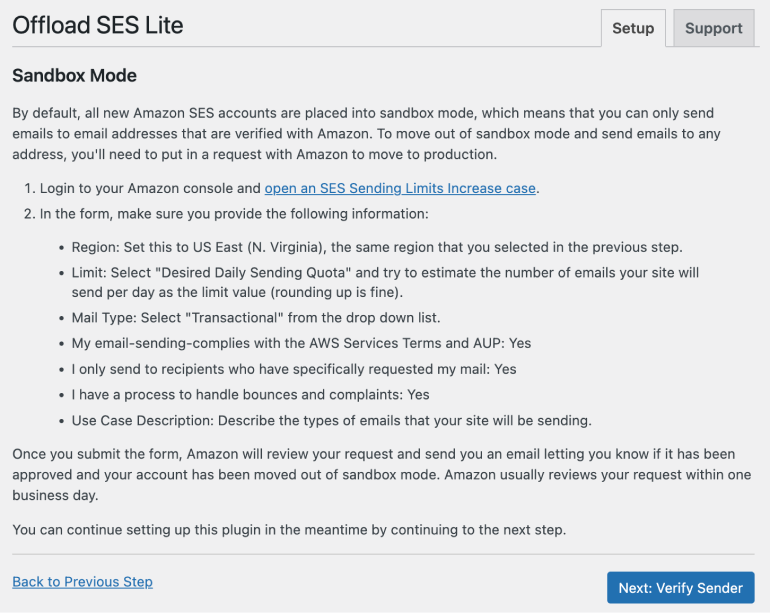
Click Next: Move out of Sandbox Mode to proceed. We discussed this previously, but WP Offload SES gives you a direct link to the form you’ll need, and a handy list of tips on what to fill in.
Click Next: Verify Sender, and verify the senders you’ll use with Amazon SES. You can verify individual addresses or a domain. We usually recommend verifying the domain, as this will allow you to send from multiple addresses on the same domain without having to verify each one. Click Next: Complete Verification to move to the next step. This will show you a screen with new CNAME records that must be added to your site’s DNS. Log in to your DNS provider, navigate to the records for that site, and add the new CNAME records. After you’ve finished updating your DNS, it can still take some time for the new records to propagate and for Amazon to verify them. You can continue setting up the plugin during this process by clicking Next: Configure WP Offload SES.
Finally, fill in some basic information that you’ll use for email sends, such as email address, name, return path, and how long WP Offload SES should retain logs. When done, click Save and Complete Setup.
At any step, you can skip directly to the “Settings” screen by clicking Skip to Settings.
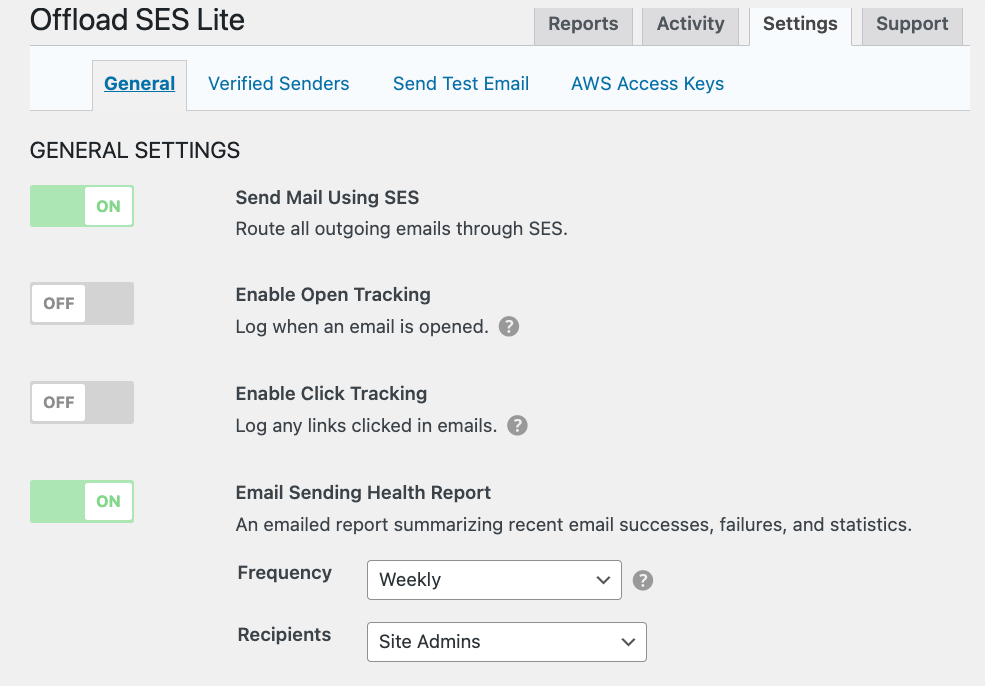
When you’re ready, toggle the Send Mail Using SES and Email Sending Health Report buttons on the “General” settings tab. Turning on Enable Open Tracking and Enable Click Tracking will generate reports that are only available in WP Offload SES Pro.
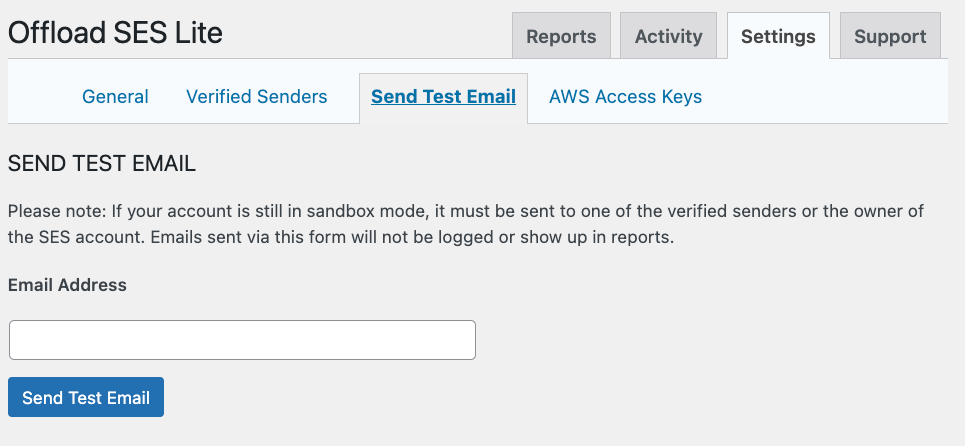
Click the Send Test Email tab, and send a test email to confirm your setup is working:
Once you have things up and running, there’s only one more step. We’ll tackle this next.
4. Set Up DKIM Records and SPF
It’s important to make your emails as deliverable as possible. This will get you into a user’s inbox, without hitting the Spam folder. DomainKeys Identified Mail (DKIM) records and the Sender Policy Framework (SPF) play key roles in helping your emails avoid being flagged as spam or phishing attempts.
DKIM is an email authentication method that allows the organization sending an email to digitally sign it using cryptographic techniques. DKIM records function as an essential component of this process. They are created as DNS records, containing public cryptographic keys associated with the email domain.
When an email is sent, the server adds a DKIM signature to the message header using the private key corresponding to the public key specified in the DKIM Records. The recipient’s email server can then check the authenticity of the DKIM signature by retrieving the public key from the DKIM records of the sender’s domain. This verification process ensures that the email has not been altered in transit and that it originated from the legitimate sender.
SPF, on the other hand, is an email validation protocol that aims to detect and prevent email spoofing. It works by designating authorized mail servers for a specific domain through SPF Records. An SPF record serves as a DNS record that includes a list of IP addresses or hostnames permitted to send email on behalf of that domain.
When an email is received, the domain’s SPF record is checked to verify if the sending server’s IP address is authorized to send mail on behalf of that domain. If the SPF check fails, it suggests that the email might be forged or sent from an unauthorized source, leading to a higher probability of it being marked as spam or rejected altogether.
You have three different options when it comes to setting up DKIM signing with Amazon SES: Easy DKIM, BYODKIM, and Manual DKIM.
Easy DKIM is the simplest option. Amazon SES automatically generates a pair of DKIM public and private keys for each domain registered in the account. The public key is published in the domain’s DNS records through a CNAME record, while the private key is securely managed by Amazon SES.
BYODKIM (Bring Your Own DKIM) allows you to use your own DKIM public and private keys. With this option, you generate keys using third-party tools and then upload them to Amazon SES.
Manual DKIM signing involves manually signing each email with a DKIM signature using a library or software. This usually involves implementing code that signs each outgoing email with the DKIM signature using the private key associated with the sending domain. Manual DKIM gives you the highest level of control over the DKIM signing process, but technical expertise and ongoing maintenance are required to ensure it remains effective.
While you’re looking into DKIM, you might want to look at your SPF record too. The emails you send through Amazon SES pass the SPF validation checks by default. If you want to see your own records, check out Amazon’s documentation, as it will run you through the necessary steps.
In most cases though, you won’t need to touch SPF settings.
Wrapping Up
Personal email services don’t cut it if you need to send transactional emails. Using WP Offload SES with Amazon SES offers a simple and cost-effective solution, and you’re able to manage it all from your site’s dashboard.
In this article, we offered the basics of using Amazon SES with WordPress. If you’d like to make further tweaks, the documentation contains a wealth of information. It’s also possible to set up some unique workflows that can scale for large applications.
Do you use a transactional email service already, and if so, are you tempted to switch to Amazon SES? Let us know in the comments section below!