


Every WordPress developer knows the feeling of despair when a migration fails, balanced by the immense feelings of relief when one succeeds. It’s a frustrating process for many devs, with every failed migration taking more time away from work they’d rather be doing. In this article, I’ll discuss tools you can use to speed up and simplify your migrations, while also mitigating some of that risk.
Make sure to catch my presentation at DE{CODE} 2023 for more tips on how to run high-speed and secure migrations. I’m teaming up with Austin Wendt, Senior Product Manager for Local, for a deep dive into advanced topics like moving a remote site into local development, performing a first-time deployment, and synchronizing two environments over time.
Presented by WP Engine, DE{CODE} 2023 is a free, 100% virtual event dedicated to helping developers modernize user experiences and build smarter WordPress sites. You can guarantee your spot at https://wpeng.in/decode23/ before the conference kickoff later this month.
Registration for DE{CODE} 2024 Now Open!
DE{CODE} 2024 takes place March 19 for the Americas and APAC, and March 21 for EMEA. This year’s conference promises to be even bigger and better, packed with presentations and conference tracks on the next generation of WordPress, how to level up your workflows, emerging technologies transforming the WordPress ecosystem, product innovations, and much more.
Don’t miss your chance to register for DE{CODE}2024!
Types of Migrations
Different migration workflows suit different purposes. Knowing the right workflow to use for your situation is the first step in a trouble-free migration. Austin and I will go over the differences between workflows in some depth at DE{CODE} 2023, but for now it’s enough to define the different types of migrations.
There are only three different workflows when it comes to migrations: remote server to your local environment, local environment to the server, and remote to remote. Each of these has its place, depending on what you’re trying to achieve.
Remote to Local
The remote-to-local workflow migrates a site from a remote server to your local machine. Generally speaking, this is the best workflow to use if you are…
- Beginning work on a client’s existing site
- Troubleshooting in a low-risk environment
- Pulling down the latest database changes
Local to Remote
The local-to-remote workflow is the exact opposite: pushing a site from your local development environment to a remote server. I recommend using this workflow when…
- Deploying a full site for the first time
- Pushing up code changes for themes or plugins
Remote to Remote
Finally, we come to the remote-to-remote workflow, where we’re migrating our site from one remote server to another. Use this workflow when…
- Switching hosting providers
- Moving between dev, staging, and production environments
Regardless of the workflow used, most migrations should focus on only changing what needs to be changed, while leaving the rest of the site alone. However, there are occasions when you want to export the entire site, usually so you can work on it locally. The integration between WP Migrate and Local makes this relatively simple, thanks to WP Migrate’s abillity to export an entire site in a format that’s exactly matched to Local’s requirements.
Full Site Exports: Migrating Constants and Core Files
WP Migrate can export your entire site into a downloadable ZIP file that contains your database, media, plugins, themes, and WordPress core files. Including the core files means you don’t even have to install WordPress on the server you’re migrating to, and the constants defined in your wp-config.php are carried over to the new site. Naturally, you can still choose to export just the database, individual tables, media files, etc., if you wish.

If you didn’t know WP Migrate could export your database and files, you might want to check out the 2.6 release post. In addition to full-site exports, we’ve recently added high-performance file transfers and the ability to migrate must-use plugins.
We’ll demonstrate the full-site export process at DE{CODE} 2023. If you haven’t experienced it before, you’ll be surprised by just how simple it is. Check off a few boxes, and very soon your ZIP file is in your hands.
Full-site exports were released with WP Migrate 2.6, which also included integration with Local. There’s a lot to love about Local. It gives you a low-risk development environment that closely mimics production, while also being ridiculously easy to install. No fiddling needed. Just install it and get to work.
Seamless Remote-to-Local Migrations
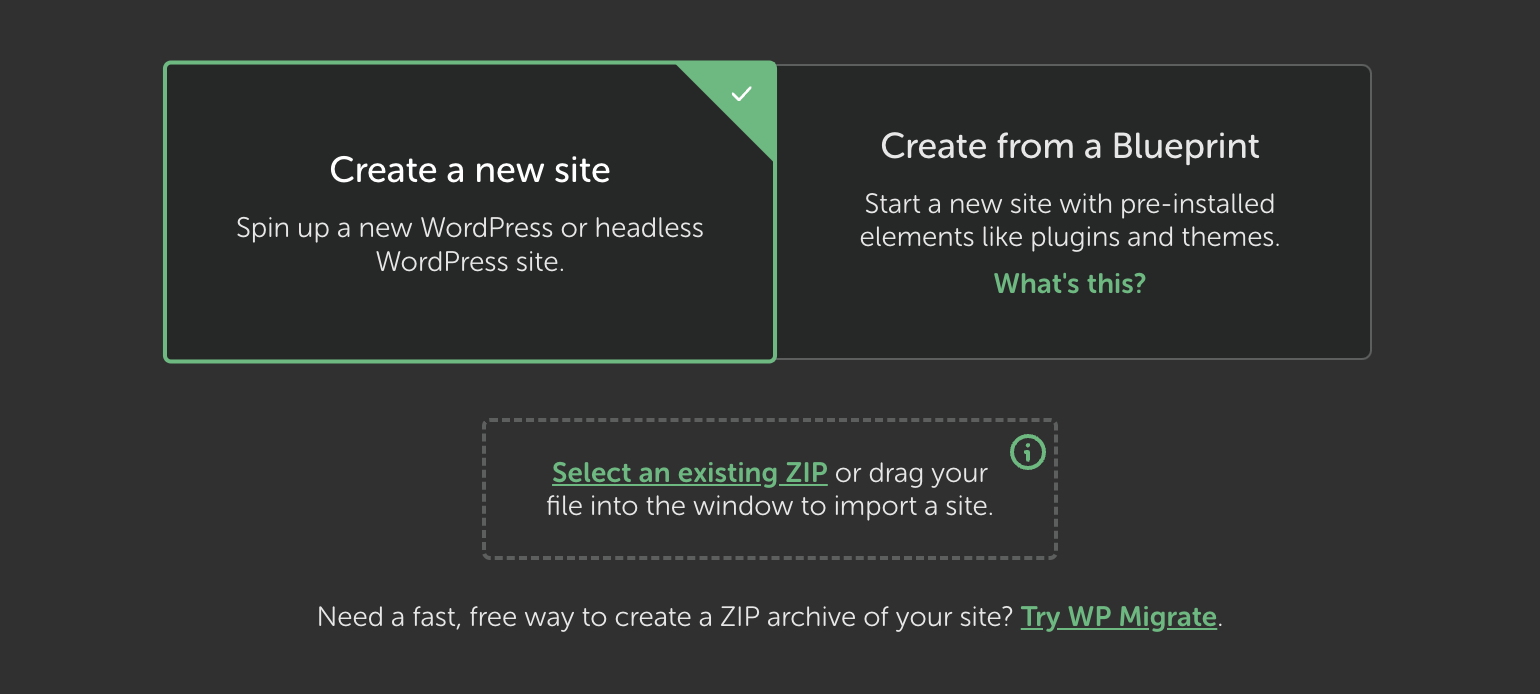
WP Migrate’s full-site exports can be used in a variety of workflows, but it’s the integration with Local where they really shine. The ZIP archive you generate with WP Migrate is structured to exactly meet Local’s requirements. Just drag and drop the ZIP into Local, and the migration is complete.
Inside the ZIP archive, you may notice that WP Migrate automatically includes a wpmigrate-export.json file. This file includes metadata such as the versions of MySQL and PHP used on the remote site, which Local will attempt to match when importing the site. This ensures the migrated site is as close as possible to the original, letting you experiment in total safety without compromising your production site.
Local-to-Remote Migrations
Local also allows users of WP Migrate to take advantage of two tools during certain migrations: Connect and MagicSync.
Connect is a feature in Local that allows you to easily push sites to a WP Engine or Flywheel server, tremendously streamlining and simplifying the local-to-remote workflow. You’re given the option to migrate your site to production, staging, or development if you’ve already created those in your account, or create them at this time if they don’t exist yet. It also gives you the option of not including the database when you push the site. Many WordPress developers have experienced the agony that comes with accidentally overwriting the entire database on the destination environment. This feature helps ensure that if you’re replacing the entire database, you’re doing it on purpose.
Keeping a thorough log of every single change is one way to make sure you’re only migrating changed files, but it’s tedious and prone to human error. That’s where MagicSync comes in. When you’re deploying updates, MagicSync only shows you the files with changes, giving you a clear view of which have changed. It also includes controls for ignoring certain files during the Connect process.
There are other ways these two tools help simplify and reduce risk from your local-to-remote migrations. They clear your site’s cache when you push changes, back up your site before the process begins so you have a safe fallback point, and provide greater security than updating your site over FTP. Using FTP exposes a direct connection to your WordPress site, leading to a potential vulnerability. MagicSync instead routes through a separate micro-service before deploying your site.
Migrating to Other Hosts
There are a lot of advantages to managed hosting with WP Engine or Flywheel, but you don’t always have control over where a site is hosted. When you’re with another host, WP Migrate is your best bet to make sure your migration goes as planned.
Push/Pull With WP Migrate
WP Migrate Pro allows you to push and pull data between remote servers, or between the server and your local machine. As long as you have the plugin installed on two or more WordPress sites, you can push and pull data between those sites.
For example, say you’re deploying a local site for the first time. The site you want to deploy has some posts and a few items in the Media Library, while the site you’re deploying to has no posts and an empty Media Library.
In this case, you’d use a Push migration from your local site to the remote site. The first thing the plugin asks you for is connection info. This is located under WP Migrate’s Settings tab on the remote site. While you’re there, you need to activate the Push toggle, allowing requests to push data to the site and overwrite its data.
It’s possible to activate Push and Pull at the same time, allowing you to pull data down from the site and push changes back to it later. This is a first-time deployment, so “Push” is all we need.

WP Migrate gives you fine-tuned control over the data you push/pull. You can push or pull your entire database, media files, themes, and plugins, but migrating your entire site isn’t always necessary. For example, there’s no reason to pull your plugins and themes down to your local environment and then push them back up if you’re just testing changes to a few database tables. That’s why WP Migrate lets you choose exactly what parts of the site to push and pull, with a great deal of granularity in those sections.

The Standard Find and Replace fields will automatically populate with the source and the destination in this scenario, as WP Migrate is working with two known WordPress installs. This eliminates the need to track the information down and enter it manually. You can also enter custom find and replace data.
The next step is to click Save Profile and give it a descriptive name, such as “Full Site Migration.” The last step is to click Push. WP Migrate shows the progress of the migration, allowing you to observe as it moves through the tables, media uploads, and so on, and giving you insight into the requests that occur as the migration proceeds.
Once you have a migration saved, you can run it again at any time from the Profiles screen of WP Migrate.
Ongoing Incremental Migrations
Going beyond first-time deployments, we can adjust this process slightly to perform ongoing, incremental migrations on your remote site. The process is very similar to the one outlined above. Simply start a new migration using the same connection info, but set it up to only include the database and new and updated media uploads.
Selecting just the new and updated media files means that it will include all media the first time it runs. On subsequent migrations, WP Migrate will only include media that has been changed since the last migration.
Save your new profile with a descriptive name like “Push Content & Media,” and you’ve got a really snappy way to perform ongoing, incremental migrations that update the new media and content while leaving the rest of the site unchanged.
Conclusion
Failed migrations carry a lot of potential consequences beyond simply wasting your time. The consequences vary depending on the workflow you’re using and how important the site is, but they’re never pleasant. The worst case scenarios are reserved for the local-to-remote and remote-to-remote workflows, but a failed migration can be heartbreaking during remote-to-local as well.
Make sure to catch Austin and me during our presentation at DE{CODE} 2023. We’ll cover a full migration workflow, discuss what you can do to decrease risk and speed up the process, and leave you with a game plan for tackling your next migration.
Will we see you at DE{CODE} 2023? Let us know in the comments!