The WordPress command line interface (WP-CLI) is an incredible tool for improving your development workflow. Understanding how commands are structured is key to using WP-CLI to its full potential. In this article, you’ll learn how to structure WP-CLI commands, including how to use parent and subcommands, as well as parameters and switches.
Before you dive into creating commands, you’ll need to install WP-CLI. The exact method differs by OS, but our guide to installing and configuring WP-CLI has everything you need.
Parent Commands and Subcommands
Almost all WP-CLI commands are structured the same way. There is a parent command for each larger area of functionality, such as wp core for working with the core WordPress installation. Each of these parent commands can be used with a number of different subcommands, and must be used with at least one.
Parent Commands Lay the Foundation
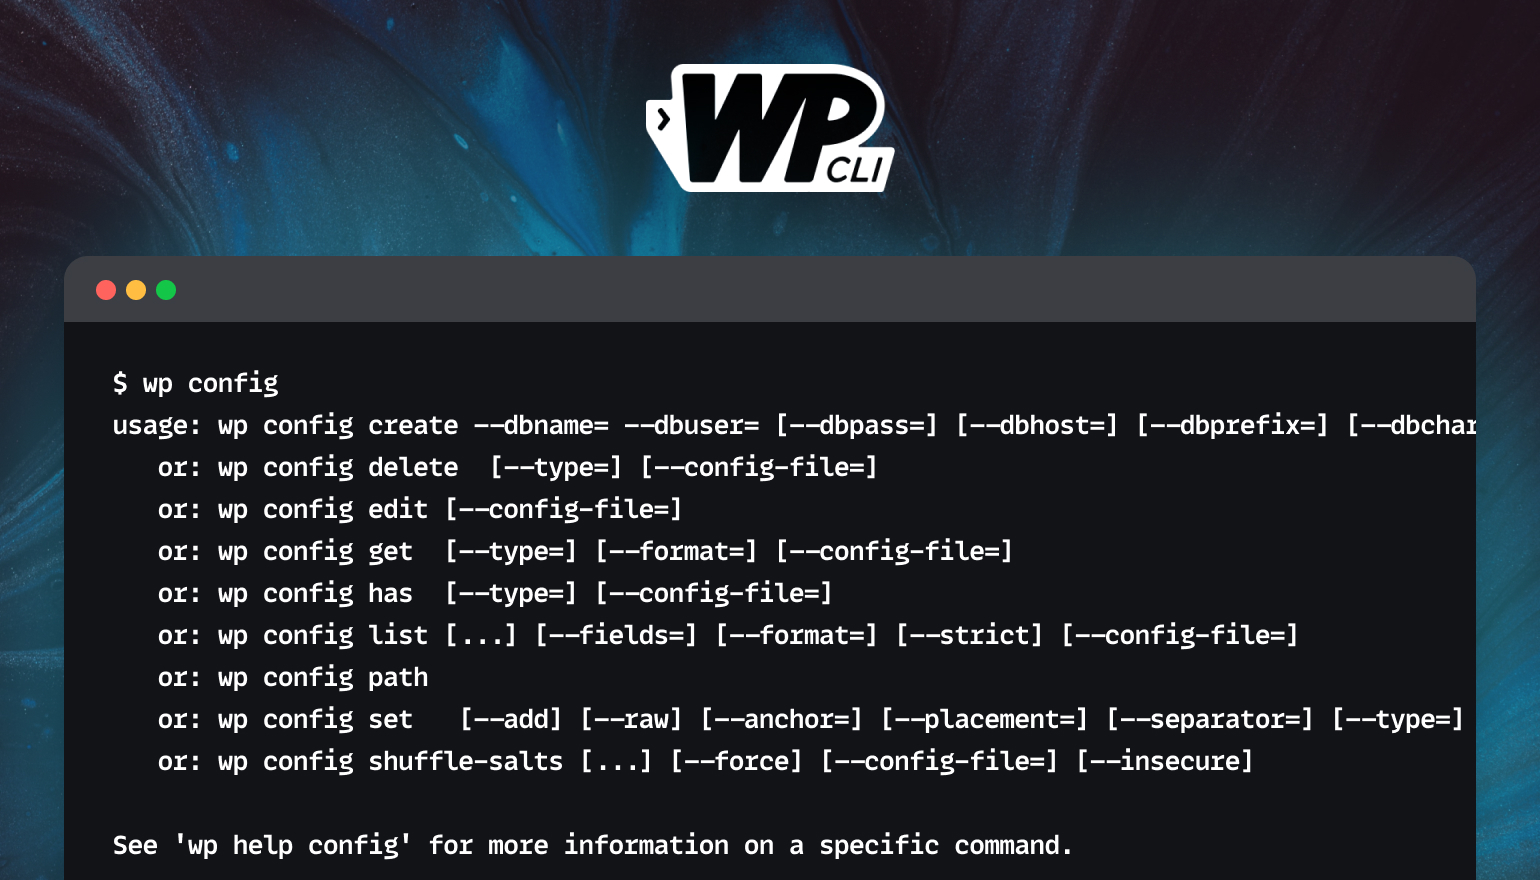
No parent command will do anything useful on its own. For example, if you try to use wp config by itself, you’ll see something like this:
~$ wp config usage: wp config create --dbname=--dbuser= [--dbpass= ] [--dbhost= ] [--dbprefix= ] [--dbcharset= ] [--dbcollate= ] [--locale= ] [--extra-php] [--skip-salts] [--skip-check] [--force] [--config-file= ] [--insecure] or: wp config delete [--type= ] [--config-file= ] or: wp config edit [--config-file= ] or: wp config get [--type= ] [--format= ] [--config-file= ] or: wp config has [--type= ] [--config-file= ] or: wp config list [ ...] [--fields= ] [--format= ] [--strict] [--config-file= ] or: wp config path or: wp config set [--add] [--raw] [--anchor= ] [--placement= ] [--separator= ] [--type= ] [--config-file= ] or: wp config shuffle-salts [ ...] [--force] [--config-file= ] [--insecure] See 'wp help config' for more information on a specific command.
That alone gives you some pretty good clues for how you would use the wp config command. You can get an even better understanding by following its advice and entering wp help config.
NAME wp config DESCRIPTION Generates and reads the wp-config.php file. SYNOPSIS wp configSUBCOMMANDS create Generates a wp-config.php file. delete Deletes a specific constant or variable from the wp-config.php file. edit Launches system editor to edit the wp-config.php file. get Gets the value of a specific constant or variable defined in wp-config.php file. has Checks whether a specific constant or variable exists in the wp-config.php file. list Lists variables, constants, and file includes defined in wp-config.php file. path Gets the path to wp-config.php file. set Sets the value of a specific constant or variable defined in wp-config.php file. shuffle-salts Refreshes the salts defined in the wp-config.php file. GLOBAL PARAMETERS --path=
There are over 40 parent commands in total in the core WP-CLI installation. Some popular plugins, like WooCommerce and BuddyPress, add their own parent commands, so your WordPress installation may have even more. In most cases, you can find out how to use the command by entering wp help followed by the name of the parent command.
Understanding a bit about how they are grouped helps when learning to use WP-CLI. It’s worth noting that WP-CLI commands almost always use singular nouns in commands. For example, the parent command for user management is named wp user rather than “wp users.” As long as you remember that, you’ll find that your intuition is often correct. The command for managing comments is, indeed, wp comment and wp cron is the command you’d use for managing WP-Cron schedules and events.
You can find a cheat sheet with some of the most commonly used parent commands below.
Subcommands Give Direction
As I mentioned earlier, none of those commands really work on their own. We also need to specify a subcommand if we’re going to get anywhere. I strongly recommend setting up tab completion. This will allow you to easily see subcommands. For example, using tab completion we can see the subcommands for plugin:
$ wp plugin [TAB]
activate           get                list               toggle
auto-updates       install            path               uninstall
deactivate         is-active          search             update
delete             is-installed       status             verify-checksums
Hitting enter without specifying the subcommand will prompt WP-CLI to present some additional help:
$ wp plugin
usage: wp plugin activate [<plugin>...] [--all] [--network]
   or: wp plugin auto-updates <command>
   or: wp plugin deactivate [<plugin>...] [--uninstall] [--all] [--network]
   or: wp plugin delete [<plugin>...] [--all]
   or: wp plugin get <plugin> [--field=<field>] [--fields=<fields>] [--format=<format>]
   or: wp plugin install <plugin|zip|url>... [--version=<version>] [--force] [--activate] [--activate-network] [--insecure]
   ....
Notice a difference in how the parameters are presented in the help text above? Some are encapsulated in < > marks, others are prefixed with double dashes --. That’s not a coincidence; they are different types of parameters. We’ll get back to that in a bit.
WP-CLI is nice to work with, in that it will often be able to tell you a little bit more about each subcommand and the parameters it expects. This is very consistent throughout all the built-in WP-CLI commands. Whenever you fail to type a full command with all expected parameters it will tell you more about what it was expecting.
WP-CLI Cheat Sheet of Popular Commands
The cheat sheet below shows some of the more common subcommands and the parent commands they go with. There are many, many more subcommands available than the ones listed here. Some parent commands, such as wp comment, have well over a dozen subcommands, while others, like wp cron, have just a few.
WP Core
WP Config
WP Theme
WP Plugin
Parameters and Switches
In addition to a parent command and a subcommand, most of the commands need at least one parameter to be able to do something useful. For example, if you want to install a plugin you need to specify which plugin to install. Naturally the same goes for activating or deleting a plugin.
There are essentially three types of parameters you’ll use with WP-CLI: ordered parameters, named parameters, and switches.
Ordered Parameters
If a command needs more than one regular parameter, they always have to be ordered correctly for the command to function. This is why they’re called ordered parameters. They are always separated by a single space. If the parameter value itself contains spaces it needs to be surrounded by quotes.
In the help text for a command, ordered parameters are surrounded by <and >. In the following example of trying to use wp post get without any parameters, we see that id is an ordered parameter because it is enclosed in <and >.
$ wp post get
usage: wp post get <id> [--field=<field>] [--fields=<fields>] [--format=<format>]
Named Parameters
WP-CLI also works a lot with named parameters. These can be given in any order. A named parameter is recognized by the double dashes before the name and the presence of an equal sign between the name and the value.
For example, looking at the help text for wp post get above, we see that the format and fields parameters are prefixed with the double dashes. That’s how we know they are named parameters for this command.
Ordering really doesn’t matter:
# This will get the the title field for post id 1 in JSON format
$ wp post get 1 --fields=title --format=json

# This is the same command, order of named parameters doesn’t matter:
$ wp post get 1 --format=json --fields=title

# This is also exactly the same, you can put named parameters before the ordered ones:
$ wp post get --format=json --fields=title 1
Switches
There are also named parameters that are only used to indicate true/false type values. These are called switches and don’t need a value specified. If you add them to the command line, they’re understood to mean “true.” If you omit them, they are “false.”
Perhaps this is best explained with a few examples:
# Passing "hello-dolly" as regular ordered parameter
$ wp plugin activate hello-dolly

# Passing a regular ordered parameter with spaces requires quotes
$ wp plugin search "WP Offload Media"

# Passing the value 'json' to the named parameter 'format'
$ wp plugin list --format=json

# Setting the 'quiet' switch to true
$ wp plugin activate hello-dolly --quiet
Not so complicated, eh? This is pretty much the norm among command line tools. But let’s add one more little detail.
Global Named Arguments
Named arguments can either be global in the sense that many WP-CLI commands use them, and they always have the same behavior when used.
Other named arguments only make sense to one specific command. This type of named argument is essentially just a named parameter. In the examples above the --quiet parameter is global because it affects all commands in the same way. But the --format parameter is not considered global because it doesn’t make sense for all commands.
How to Use WP-CLI Commands
As an example, let’s look at how to use wp-plugin to install and activate a WordPress plugin. Along with managing users, this is one of the first areas new WP-CLI users want to learn about. Even if you are not terribly interested in managing plugins from the command line, it’s worth reading this section to get warmed up for working with WP-CLI.
Installing a new plugin from the WordPress repository is very straightforward. You need a parent command (wp plugin), a subcommand (install), and an ordered parameter (the plugin’s official slug) to install the plugin. Activating the plugin uses a similar command, but with a different subcommand (activate).
Put everything together and you should see something like this:
# Installing a plugin
$ wp plugin install hello-dolly
Installing Hello Dolly (1.7.2)
Downloading installation package from https://downloads.wordpress.org/plugin/hello-dolly.1.7.2.zip...
The authenticity of hello-dolly.1.7.2.zip could not be verified as no signature was found.
Unpacking the package...
Installing the plugin...
Plugin installed successfully.
Success: Installed 1 of 1 plugins.

$ wp plugin activate hello-dolly
Plugin 'hello-dolly' activated.
Success: Activated 1 of 1 plugins.
As you can see, installing and activating a plugin is two separate things in WP-CLI, just as it is when you install a plugin using the web interface. But installing and then directly activating a plugin is so common that WP-CLI has a way to do both at the same time:
# Installing AND activating a plugin in one go
$ wp plugin install --activate hello-dolly
One tricky part is finding the right slug for the plugin you want. All plugins are identified by their official slug, but in many cases the slug isn’t even remotely similar to the plugin’s official name. The wildly popular Yoast SEO plugin has the slug wordpress-seo. The slug for our own plugin WP Offload Media is amazon-s3-and-cloudfront.
Slugs are assigned when plugins are first accepted to the WordPress plugin repository and are the only unique identifiers. Even if the name of the plugin changes, the slug remains the same. You can always go to the plugin repo webpage, search for the plugin and look at the path in the URL:

It works, but it lacks finesse and takes you out of your terminal. Here’s the proper way to do it using WP-CLI’s search subcommand:
wp plugin search "wp offload media" --per-page=1 --fields=name,slug
Success: Showing 1 of 66 plugins.
+-----------------------------------------------------------------------+--------------------------+
| name                                                                  | slug                     |
+-----------------------------------------------------------------------+--------------------------+
| WP Offload Media Lite for Amazon S3, DigitalOcean Spaces, and Google  | amazon-s3-and-cloudfront |
| Cloud Storage                                                         |                          |
+-----------------------------------------------------------------------+--------------------------+
If you’re keen to learn more about managing plugins, we will dive into all the nitty gritty aspects of the wp plugin command in a later post about WP-CLI. For now we’re just using it as a way to demonstrate using parameters.
Wrapping Up
The biggest benefit you’ll see from integrating WP-CLI into your development workflow is likely just how much faster it lets you work. Practically anything you can do from the WordPress admin can be accomplished in less time using the command line.
Once you know the basics, you can take WP-CLI even further with our list of WP-CLI packages we can’t live without.
Understanding how commands, subcommands, and parameters are structured is key to getting comfortable with WP-CLI. My intention is to provide you with the basic knowledge you need to start experimenting on your own. If you have any questions about how to structure your WP-CLI commands, parameters, or anything else WP-CLI related, please let me know in the comments.