WP-CLI allows you to do practically anything you can do in the WordPress admin, but on the command line. This saves a lot of time and provides a cleaner workflow. You can use WP-CLI to manage WordPress core, run theme updates, manage multisite installations, and much more. In this article we’re going to concentrate on one of the most common use cases, managing your WordPress plugins.
WP-CLI commands are all structured in the same way. There is always a parent command (such as wp plugin) and a subcommand (such as install), followed by parameters and switches. We’re going to concentrate on wp plugin and its subcommands in this article, but you can see a more detailed explanation in our guide to WP-CLI command structure.
That article used the wp plugin command as an example, highlighting how to install and activate plugins using WP-CLI. In this article we’re going to dive a lot deeper into how to manage our plugins using the WordPress command line interface.
Installing and Activating Plugins
There are currently 16 official subcommands for the wp plugin parent command. In this section we’ll cover the subcommands for installation and activation. We’ll also look at how to install and activate plugins with a single command. We’ll also look at how to install plugins from sources other than the WordPress Plugin Directory.
Enter wp plugin install followed by the plugin’s official slug to install the latest version:
wp plugin install hello-dolly
Installing Hello Dolly (1.7.2)
Downloading installation package from https://downloads.wordpress.org/plugin/hello-dolly.1.7.2.zip...
Using cached file '/Users/eriktorsner/.wp-cli/cache/plugin/hello-dolly-1.7.2.zip'...
The authenticity of hello-dolly.1.7.2.zip could not be verified as no signature was found.
Unpacking the package...
Installing the plugin...
Plugin installed successfully.
Success: Installed 1 of 1 plugins.
Next, we activate the plugin using the wp plugin activate command:
wp plugin activate hello-dolly
Plugin 'hello-dolly' activated.
Success: Activated 1 of 1 plugins.
Searching for a Plugin Slug
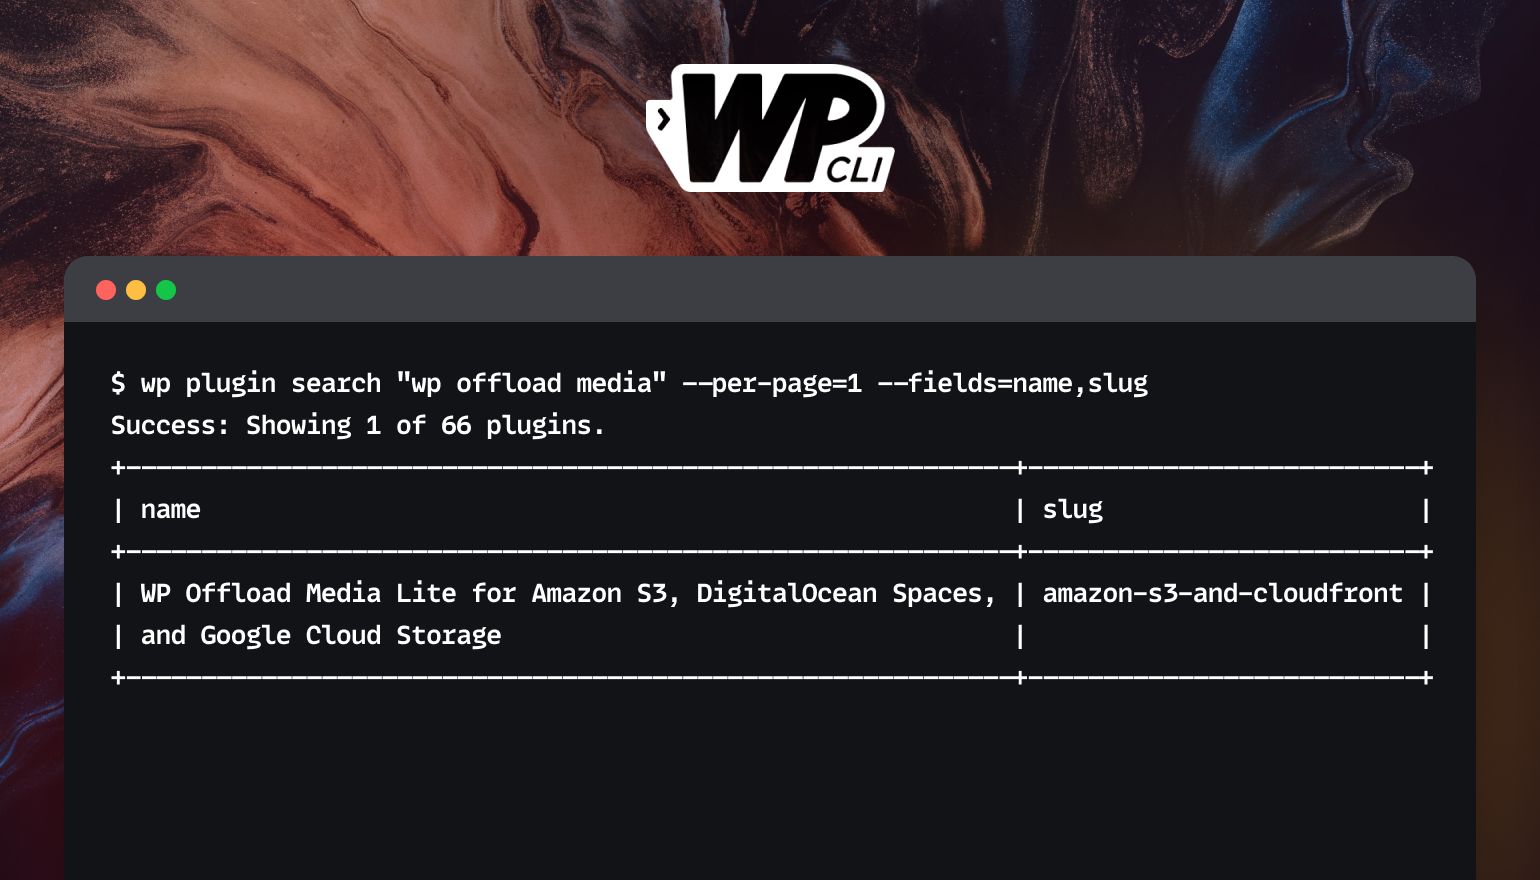
Note that the slug is often different from the plugin name. The slug is visible in the plugin’s URL in the WordPress Plugin Directory, but you can speed up your workflow by sticking with the command line and using the search subcommand, followed by two parameters and their values: --per-page=1 and --fields=name,slug.
The optional --per-page parameter tells WP-CLI how many results to show us, in this case just one. It will default to displaying 10 results if you don’t give it this parameter. I’ve given it a value of 1 here as I only want to see the most relevant result.
The --fields parameter tells WP-CLI to ask for specific fields from the API, in this case the plugin’s name and slug. There’s a wide range of values you can use here, including version to see the current version number, and rating to see the plugin’s ratings as both a percentage and the total number of ratings. You can instead use --field=<field> if you only want to display the result of a single field. You must use either the --fields or --field parameter with the wp plugin search command.
wp plugin search "wp offload media" --per-page=1 --fields=name,slug
Success: Showing 1 of 66 plugins.
+--------------------------------------------------------------------------------+--------------------------+
| name                                                                           | slug                     |
+--------------------------------------------------------------------------------+--------------------------+
| WP Offload Media Lite for Amazon S3, DigitalOcean Spaces, and Google Cloud Sto | amazon-s3-and-cloudfront |
| rage                                                                           |                          |
+--------------------------------------------------------------------------------+--------------------------+
As the response for this command is a list, this is a good opportunity to show what the --format parameter can do. Let’s ask WP-CLI to give us that list in JSON format, and then pipe it via the jq utility for prettier formatting. The jq utility is a lightweight command-line JSON processor that you can install at the link above, or try out online. Make sure to omit | jq from the command below if you don’t have it installed.
When we ask for JSON formatted output, WP-CLI omits the status message so we don’t get broken JSON:
$ wp plugin search "wp offload media" --per-page=1 --fields=name,slug --format=json | jq
[
  {
    "name": "WP Offload Media Lite for Amazon S3, DigitalOcean Spaces, and Google Cloud Storage",
    "slug": "amazon-s3-and-cloudfront"
  }
]
To activate the plugin once it’s installed, use wp plugin activate followed by the plugin’s official slug.
Installing and Activating a Plugin at the Same Time
When it comes to managing your plugins with WP-CLI, one of the big advantages is that you can install and activate a plugin with a single command. While activate can be used as a subcommand with wp plugin, it can also be used as a parameter with the wp plugin install command:
# Installing and activating the plugin at the same time
wp plugin install --activate hello-dolly
Installing a Specific Plugin Version
It’s not uncommon that you want to install a specific version of a plugin for testing purposes. As long as the version you want is still available on the WordPress Plugin Directory, you can select any version you see fit:
# Installing a specific plugin version
wp plugin install woocommerce --version=5.5.3
Installing Plugins From Other Locations
The WordPress Plugin Directory isn’t the only place we can get plugins. We can also install a plugin straight from the file system. Most of the time when you buy a premium plugin, you get the initial delivery in the form of a zip file. WP-CLI will happily install that zip file directly, with no need to extract the package first:
# Installing a plugin from Downloads folder
$ wp plugin install ~/Downloads/advanced-custom-fields-pro.zip
This also works if the plugin you want to install is available on a URL, perhaps only accessible by supplying credentials via request parameters or on a server with a self-signed certificate:
# Get the plugin from a URL
wp plugin install http://www.hellfish.media/my-plugin.zip

# ...or even a private file from an Amazon bucket:
wp plugin install https://s3.amazonaws.com/bucketname/my-plugin.zip?X-Amz-SignedHeaders=host&X-Amz-Expires=900&X-Amz-Signature=abc123

# From our internal server with a self-signed cert:
wp plugin install https://intranet.hellfish.media/my-plugin.zip --insecure
Updating Plugins With WP-CLI
Once you have a plugin installed, it’s important to keep it updated for security reasons To find out if there are any plugins to update, we can run the wp plugin list command:
wp plugin list
+-------------------------------+----------+-----------+---------+
| name                          | status   | update    | version |
+-------------------------------+----------+-----------+---------+
| amazon-s3-and-cloudfront      | active   | available | 2.6.1   |
| hello-dolly                   | active   | available | 1.7.1   |
| wunderdevmu                   | must-use | none      | 1.0     |
+-------------------------------+----------+-----------+---------+
In this case, both the Hello Dolly and WP Offload Media plugins need updates. Naturally there is a separate subcommand for that called update.
We can either update them one by one, or be a bit lazy and just update everything that needs to be updated in one go using the --all switch. The default behavior of the update command is to update all the way up to the latest available version, which includes major version upgrades. But by using the --minor switch we can be a little more careful and only update for minor versions. For example, we can tell it to update from 1.2.3 to 1.3.0, but not to 2.0.0. We can even be super extra careful and use the --patch switch to limit updates to just patches, i.e, from 1.2.3 to 1.2.5 but never to 1.3.0.
# Carefully update plugins one by one
wp plugin update wp-offload-media
wp plugin update hello-dolly

# The cowboy approach
wp plugin update --all

# A bit more sensible
wp plugin update --all --minor

# Very defensive
wp plugin update --all --patch
Note: The --minor and --patch switches assume that the plugin is using semantic versioning. Far from all plugins do this, so you’ll need to look this up for the plugins you are using so you don’t get any unpleasant surprises. The --dry-run option allows you to check and make sure your commands are correct:
# Test updating a single plugin to just patches
wp plugin update hello-dolly --patch --dry-run
The --exclude=<plugin name> parameter is used to indicate which plugins should be excluded from updating. Include the plugin names as a comma-separated list, and WP-CLI will update all the other plugins while leaving those alone:
wp plugin update --all --exclude=hello-dolly
Enabling Maintenance mode...
Downloading update from https://deliciousbrains.com/my-account/download/7512/?version=2.6.2...
Unpacking the update...
Installing the latest version...
Removing the old version of the plugin...
Plugin updated successfully.
Disabling Maintenance mode...
+--------------------------+-------------+-------------+---------+
| name                     | old_version | new_version | status  |
+--------------------------+-------------+-------------+---------+
| amazon-s3-and-cloudfront | 2.6.1       | 2.6.2       | Updated |
+--------------------------+-------------+-------------+---------+
Forcing Plugin Reinstallation
Most premium plugins come with their own built-in update checker that also works great with WP-CLI. In my experience, any plugin that can be one-click updated via the WordPress admin pages can also be updated using WP-CLI. But in some cases updates are provided via a new version of the zip file that you need put in the correct place on your server. You can apply these kind of updates by forcing a reinstallation of the plugin using the --force switch:
# Force a plugin to reinstall
wp plugin install ~/Downloads/my-custom-plugin-v2.zip --force
Enabling Automatic Updates
Since version 5.5, WordPress can automatically update plugins. Automatic updates need to be enabled for each individual plugin. WP-CLI does not offer any bulk handling for auto updates. It has to be done individually per plugin by using the auto-updates subcommand. You can see how it works with the following commands:
# Check if auto updates are enabled for a plugin
wp plugin auto-updates status hello-dolly

# Enable auto updates
wp plugin auto-updates enable hello-dolly

# Disable it again
wp plugin auto-updates disable hello-dolly
Deactivating and Removing Plugins
Installing, activating, and updating plugins are among the most common tasks, but there are other plugin management jobs WP-CLI can handle for us.
If you’ve ever tried to figure out what’s causing a problem on your WordPress website, you’ve probably been advised to deactivate all plugins as one of the first steps. It’s possible to do this with bulk handling in a web browser, but it always makes me feel nervous. I prefer to do it via the command line using the --all switch.
# Deactivate all plugins at once
wp plugin deactivate --all

# And reactivate them again
wp plugin activate --all
Removing a plugin entirely is also easily done with WP-CLI. One difference between doing this via the command line and the browser is that WP-CLI will let you remove a plugin without running the deactivation hooks first. If you ever had a plugin installed that crashes WordPress during deactivation, you know why this can be so useful:
# Deactivate and uninstall
wp plugin deactivate hello-dolly --uninstall

# Remove a plugin without giving it a chance to deactivate
wp plugin delete hello-dolly
There is also the toggle subcommand that is related to activation and deactivation of plugins. It will flip or toggle the activation status so that it changes to the opposite of the current status. You can add --network to toggle the plugin on or off for an entire multisite network.
Plugin Checksums
WP-CLI has the ability to compare the checksums of your installed plugins with the checksums for the same plugin and version on the WordPress Plugin Directory. This is a very efficient way to determine if the plugin files in your WordPress installation have been manipulated. If they have, it’s a strong indication that you’ve been hacked.
Checksums are special computer algorithms that can take an input of any type and size and convert it to a short string. This string is typically around 20-40 characters long, which makes it suitable for storing in a database. This resulting string is called a hash, a signature, or for historic reasons, a checksum.
What makes these algorithms unique is that if even a single character changes in the input, the output will be completely different. Feed all the files of a plugin into the checksum algorithm one by one, and you’ll end up with one small signature, or checksum, that represents the whole plugin.
Every time a new version of a plugin is published on the WordPress Plugin Directory, the checksum is calculated and saved for that specific version. A few months later when you want to double check that you haven’t been hacked, you can ask WP-CLI to calculate the checksum for your plugins, and compare them to the original checksums that WordPress keeps. If there are added, modified, or missing files on your end, the checksum for the plugin will differ from the original one and WP-CLI will make some noise about it.
The subcommand that handles this hash-checking magic is called verify-checksums and it is essentially the same as asking “are my plugins unchanged since I got them from the WordPress Plugin Directory?”
# Check for a single plugin
wp plugin verify-checksums hello-dolly
Success: Verified 1 of 1 plugins

# Check for all plugins that comes from the repo
wp plugin verify-checksums  --all
This only works for plugins that were installed from the official WordPress Plugin Directory, so your premium plugins will not be checked by this command. The verify-checksums subcommand also exists for wp core but can’t be used to verify WordPress themes.
Commands for Scripting
So far, the commands we’ve covered are useful for anyone who needs to manage WordPress plugins. The last set of wp plugin subcommands I’m going to cover are primarily of interest to WordPress developers, as they’re mostly intended for use in Bash scripts.
First we need to talk a little bit about Unix exit codes. In a Unix system, all programs that exit running return with an exit code. The standard interpretation is that exit code 0 means that the program finished just fine, while a non-zero exit code indicates an error occurred.
Error codes are often used in shell scripts to use in if/else statements and other forms of branching. We don’t see the exit code when running a command normally from the command prompt, but we can always find it by using $?:
# Run something that works and get the exit code
date
echo $?
0

# Run something that fails
ls /nonexistingfolder
ls: /idongfdg: No such file or directory
echo $?
1
In WP-CLI, we have a bunch of commands that are mostly intended to check something and return a useful exit code. The wp plugin command has two of these subcommands, is-installed and is-active, that let us check if a certain plugin is installed and activated:
# Check if hello-dolly is installed (it is)
wp plugin is-installed hello-dolly
echo $?
0

# Remove hello-dolly and check again
wp plugin delete hello-dolly
wp plugin is-installed hello-dolly
echo $?
1

# Check if woocommerce is activated
wp plugin is-active woocommerce
echo $?
0

# Deactivate woocommerce
wp plugin deactivate woocommerce
wp plugin is-active woocommerce
echo $?
1
Using the above commands, it’s possible to write Bash scripts that do different things depending on if a certain plugin is installed/activated or not.
The last subcommand that I suspect is mostly for scripting purposes is path. This command simply returns the path to a plugin’s main PHP file, and consequently to the plugin folder as well. We can combine this with other Bash trickery, for example like this:
# Show all the files in the woocommerce plugin folder
ls -al $(dirname $(wp plugin path woocommerce))
This is not super useful in everyday command line work, but it’s certainly handy when writing scripts and you need to get the path for a plugin.
Conclusion
As you can see, managing WordPress plugins through the command line increases your speed and makes many common tasks much simpler. I’ve covered the most common tasks when it comes to managing your plugins, but I encourage you to explore further on your own. You’ll soon find that the power of WP-CLI extends far beyond plugins, allowing you to do practically anything you could do in the WordPress admin, but much faster.
Do you have any great examples of how you are using the wp plugincommand? Please let me know in the comments.