


In 2018 Google started advocating that sites adopt HTTPS encryption, by marking sites not using an SSL certificate as “not secure” in their Chrome browser. This was widely accepted as a good idea, as securing web traffic protects both the site owner and their customers.
While Let’s Encrypt and its API has made it wonderfully easy for anyone to generate and install SSL certificates on their servers, it does little to help developers with HTTPS in their development environments. Creating a local SSL certificate to serve your development sites over HTTPS can be a tricky business. Even if you do manage to generate a self-signed certificate, you still end up with browser privacy errors.
In this article, we’ll walk through creating your own certificate authority (CA) for your local servers so that you can run HTTPS sites locally without issue.
- Why HTTPS Locally?
- How It Works
- Becoming a (Tiny) Certificate Authority
- Installing Your Root Certificate
- Creating CA-Signed Certificates for Your Dev Sites
- Shell Script
- Alternatives
- Conclusion
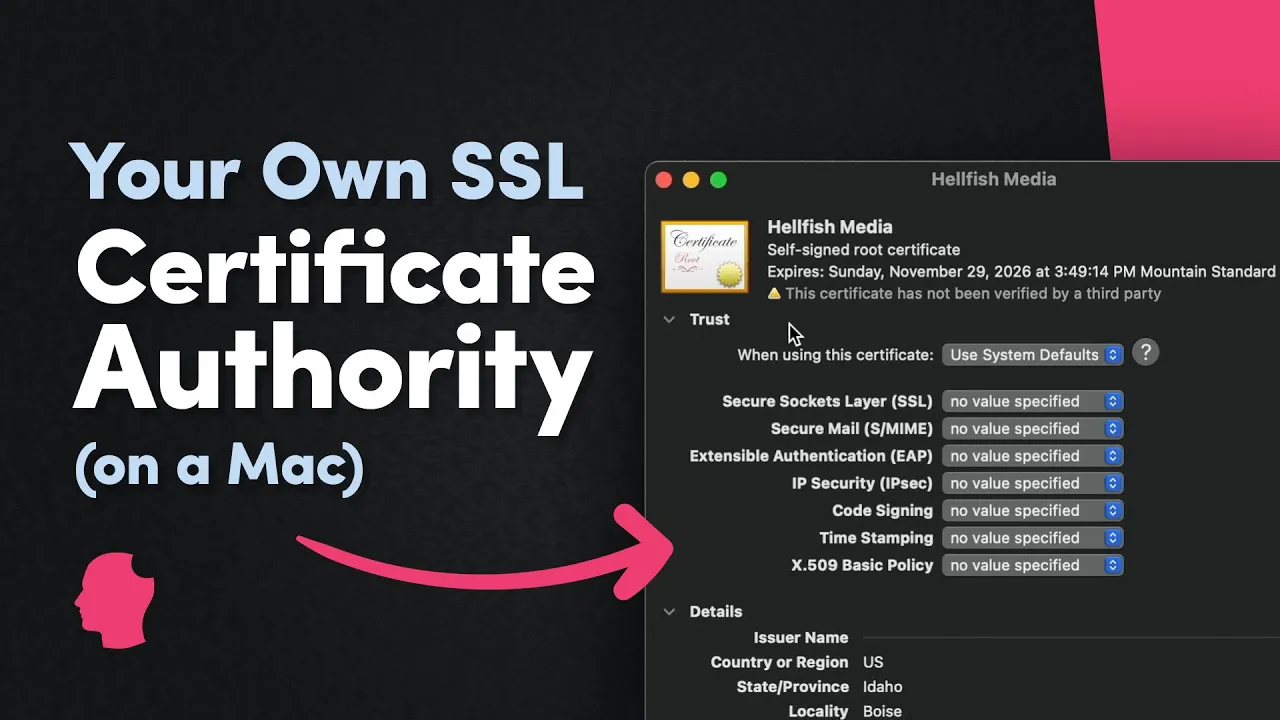
If you prefer to learn visually, our video producer Thomas has created a video for you that outlines the steps involved in creating your own local CA. He’s also created videos that layout the process for Linux and Windows users.
Why HTTPS Locally?
Why not just use regular HTTP locally? Because if your production site is HTTPS-only and you’re developing locally on regular HTTP, your development and production environments are not as similar as they could be.
For example, my development environment for this site (and SpinupWP) runs as an Ubuntu server in a VMware virtual machine (VM) on my Mac. The production site is an Ubuntu server running on DigitalOcean with an almost identical configuration.
You definitely want your development environment to mirror production as closely as possible. When it doesn’t, you invite more issues showing up in production that didn’t show up in development. Running HTTP when your production site is HTTPS-only is definitely an unnecessary risk. Even in a situation where you can’t mirror your production environment perfectly, you’ll still want to run HTTPS locally, or you’ll be fighting with mixed content SSL warnings all day long.
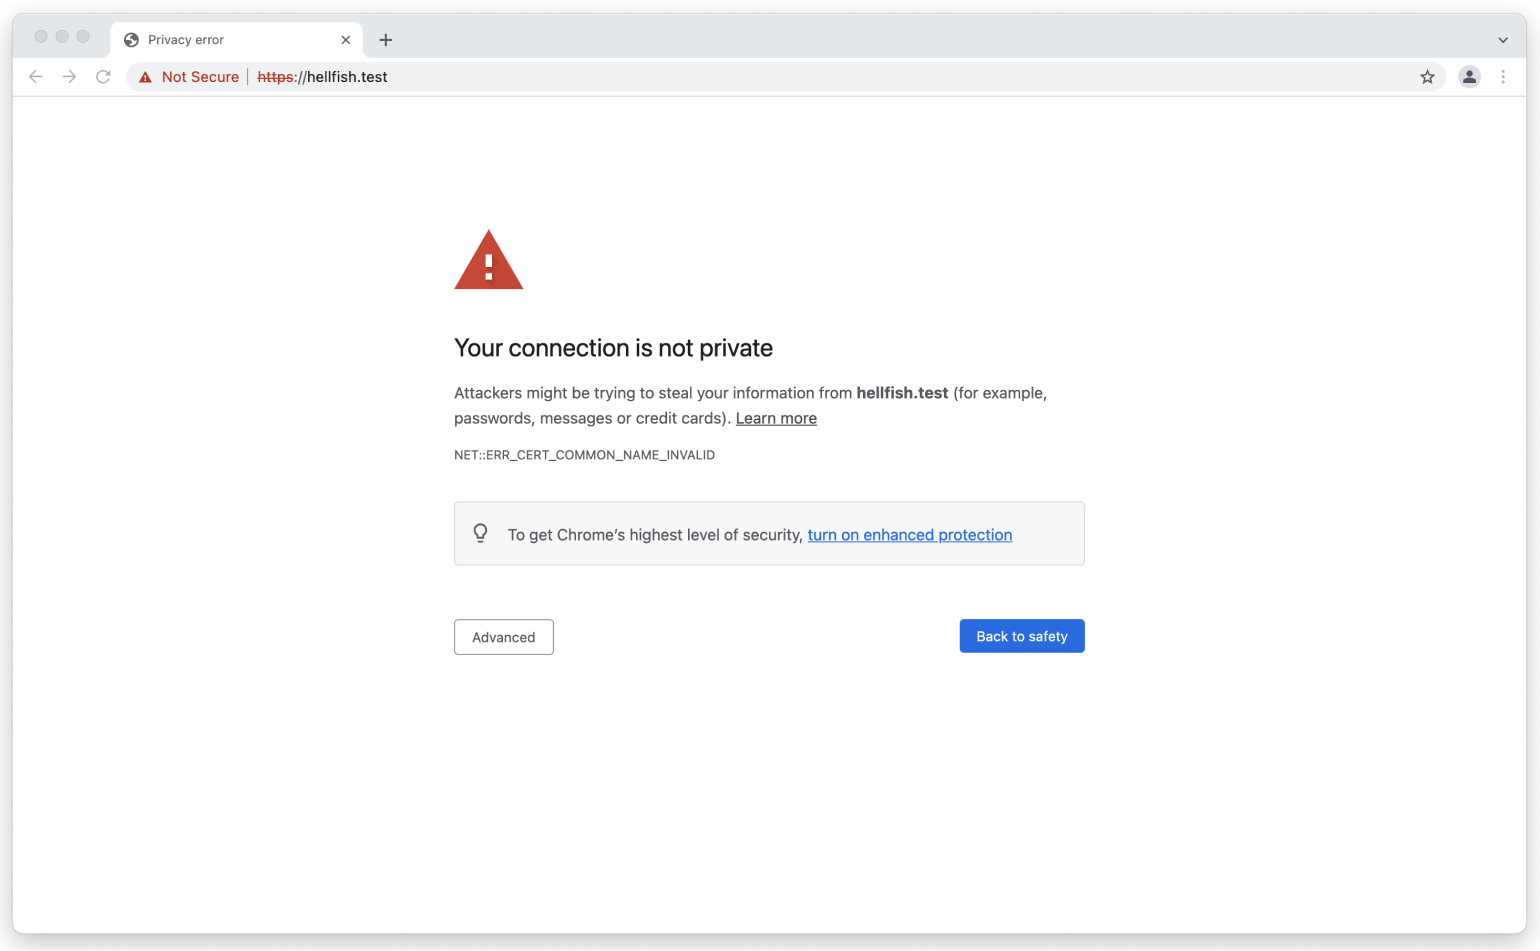
If you’ve ever tried to browse to a local site via HTTPS, which doesn’t have an SSL certificate configured, you’ve probably seen the following message in Chrome:
Or the following in Firefox:
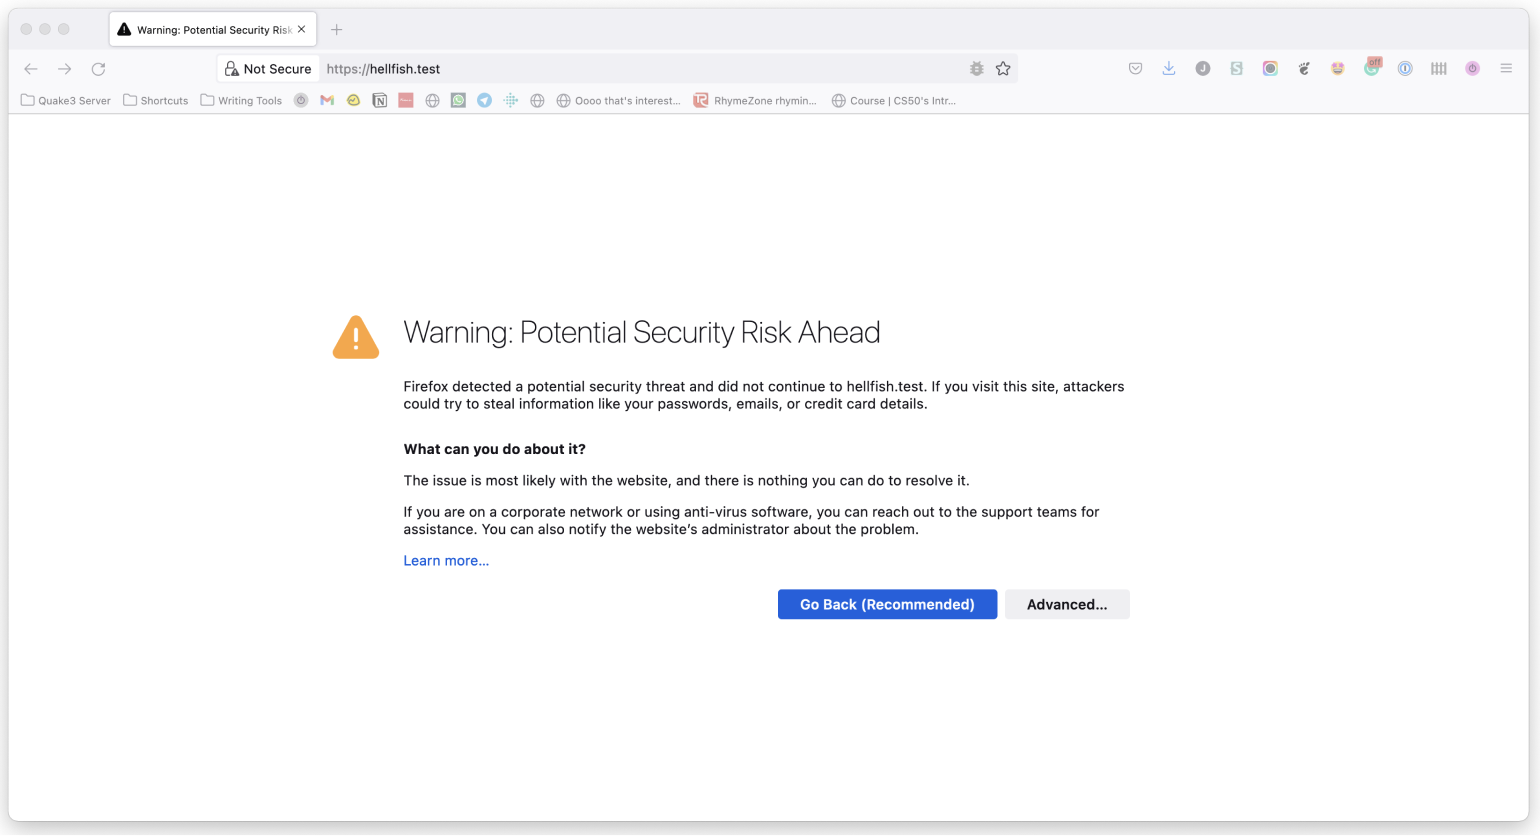
Other browsers have different messages, but the gist is the same.
One way to work around this is to switch your local WordPress development environment to something like LocalWP, DevKinsta, or even Laravel Valet which offer local SSL solutions out of the box. The downside is that this means changing your development workflow, not ideal if you are more comfortable with what you already have, especially if it already matches your production environment.
Searching for a local SSL solution online will often result in you going down the rabbit hole of self-signed certificates. However, trying to get a self-signed SSL certificate working with your local server kind of sucks if you’re not using a tool that handles it for you, which brings you back to needing to switch local development environments.
The main problem with locally self-signed certificates is that they also need to be trusted by your browser. Just setting up a local self-signed certificate isn’t enough. You end up with the same browser message, but this time with ERR_CERT_AUTHORITY_INVALID. This happens because the browser wants to check the validity of this certificate with a certificate authority, and can’t. So the solution is to become your own CA!
How It Works
To request an SSL certificate from a CA like Verisign or GoDaddy, you send them a Certificate Signing Request (CSR), and they give you an SSL certificate in return that they have signed using their root certificate and private key. All browsers have a copy (or access to a copy from the operating system) of the root certificate from the various CAs, so the browser can verify that your certificate was signed by a trusted CA.
That’s why when you generate a self-signed certificate the browser doesn’t trust it. It hasn’t been signed by a CA. The way to get around this is to generate our own root certificate and private key. We then add the root certificate to all the devices we own just once, and then all the self-signed certificates we generate will be inherently trusted.
Becoming a (Tiny) Certificate Authority
It’s kind of ridiculous how easy it is to generate the files needed to become a certificate authority. It really only takes two commands. Let’s dive into how we can do this on macOS and Linux, and then look at how it works in the Windows operating system.
Generating the Private Key and Root Certificate on macOS Monterey and Linux
As macOS and Linux are both Unix-like operating systems, the processes for generating the required files are identical.
The only real difference between the two is that on macOS you might need to install the OpenSSL command-line application. To do that, if you don’t already have it, install homebrew, which will allow you to install OpenSSL.
/bin/bash -c "$(curl -fsSL https://raw.githubusercontent.com/Homebrew/install/HEAD/install.sh)"
brew install openssl
The majority of Linux distros come with OpenSSL installed. If not, it can be installed via your default package manager.
Then, we can create a location to store our local certificate files. This is not a requirement, but it makes it easier to find the keys later.
mkdir ~/certs
cd ~/certs
With that set up, we’re ready to generate the private key to become a local CA:
openssl genrsa -des3 -out myCA.key 2048
OpenSSL will ask for a passphrase, which we recommend not skipping and keeping safe. The passphrase will prevent anyone who gets your private key from generating a root certificate of their own. The output should look like this:
Generating RSA private key, 2048 bit long modulus
.................................................................+++
.....................................+++
e is 65537 (0x10001)
Enter pass phrase for myCA.key:
Verifying - Enter pass phrase for myCA.key:
Next, we generate a root certificate:
openssl req -x509 -new -nodes -key myCA.key -sha256 -days 1825 -out myCA.pem
You will be prompted for the passphrase of the private key you just chose and a bunch of questions. The answers to those questions aren’t that important. They show up when looking at the certificate, which you will almost never do. I suggest making the Common Name something that you’ll recognize as your root certificate in a list of other certificates. That’s really the only thing that matters.
Enter pass phrase for myCA.key:
You are about to be asked to enter information that will be incorporated
into your certificate request.
What you are about to enter is what is called a Distinguished Name or a DN.
There are quite a few fields but you can leave some blank
For some fields there will be a default value,
If you enter '.', the field will be left blank.
-----
Country Name (2 letter code) [AU]:US
State or Province Name (full name) [Some-State]: Springfield State
Locality Name (eg, city) []:Springfield
Organization Name (eg, company) [Internet Widgits Pty Ltd]:Hellfish Media
Organizational Unit Name (eg, section) []:7G
Common Name (e.g. server FQDN or YOUR name) []:Hellfish Media
Email Address []:[email protected]
You should now have two files: myCA.key (your private key) and myCA.pem (your root certificate).
🎉 Congratulations, you’re now a CA. Sort of.
Generating the Private Key and Root Certificate on Windows
On Windows, it’s also possible to configure your environment to run the openssl commands. You just need some additional tools.
If you are running Windows Subsystem for Linux (WSL) then it’s as if you’re running Linux and the commands will work exactly the same. If you’re using Windows with something like WampServer or XAMPP you’ll need a way to install the OpenSSL command-line utility in Windows. The most straightforward way to do this is to install Git for Windows, which comes bundled with OpenSSL and the Git Bash utility.
Once you open a Git Bash window, you can run the same commands as for macOS or Linux, with one small difference. Due to how some console applications (specifically OpenSSL) work in Git Bash, you need to prefix all openssl commands using the winpty utility.
So for example, the following command is how to generate the private key to become a local CA in Git Bash:
winpty openssl genrsa -des3 -out myCA.key 2048
The other small differences are the file paths in Git Bash. When you open a Git Bash instance, the home directory in the terminal is mapped to your User directory in Windows, but with a Linux-like directory structure. So if your User directory is located at c:\Users\Hellfish in Windows, your Git Bash home directory will be c/Users/Hellfish.
Installing Your Root Certificate
To become a real CA, you need to get your root certificate on all the devices in the world.

But we don’t need to become a real CA. We just need to be a CA for the devices you own. We need to add the root certificate to any laptops, desktops, tablets, and phones that access your HTTPS sites. This can be a bit of a pain, but the good news is that we only have to do it once. Our root certificate will be good until it expires.
Adding the Root Certificate to macOS Monterey Keychain
Via the CLI
sudo security add-trusted-cert -d -r trustRoot -k "/Library/Keychains/System.keychain" myCA.pem
Via the macOS Keychain App
- Open the macOS Keychain app
- If required, make sure you’ve selected the System Keychain (older macOS versions default to this keychain)
- Go to File > Import Items…
- Select your private key file (i.e.
myCA.pem) - Search for whatever you answered as the “Common Name” name above

- Double-click on your root certificate in the list
- Expand the Trust section
- Change the “When using this certificate:” select box to Always Trust
- Close the certificate window
- During the process it may ask you to enter your password (or scan your finger), do that
- 🎉 Celebrate!
Adding the Root Certificate to Linux
There are so many Linux distributions, but Ubuntu is by far the most popular and it’s what we used when we built SpinupWP. Therefore these instructions will cover Ubuntu.
- If it isn’t already installed, install the
ca-certificatespackage.sudo apt-get install -y ca-certificates - Copy the
myCA.pemfile to the/usr/local/share/ca-certificatesdirectory as amyCA.crtfile.sudo cp ~/certs/myCA.pem /usr/local/share/ca-certificates/myCA.crt - Update the certificate store.
sudo update-ca-certificates
You can test that the certificate has been installed by running the following command:
awk -v cmd='openssl x509 -noout -subject' '/BEGIN/{close(cmd)};{print | cmd}' < /etc/ssl/certs/ca-certificates.crt | grep Hellfish
If it’s installed correctly, you’ll see the details of the root certificate.
subject=C = US, ST = Springfield State, L = Springfield, O = Hellfish Media, OU = 7G, CN = Hellfish Media, emailAddress = [email protected]
Adding the Root Certificate to Windows 10
- Open the “Microsoft Management Console” by using the Windows + R keyboard combination, typing
mmcand clicking Open - Go to File > Add/Remove Snap-in
- Click Certificates and Add
- Select Computer Account and click Next
- Select Local Computer then click Finish
- Click OK to go back to the MMC window
- Double-click Certificates (local computer) to expand the view
- Select Trusted Root Certification Authorities, right-click on Certificates in the middle column under “Object Type” and select All Tasks then Import
- Click Next then Browse. Change the certificate extension dropdown next to the filename field to All Files (*.*) and locate the
myCA.pemfile, click Open, then Next - Select Place all certificates in the following store. “Trusted Root Certification Authorities store” is the default. Click Next then click Finish to complete the wizard.
If everything went according to plan, you should see your CA certificate listed under Trusted Root Certification Authorities > Certificates.

Adding the Root Certificate to iOS 14
If you use something like ngrok to browse to your local development sites on mobile devices, you might need to add the root certificate to these devices. On iOS devices you can do so fairly easily by following these steps:
- Email the root certificate to yourself, so you can access it on your iOS device. Make sure to use the default Mail app to access the email.
- Tap on the attachment in the email on your iOS device. It will prompt you to review the profile in the Settings app.
- Open the Settings app and click Profile Downloaded near the top.
- Click Install in the top right, and then Install again on the Warning screen.
- Once installed, hit Close and go back to the main Settings page.
- Go to General > About.
- Scroll to the bottom and click on Certificate Trust Settings.
- Enable your root certificate under “ENABLE FULL TRUST FOR ROOT CERTIFICATES”.

Creating CA-Signed Certificates for Your Dev Sites
Now we’re a CA on all our devices and we can sign certificates for any new dev sites that need HTTPS. First, we create a private key for the dev site. Note that we name the private key using the domain name URL of the dev site. This is not required, but it makes it easier to manage if you have multiple sites:
openssl genrsa -out hellfish.test.key 2048
Then we create a CSR:
openssl req -new -key hellfish.test.key -out hellfish.test.csr
You’ll get all the same questions as you did above and, again, your answers don’t matter. In fact, they matter even less because you won’t be looking at this certificate in a list next to others.
You are about to be asked to enter information that will be incorporated
into your certificate request.
What you are about to enter is what is called a Distinguished Name or a DN.
There are quite a few fields but you can leave some blank
For some fields there will be a default value,
If you enter '.', the field will be left blank.
-----
Country Name (2 letter code) [AU]:US
State or Province Name (full name) [Some-State]:Springfield State
Locality Name (eg, city) []:Springfield
Organization Name (eg, company) [Internet Widgits Pty Ltd]:Hellfish Media
Organizational Unit Name (eg, section) []:7G
Common Name (e.g. server FQDN or YOUR name) []:Hellfish Media
Email Address []:[email protected]

Please enter the following 'extra' attributes
to be sent with your certificate request
A challenge password []:
An optional company name []:
Finally, we’ll create an X509 V3 certificate extension config file, which is used to define the Subject Alternative Name (SAN) for the certificate. In our case, we’ll create a configuration file called hellfish.test.ext containing the following text:
authorityKeyIdentifier=keyid,issuer
basicConstraints=CA:FALSE
keyUsage = digitalSignature, nonRepudiation, keyEncipherment, dataEncipherment
subjectAltName = @alt_names

[alt_names]
DNS.1 = hellfish.test
We’ll be running openssl x509 because the x509 command allows us to edit certificate trust settings. In this case we’re using it to sign the certificate in conjunction with the config file, which allows us to set the Subject Alternative Name. I originally found this answer on Stack Overflow.
Now we run the command to create the certificate: using our CSR, the CA private key, the CA certificate, and the config file:
openssl x509 -req -in hellfish.test.csr -CA myCA.pem -CAkey myCA.key \
-CAcreateserial -out hellfish.test.crt -days 825 -sha256 -extfile hellfish.test.ext
We now have three files: hellfish.test.key (the private key), hellfish.test.csr (the certificate signing request, or csr file), and hellfish.test.crt (the signed certificate). We can configure local web servers to use HTTPS with the private key and the signed certificate.
If you’re using MAMP Pro, version 6.0 introduced built-in SSL support. You can enable it by checking the SSL box under your selected web server.

If you prefer to use the locally signed certificate we’ve just set up, you can do this by enabling the “Expert” view, clicking on the SSL tab, and choosing your “Certificate” and “Certificate key” (private key) files.

If you’re running a Linux or Windows environment which uses Nginx you can use the instructions in our Install WordPress on Ubuntu 20.04 series.
If you’re on Linux or Windows using Apache, you’ll need to enable the Apache SSL mod, and configure an Apache virtual host for port 443 for the local site. It will require you to add the SSLEngine, SSLCertificateFile, and SSLCertificateKeyFile directives, and point the last two to the certificate and key file you just created.
<VirtualHost *:443>
   ServerName hellfish.test
   DocumentRoot /var/www/hellfish-test

   SSLEngine on
   SSLCertificateFile /path/to/certs/hellfish.test.crt
   SSLCertificateKeyFile /path/to/certs/hellfish.test.key
</VirtualHost>
We don’t have instructions for how to do this on Windows using IIS, because WordPress is not the easiest to configure on IIS systems.
We don’t have to create a new CA for each site. We can just repeat this last part of creating a certificate for any other dev sites.
Shell Script
To make things even speedier, here’s a handy shell script you can modify for your own purposes. It should work on macOS, Linux, or Windows via Git Bash:
#!/bin/sh

if [ "$#" -ne 1 ]
then
  echo "Usage: Must supply a domain"
  exit 1
fi

DOMAIN=$1

cd ~/certs

openssl genrsa -out $DOMAIN.key 2048
openssl req -new -key $DOMAIN.key -out $DOMAIN.csr

cat > $DOMAIN.ext << EOF
authorityKeyIdentifier=keyid,issuer
basicConstraints=CA:FALSE
keyUsage = digitalSignature, nonRepudiation, keyEncipherment, dataEncipherment
subjectAltName = @alt_names
[alt_names]
DNS.1 = $DOMAIN
EOF

openssl x509 -req -in $DOMAIN.csr -CA ../myCA.pem -CAkey ../myCA.key -CAcreateserial \
-out $DOMAIN.crt -days 825 -sha256 -extfile $DOMAIN.ext
Alternatives
An alternative to look into for creating locally trusted SSL certificates is mkcert (thanks to the folks in the comments for pointing this out). If you don’t mind using one of the various package managers listed in mkcert’s readme file to install the tool, it’s a solid alternative for creating locally trusted SSL certificates. The downside is that it only installs the root CA certificate for you on your local machine and creates locally signed SSL certificates, you still need to configure the certificates manually for each local site.
Conclusion
So there you have it, how to become your own local certificate authority to sign your local SSL certificates and use HTTPS on your local sites. Hopefully, this will eliminate the dreaded “Your connection is not private” message for you on your local development websites.
Have you tried setting up a CA of your own? Do you work locally with HTTPS? Let me know in the comments below.