


Just about every WordPress website should be served over HTTPS instead of HTTP, for reasons of both security and SEO. HTTP content isn’t encrypted, leaving your site vulnerable, and Google started using HTTPS as a ranking signal in 2014. It’s also required for HTTP/2, which offers higher speeds than HTTP. In this article, I’ll show you everything you need to know to take a site from HTTP to HTTPS, including implementing an SSL certificate and dealing with any mixed content warnings.
Table of Contents
- Reasons to Switch from HTTP to HTTPS
- Why You Need SSL Certificates
- Making the Switch to HTTPS
- Fixing Mixed Content Warnings With a Search and Replace
- Updating Scripts, Libraries, and Your CDN
- Redirecting from HTTP to HTTPS
- Next Steps
- Wrapping Up
Reasons to Switch from HTTP to HTTPS
Most sites on the web are already HTTPS at this point. About 95% of sites are using HTTPS, according to the Google Transparency Report. However, there’s still a need to move sites from HTTP to HTTPS. I can think of at least three use cases:
- Moving from local to live: You may be using HTTP to build a new site locally, requiring a switch to HTTPS when it goes live.
- No SSL on host staging: If your hosting provider provides staging sites but doesn’t provide an SSL certificate, you’ll need to convert to HTTPS when you move the site to production.
- Live sites still on HTTP: This is a very rare occurrence these days, but it does crop up occasionally. We’ll provide the process for how to do this below, but you’ll also need to update Google Analytics, Google Search Console, your CDN URL, and any links you control, such as social media.
Getting an SSL certificate is only part of the battle. There are a few more tweaks you’ll need to get your WordPress site running well over HTTPS after installing the certificate:
- Testing the site over HTTPS to make sure the certificate is installed properly
- Updating the URLs in the database
- Fixing any mixed content warnings
- Adding redirects from HTTP URLs to the HTTPS versions of URLs
Why You Need SSL Certificates
Properly validated SSL certificates ensure the data transferred between two systems is encrypted. Here’s how the process breaks down:
- A browser or server attempts to connect to a web server and requests that the server identify itself.
- The web server sends a copy of its SSL certificate.
- The browser (or server) determines if the certificate has been signed by a recognized Certificate Authority.
In short, SSL certificates authenticate your site’s identity, enabling a secure connection. It is possible to self-sign certificates in some cases, such as when you need an SSL for local development. Often, you’ll use an SSL provided by your host.
SSL is short for Secure Sockets Layer. Oddly enough, what we call SSL today is actually a revamped protocol: Transport Layer Security (TLS). The underlying technology and the name changed, but the initials SSL stuck around.
Choosing the Right SSL
SSL certificates are categorized in two ways: validation levels and the types of domains they’ll secure.
Validation Levels
Domain Validation: This is the lowest level and therefore the easiest to get. All it says is that the owner is verified as having control over the domain. The turnaround time tends to be very fast, with email verification usually provided within a couple of hours. The most typical use case for a certificate like this is a small business that doesn’t exchange information with users.
Organization Validation: This is a step up from domain validation, as the CA will verify both domain ownership and details of the organization, such as name and location. It often takes a day or two for the verification to come through compared to domain validated certs.
Extended Validation: The absolute peak of certificate validation. In addition to checking domain ownership and organization details as above, the CA will also verify the requesting entity’s physical location and legal details. In short, the CA does everything they can to verify your existence short of having some guys come over to take pictures and check your ID.
Secured Domains
- Single Domain: These apply to just one domain and won’t work with any other, not even subdomains of that domain.
- Wildcard: These will serve as an SSL for a single domain and all its subdomains.
- Multi-Domain: These SSLs list several domains on one certificate, covering all of them and their subdomains.
Making the Switch to HTTPS
There are some things you’ll need to take care of before you get started. First, you should consider making a backup of your site first. If this is a live site, then definitely make a backup first. There are other requirements you’ll need to have in place as well:
- SSL certificate(s)
- Check for HTTPS versions of external services and scripts
- Make sure host and CDN support HTTP/2
That last one isn’t technically necessary, but you won’t get the performance benefits of HTTP/2 if it’s not supported. You also might want to consider a plugin that supports share recovery, as the social share counts on your posts and pages will disappear when you switch from HTTP to HTTPS.
One word of warning regarding traffic: if you’re switching a live site to HTTPS, don’t be surprised if your traffic and search rankings dip a little bit while Google re-crawls the new HTTPS site.
Acquiring, Implementing, and Verifying Your SSL Certificate
Many WordPress hosting companies offer SSL certificates as part of their service. The process for requesting these varies from host to host (and may not be included in your hosting plan), but it’s usually fairly straightforward. For example, if your site is hosted by WP Engine, then all you need to do is log into the WP Engine User Portal, choose the WordPress install you want to certify, select SSL, and click Add Certificates. You’re then able to choose from the existing options.
If your web host doesn’t offer SSL certificates, you can also purchase one from a CA, such as GoDaddy or GlobalSign. You’ll then have to install the certificate manually. The exact process for this varies greatly depending on your server configuration, but at a bare minimum you’ll need SSH and/or control panel access to your server, as well as access to the DNS records for your domain. Linode and DigitalOcean have great guides that cover this in detail.
Another option is to set up Let’s Encrypt SSL and get a free certificate that way.
Regardless of which method you use, the process generates a Certificate Signing Request (CSR) on the server where it will be installed and forwards the request to the CA. The CSR includes pertinent information like the domain name, organization name, etc. It also contains the public key that will be associated with the certificate. The process will also create a private key, which is not included in the CSR. Make a note of this private key, as you’ll need it to install the certificate.
If you’re using a manual process, you’ll need to download the SSL certificate and the certificate bundle file from your CA, and upload them to your server. You will then need to edit your server configuration files to reference the SSL and the bundle files.
Defining HTTPS Versions of URLs in wp-config.php
Once you have installed your SSL certificate, you’ll need to update your site to use it. One habit I’ve picked up from working with WordPress over the years is that I always define the new Site URL in my wp-config.php file before running any updates on the database.
This can help with troubleshooting any major issues that may arise from changing the URL. For example, the SSL certificate may not be set up properly, or there may be some code dependent on the URL. If something like that happens, it’s easy and quick to remove the lines from the wp-config.php file while troubleshooting further.
To do this, edit your wp-config.php file by adding the following lines above the “That’s all, stop editing!” comment:
define( 'WP_HOME', 'https://mdb.test' );
define( 'WP_SITEURL', 'https://mdb.test' );
These lines take precedence over the values of the siteurl and home options in your database.
You can also adjust these through the WordPress dashboard. Click on Settings > General and make sure that the WordPress address and site address are set to HTTPS versions. If not, you can adjust them here.

Check out a few pages on your site once you’ve added those to your wp-config.php file. You might notice some mixed content warnings due to images or other files loading over HTTP instead of HTTPS. We’ll fix those next.
Fixing Mixed Content Warnings With a Search and Replace
Mixed content warnings occur when a page delivers both HTTPS and HTTP content to a browser. The content itself could consiste of JavaScript, CSS, images, or any linked resource. These warnings mean that the page is only partially encrypted, and therefore some of the information can be read or modified by attackers. You can fix these manually, but you’re usually better off running a search and replace using WP Migrate, WP Migrate Pro, or through the command line with WP-CLI.
The manual process requires you to visit each page that’s popping up the mixed content warning. Once you’re there, start your browser’s devtools and click on Console. This should show you exactly what’s causing those warnings so you can take steps to fix them. One of the most common causes is a linked resource, such as an image, pulling from a non-HTTPS source.
Running a Search/Replace With WP Migrate
Now that we’ve got the main Site URL and Home URL switched over to HTTPS, we’ll still need to update the rest of the content in the database to use the HTTPS versions of the URLs.
We can do this with WP Migrate’s Find & Replace feature. Open WP Migrate on the backend of your WordPress site, click Migrate, and then click Find & Replace under “Tools for This Site”.

The next step is to fine-tune our find and replace. I’ve set it to search all tables, and checked the “Backup all tables with ‘wp_’ prefix” option – this ensures that we can roll back if we need to later.
Under “Advanced Options”, I left the “Replace GUIDs” option unchecked. This is important if your website has already been live because updating the GUIDs could make any posts or pages show up as new in feed readers. However, I recommend checking this box if you’re taking the site live for the first time. I also unchecked the “Exclude transients” option in case there are any temporary options in the database that rely on the site URL.

Under “Custom Find & Replace”, I’ve added the HTTP version of the URL In the “Find” column, with the HTTPS version in the “Replace” column. The last step is to click Preview Changes. This will start the process, showing you the changes and asking you to save or cancel each one. Clicking the arrow next to the “Preview Changes” button allows you to toggle the button’s function to “Find & Replace”. This will run the entire process without prompts.

Running a Search/Replace With WP-CLI
You can also run your search and replace on the command line using WP-CLI.
After launching WP-CLI, the first thing you should do is backup your database. You’ll want to be able to rollback any changes if something goes wrong.
WP-CLI commands always follows a certain format, with a parent command and subcommand, followed by parameters and switches.
The command for making changes to the database is wp db. We’ll add the export subcommand to backup the database. The only parameter we need to add is the file’s path. Let’s stash it one folder up from our WordPress directory to make it a little harder for attackers to find:
wp db export ../mdb_test_backup.sql
The next step is to actually run the search and replace, using wp search-replace. For this to work, we need to add the 'old' and 'new' options to this command. This tells WP-CLI what to search for and what to replace it with when it finds it. Replace 'old' (the HTTP address) and 'new' (the HTTPS version) with the correct values in the example below, while retaining the single quotes.
wp search-replace 'old' 'new'
The wp search-replace command lists many other options in addition to old and new, but we’re going to look at just three more for now.
The first is [--dry-run], which tells WP-CLI to run the process and give you a report, but doesn’t actually make the changes. This is very useful for checking to make sure the process will work as intended.
The second is [--report-changed only]. This ensures WP-CLI only shows the changes, rather than every single entry on our WordPress site.
Finally, we’ll insert --skip-columns=guid. This makes sure the existing GUIDs on our WordPress site are left alone. You should omit this option if you’re taking a site live for the first time.
Here’s what we get when we put it all together:
wp search-replace ‘http://mdb.test’ ‘https://mdb.test’ --dry-run --report-changed-only --skip-columns=guid
+------------------+-----------------------+--------------+------+
| Table            | Column                | Replacements | Type |
+------------------+-----------------------+--------------+------+
| wp_postmeta      | meta_value            | 3            | PHP  |
| wp_posts         | post_content          | 5            | SQL  |
+------------------+-----------------------+--------------+------+
Success: 8 replacements to be made.
Updating Scripts, Libraries, and Your CDN
You may have custom scripts and libraries in your header or footer that need to be updated. In most cases, you can fix this by updating the script to point to the HTTPS version instead.
If you’re using a Content Delivery Network (CDN), you may need to update that as well. The actual method you use will depend on the CDN, but most of the popular services provide guides:
Redirecting from HTTP to HTTPS
There are different ways to do this depending on whether you use Nginx or Apache in your stack. In either case, you’ll need to SSH or SFTP into your server to make any changes. In addition, you can use a plugin or the Content Security Policy upgrade-insecure-requests directive. I wouldn’t recommend either of those for most sites, but they can help cover the gap for sites with large numbers of legacy URLs, or until a more permanent solution is put in place.
A word of warning. None of these techniques will magically cause HTTPS resources to appear where none existed before. All redirection does is ensure users trying to access HTTP content are redirected to HTTPS content instead. In cases where there is no HTTPS content, users will be served nothing.
Redirecting With Nginx
If your server stack uses Nginx, you can redirect from HTTP to HTTPS by adding a few lines to your nginx.conf file. The exact location may vary depending on whether you’re using Nginx Plus or Open Source, as well as the package system used to install Nginx. Typically, it’s located in /etc/nginx, /usr/local/nginx/conf, or /usr/local/etc/nginx.
You can copy and paste the lines below into your Nginx configuration file. Remember to swap out all instances of mdb.test for the name of your server.
server {
    listen 80;
    server_name mdb.test www.mdb.test;
    return 301 https://mdb.test$request_uri;
}
Redirecting With Apache
Control panels like cPanel and Plesk allow you to change the settings Apache uses and redirect HTTP to HTTPS. You can also do this by adding a few lines to your Apache .htaccess file.
RewriteEngine On
RewriteCond %{HTTPS} off
RewriteRule ^(.*)$ https://%{HTTP_HOST}%{REQUEST_URI} [L,R=301]
Make sure to add new lines outside of any WordPress modifications already present in your .htaccess file. This section is marked with # BEGIN WordPress and # END WordPress. When you’re done, you should have something like this:
RewriteEngine On
RewriteCond %{HTTPS} off
RewriteRule ^(.*)$ https://%{HTTP_HOST}%{REQUEST_URI} [L,R=301]

# BEGIN WordPress

RewriteEngine On
RewriteRule .* - [E=HTTP_AUTHORIZATION:%{HTTP:Authorization}]
RewriteBase /
RewriteRule ^index\.php$ - [L]
RewriteCond %{REQUEST_FILENAME} !-f
RewriteCond %{REQUEST_FILENAME} !-d
RewriteRule . /index.php [L]

# END WordPress
Redirecting With a Plugin
You can also use a plugin to force HTTPS on your WordPress site. There are plenty of options, of which the Really Simple SSL plugin seems to be the most popular.
It’s best practice to update the URLs in your database, rather than relying on a plugin. However, plugins can be really helpful before you take the time to make permanent changes.
Redirecting With a Content Security Policy
Setting a Content Security Policy (CSP) is a useful way to manage mixed content on a large scale, making it very handy for large sites with a lot of legacy HTTP URLs. To enable CSP features, you must include the Content-Security-Policy header in the response sent from your server. If you cannot access your headers, you can also set it using a <meta> tag in the page’s <head> section.
If you have header access, it’s just a matter of sending this directive:
Content-Security-Policy: upgrade-insecure-requests
This works by forcing any browsers visiting your site to make secure requests instead of accessing resources that use HTTP. This prevents the user from ever seeing the insecure content.
As mentioned above, you can also use a <meta> tag in the page’s <head>:
meta http-equiv="Content-Security-Policy" content="upgrade-insecure-requests"
Next Steps
With the find and replace finished and all URLs in the database updated, you can remove the updates you made to your wp-config.php file and check a few pages on the front end of your site to make sure that everything is working as expected.
If the website isn’t marked as secure (usually with a green padlock icon in Chrome or Firefox) by your browser, check to see if you still have any mixed content warnings. These happen when the page is HTTPS but there are some assets loading over HTTP.
You can usually spot these sorts of warnings by heading over to your browser’s javascript console and looking for any errors about content being loaded over HTTP:
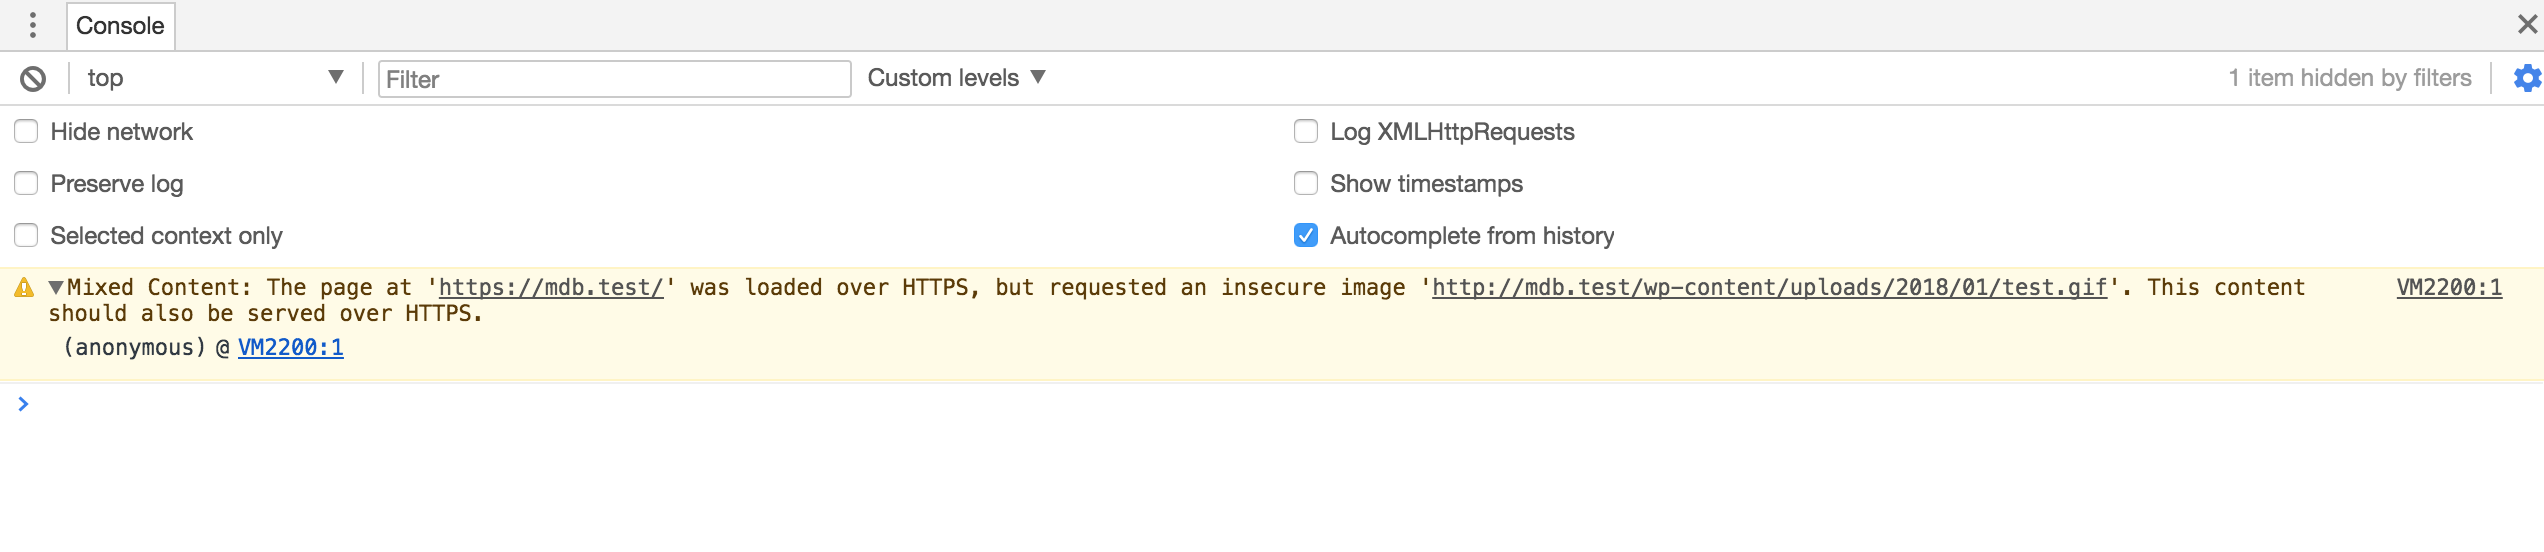
If you do have these errors, the most common culprit is theme or plugin files – sometimes links to theme or plugin assets can be hardcoded and will need to be corrected.
Wrapping Up
Whether you’re taking a site live for the first time or switching an existing site to HTTPS, the tools available make it easier than ever to implement your security certificate and take care of your mixed content warnings.
What are your favorite tools for this? Let me know in the comments.